By: Team MooLah Since: Aug 2019 Licence: MIT
- 1. Introduction
- 2. Setting Up
- 3. Design
- 4. Implementation
- 5. Documentation
- 6. Testing
- 7. Dev Ops
- Appendix A: Product Scope
- Appendix B: User Stories
- Appendix C: Use Cases
- Appendix D: Non Functional Requirements
- Appendix E: Glossary
- Appendix F: Product Survey
- Appendix G: Instructions for Manual Testing
- G.1. Launch and Shutdown
- G.2. Adding an expense
- G.3. Editing an expense
- G.4. Deleting an expense
- G.5. Adding a menu-item expense
- G.6. Undo and redo
- G.7. Adding a budget
- G.8. Editing a budget
- G.9. Deleting a budget
- G.10. Switching the primary budget
- G.11. Switching budget period
- G.12. Listing all budgets
- G.13. Clearing all budgets
- G.14. Deleting an expense from budget panel
- G.15. Editing an expense from budget panel
- G.16. Testing of events
- G.17. Testing of aliases
- G.18. Testing of suggestions
- G.19. Testing of input history
- G.20. Testing of generic commands
- G.21. Testing statsbasic
- G.22. Testing statscompare
- G.23. Testing statstrend
1. Introduction
MooLah is a expense tracker, morphed from the seedu project "AddressBook - Level 3".
Expense tracking is an inherently troublesome task, because it includes managing multiple budgets, monitoring complicated statistics, and anticipating future spending. MooLah aims to streamline this process by providing a user-friendly desktop Command-Line Interface (CLI) solution.
MooLah improves user experience through autocomplete and prefix suggestions, significantly boosting efficiency. MooLah also adopts an external library Natty, a natural language time parser, so that it accepts more intuitive input format for time. MooLah’s robust budgeting feature allows users to track expenses under different budgets, monitor their spending through the progress bar, and receive timely notification when important thresholds are reached. With MooLah’s powerful statistics, users can view a summary of their spending in various modes, be it a pie chart, a table or a trend line. Besides, users can plan ahead and set up reminders for future events. Furthermore, the menu feature is specially tailored to students in National University of Singapore, allowing them to record a food item expense directly from preset menus in school canteens. Almost all commands in MooLah support undo-redo, increasing tolerance for occasional mistakes and thus creating a seamless user experience. All these solid and well-developed features make MooLah a perfect personal finance assistant.
1.1. Purpose & Scope
This document specifies architecture and software design decisions for the app MooLah. The intended audience of this document is the developers, designers, and software testers of MooLah.
1.2. Software Overview
MooLah is a desktop CLI application that help users track their expenses. The App supports many other extensions such as budgeting, planning and reminders. In particular, it is tailored to students in National University of Singapore who dine frequently in school canteens.
1.3. Before We Begin
Here are some widely-used symbols in this document:
| Contains essential information that explains a concept more clearly. |
| Contains extra information that might be useful. |
2. Setting Up
This section contains information on steps to set up the developer environment on your computer.
Refer to the guide here.
3. Design
This section explains MooLah’s software architecture.
3.1. Architecture
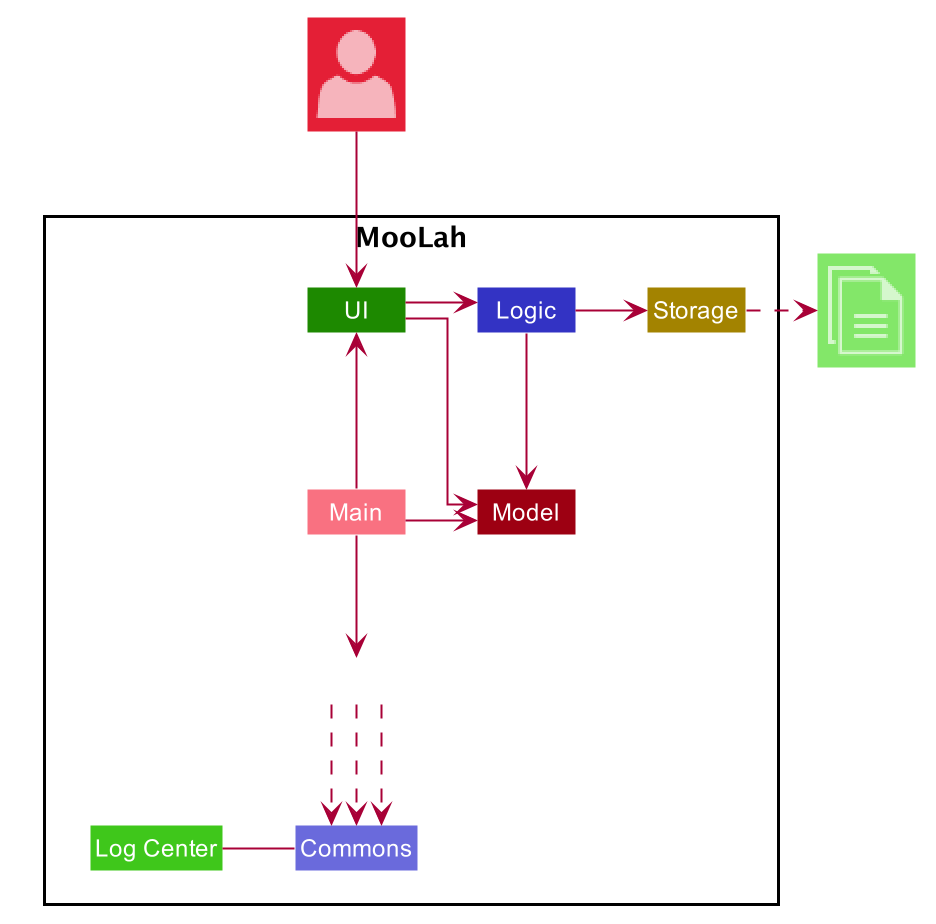
The Architecture Diagram given above explains the high-level design of the App. Given below is a quick overview of each component.
The .puml files used to create diagrams in this document can be found in the diagrams folder.
Refer to the Using PlantUML guide to learn how to create and edit diagrams.
|
-
At app launch: Initializes the components in the correct sequence, and connects them up with each other.
-
At shut down: Shuts down the components and invokes cleanup method where necessary.
Commons represents a collection of classes used by multiple other components.
The following class plays an important role at the architecture level:
-
LogsCenter: Used by many classes to write log messages to the App’s log file.
The rest of the App consists of four components.
Each of the four components
-
Defines its API in an
interfacewith the same name as the Component. -
Exposes its functionality using a
{Component Name}Managerclass.
For example, the Logic component (see the class diagram given below) defines it’s API in the Logic.java interface and exposes its functionality using the LogicManager.java class.
How the architecture components interact with each other
The Sequence Diagram below shows how the components interact with each other for the scenario where the user issues the command deleteexpense 1.
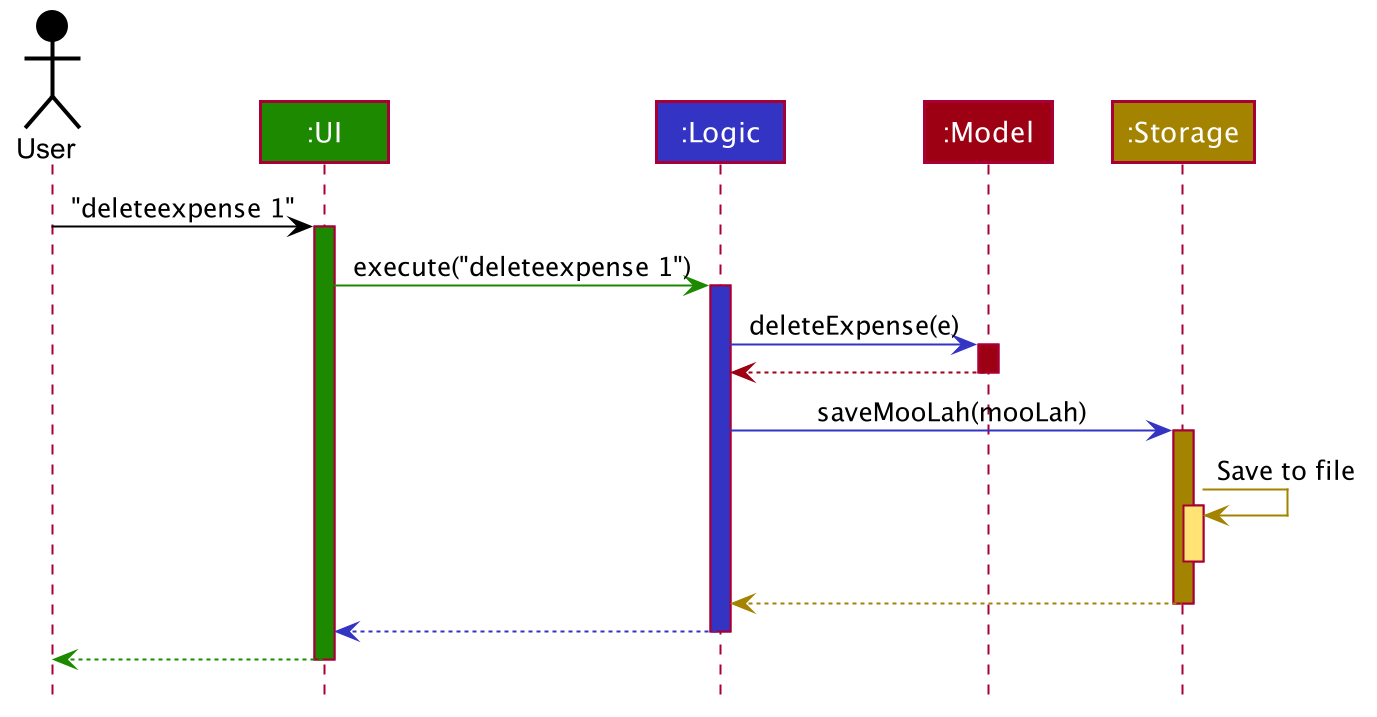
deleteexpense 1 commandThe sections below give more details of each component.
3.2. UI component

API : Ui.java
The UI consists of a MainWindow that is made up of parts e.g.CommandBox, ResultDisplay, SinglePanelView, StatusBarFooter etc. All these, including the MainWindow, inherit from the abstract UiPart class.
The UI component uses JavaFx UI framework. The layout of these UI parts are defined in matching .fxml files that are in the src/main/resources/view folder. For example, the layout of the MainWindow is specified in MainWindow.fxml
The UI component,
-
Determines what commands are available to the user.
-
Executes user commands using the
Logiccomponent. -
Listens for changes to
Modeldata so that the UI can be updated with the modified data.
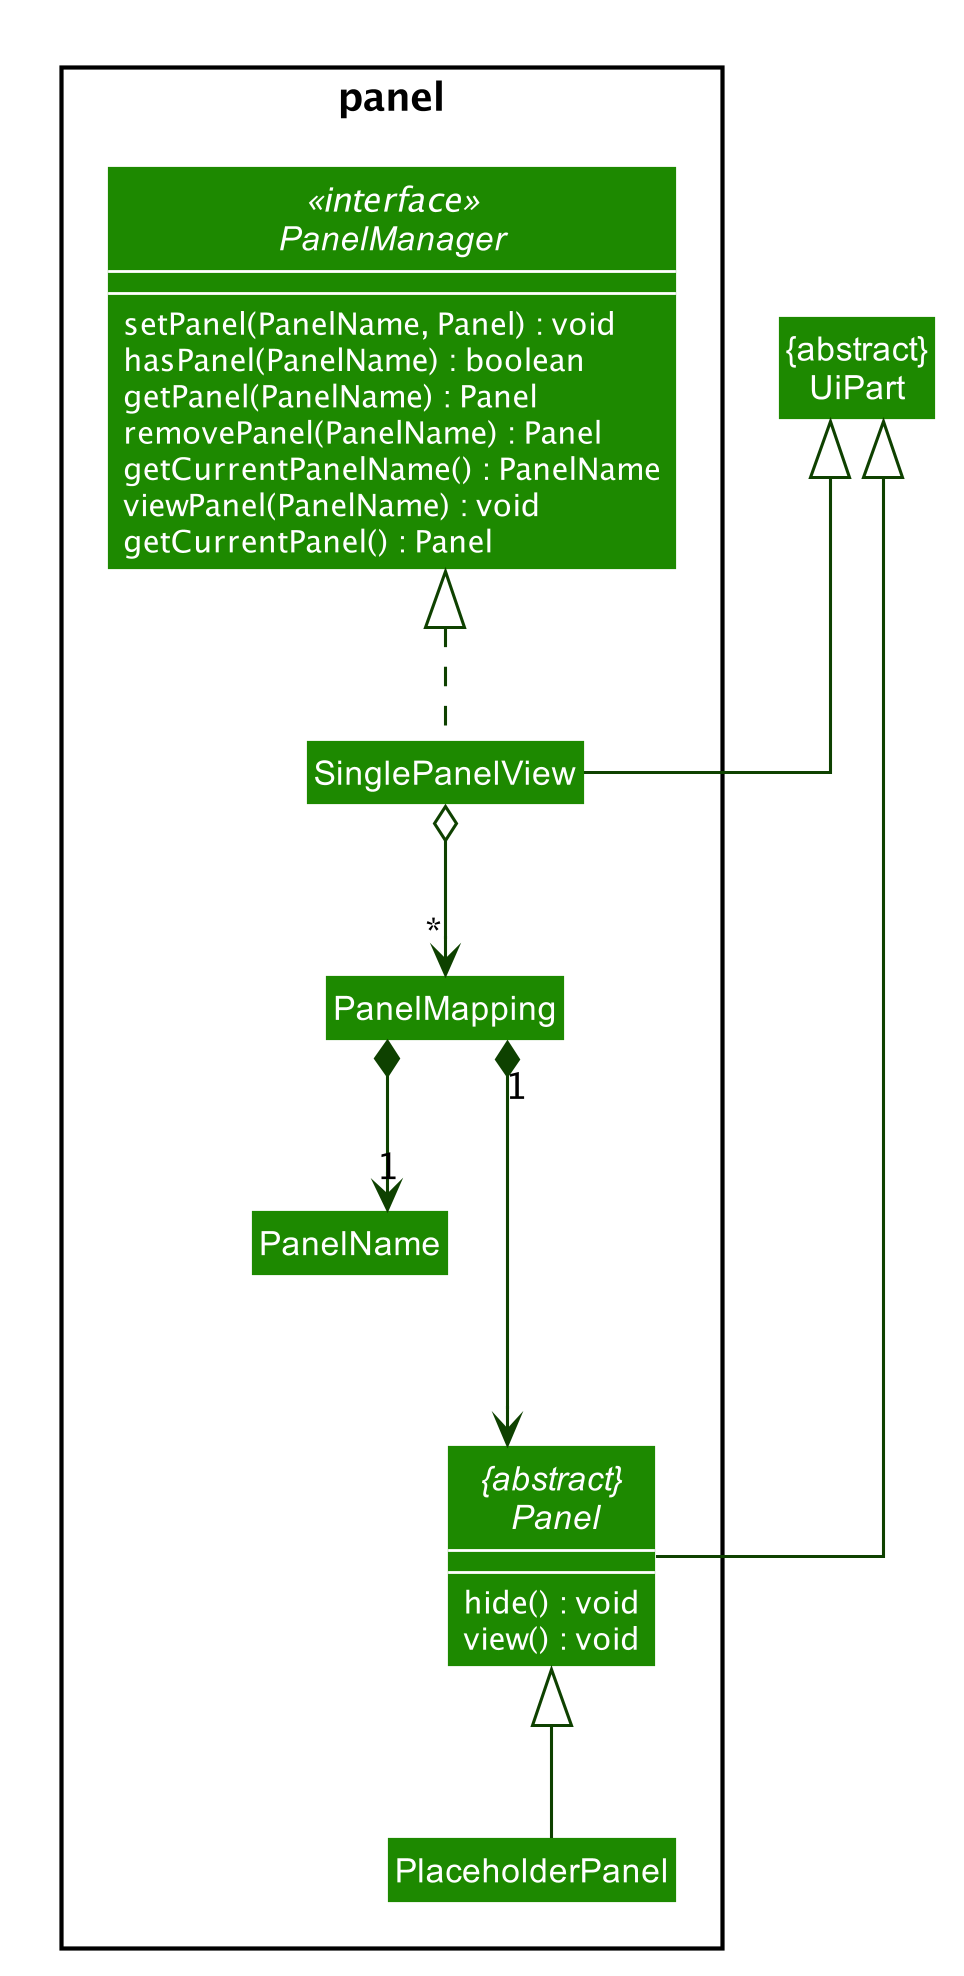
The content that is being shown in the MainWindow to the user is managed by a SinglePanelView which implements the
PanelManager interface that supports the following operations:
PanelManager#viewPanel(PanelName)
PanelManager#hasPanel(PanelName)
PanelManager#getPanel(PanelName)
PanelManager#setPanel(PanelName, Panel)
PanelManager#getCurrentPanel()
PanelManager#getCurrentPanelName()
PanelManager#removePanel(PanelName)

The PanelManager manages the other Panels which represent their respective Model component:
-
AliasMappingsasAliasListPanel -
UniqueBudgetListasBudgetListPanel -
Primary
BudgetasBudgetPanel -
UniqueExpenseListasExpenseListPanel -
UniqueEventListasEventListPanel -
StatisticsasStatsPanel
Each of these Panels extend the abstract Panel class and implement the abstract methods:
-
Panel#view()which displays the panel to the user -
Panel#hide()which hides the panel from the user
When users execute a valid command, via Logic, the Model is updated. These changes are reflected in the respective Panel components.
The CommandResult returned by the Logic component also tells the UI which Panel needs to be displayed.
The UI then displays the Panel to the user.
Users may also manually change between the visible Panels through the CLI by using the view command.
The following sequence diagram shows the events which occur in order to change the the UI Panel component displayed in the SinglePanelView
component of the MainWindow when the user executes a view command.

-
The user executes a valid view command
-
The
Logicparses the input as aViewPanelCommand -
The
#run(Model)method of theViewPanelCommandinstance returns aCommandResultcontaining aPanelName -
The
MainWindowuses thePanelNameto callPanelManager#viewPanel(PanelName). -
The
SinglePanelViewobject which implementsPanelManagercalls the#view()on the panel which needs to be displayed, and calls#hide()on all other panels. -
The user sees the changes to the GUI.
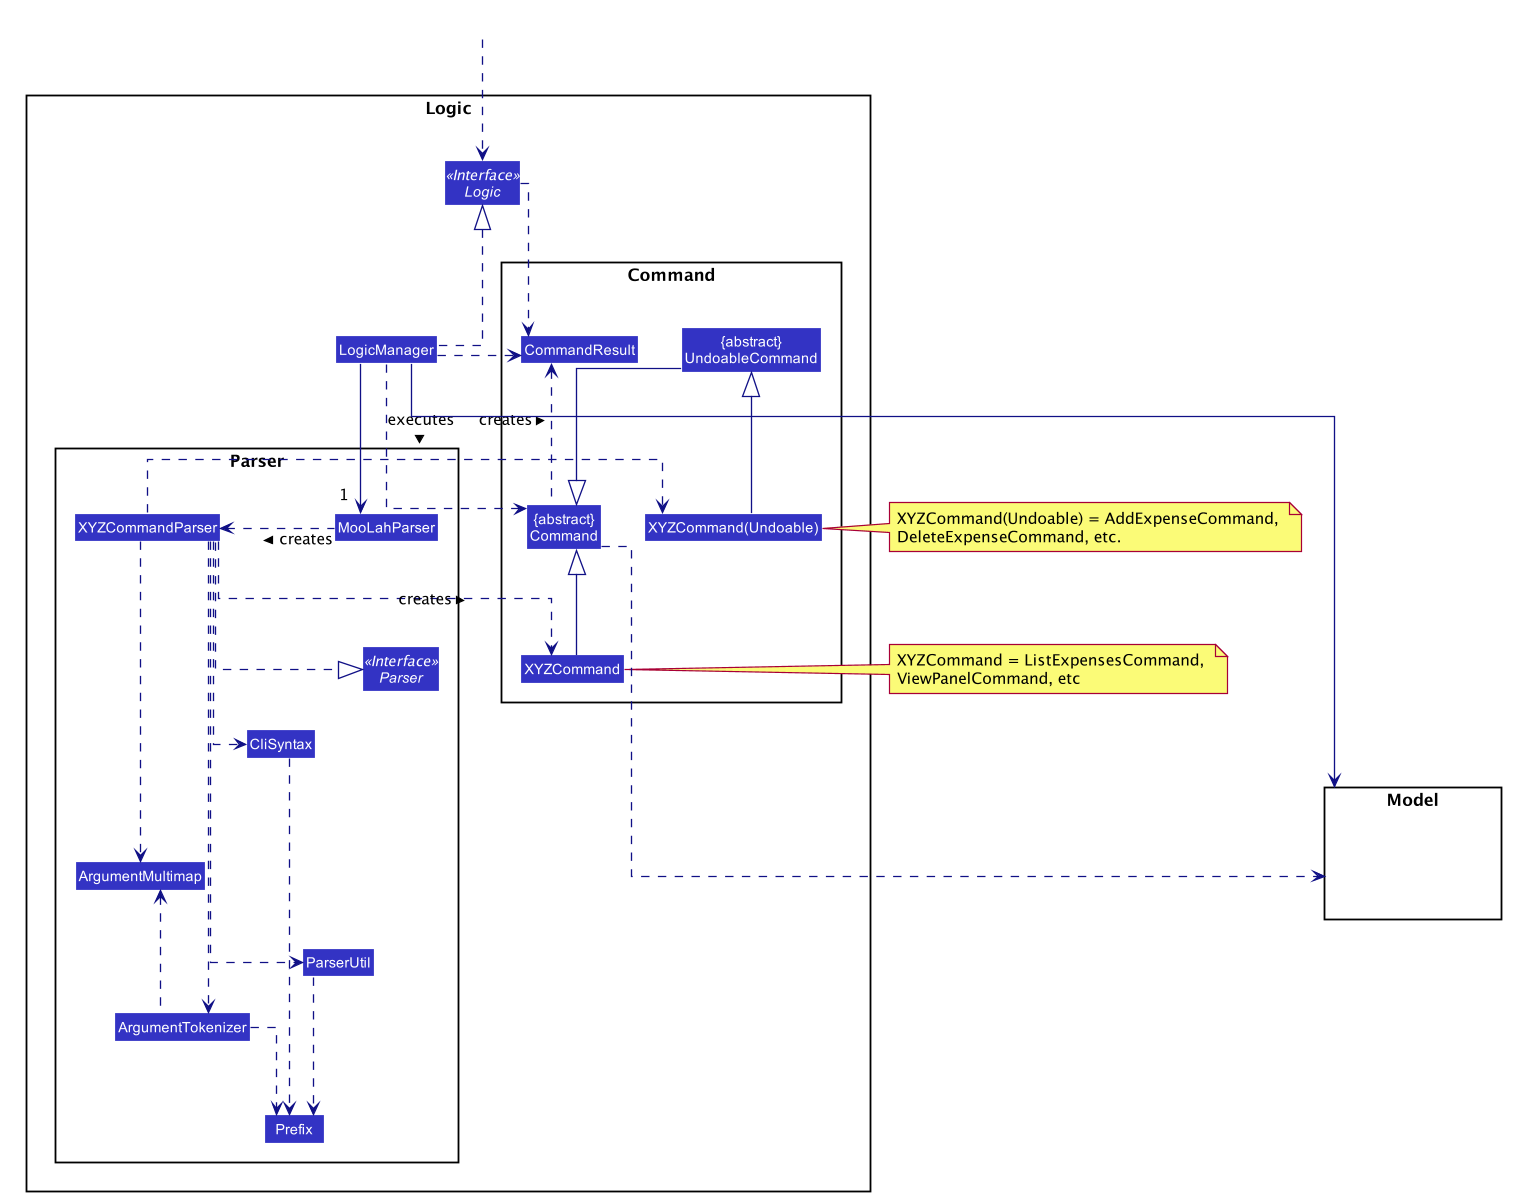
3.3. Logic component
API :
Logic.java
-
Logicuses theMooLahParserclass to parse the user command. -
This results in a
Commandobject which is executed by theLogicManager. -
The command execution can affect the
Model(e.g. adding an expense). -
The result of the command execution is encapsulated as a
CommandResultobject which is passed back to theUi. -
In addition, the
CommandResultobject can also instruct theUito perform certain actions, such as displaying help to the user.
Given below is the Sequence Diagram for interactions within the Logic component for the execute("delete 1") API call.
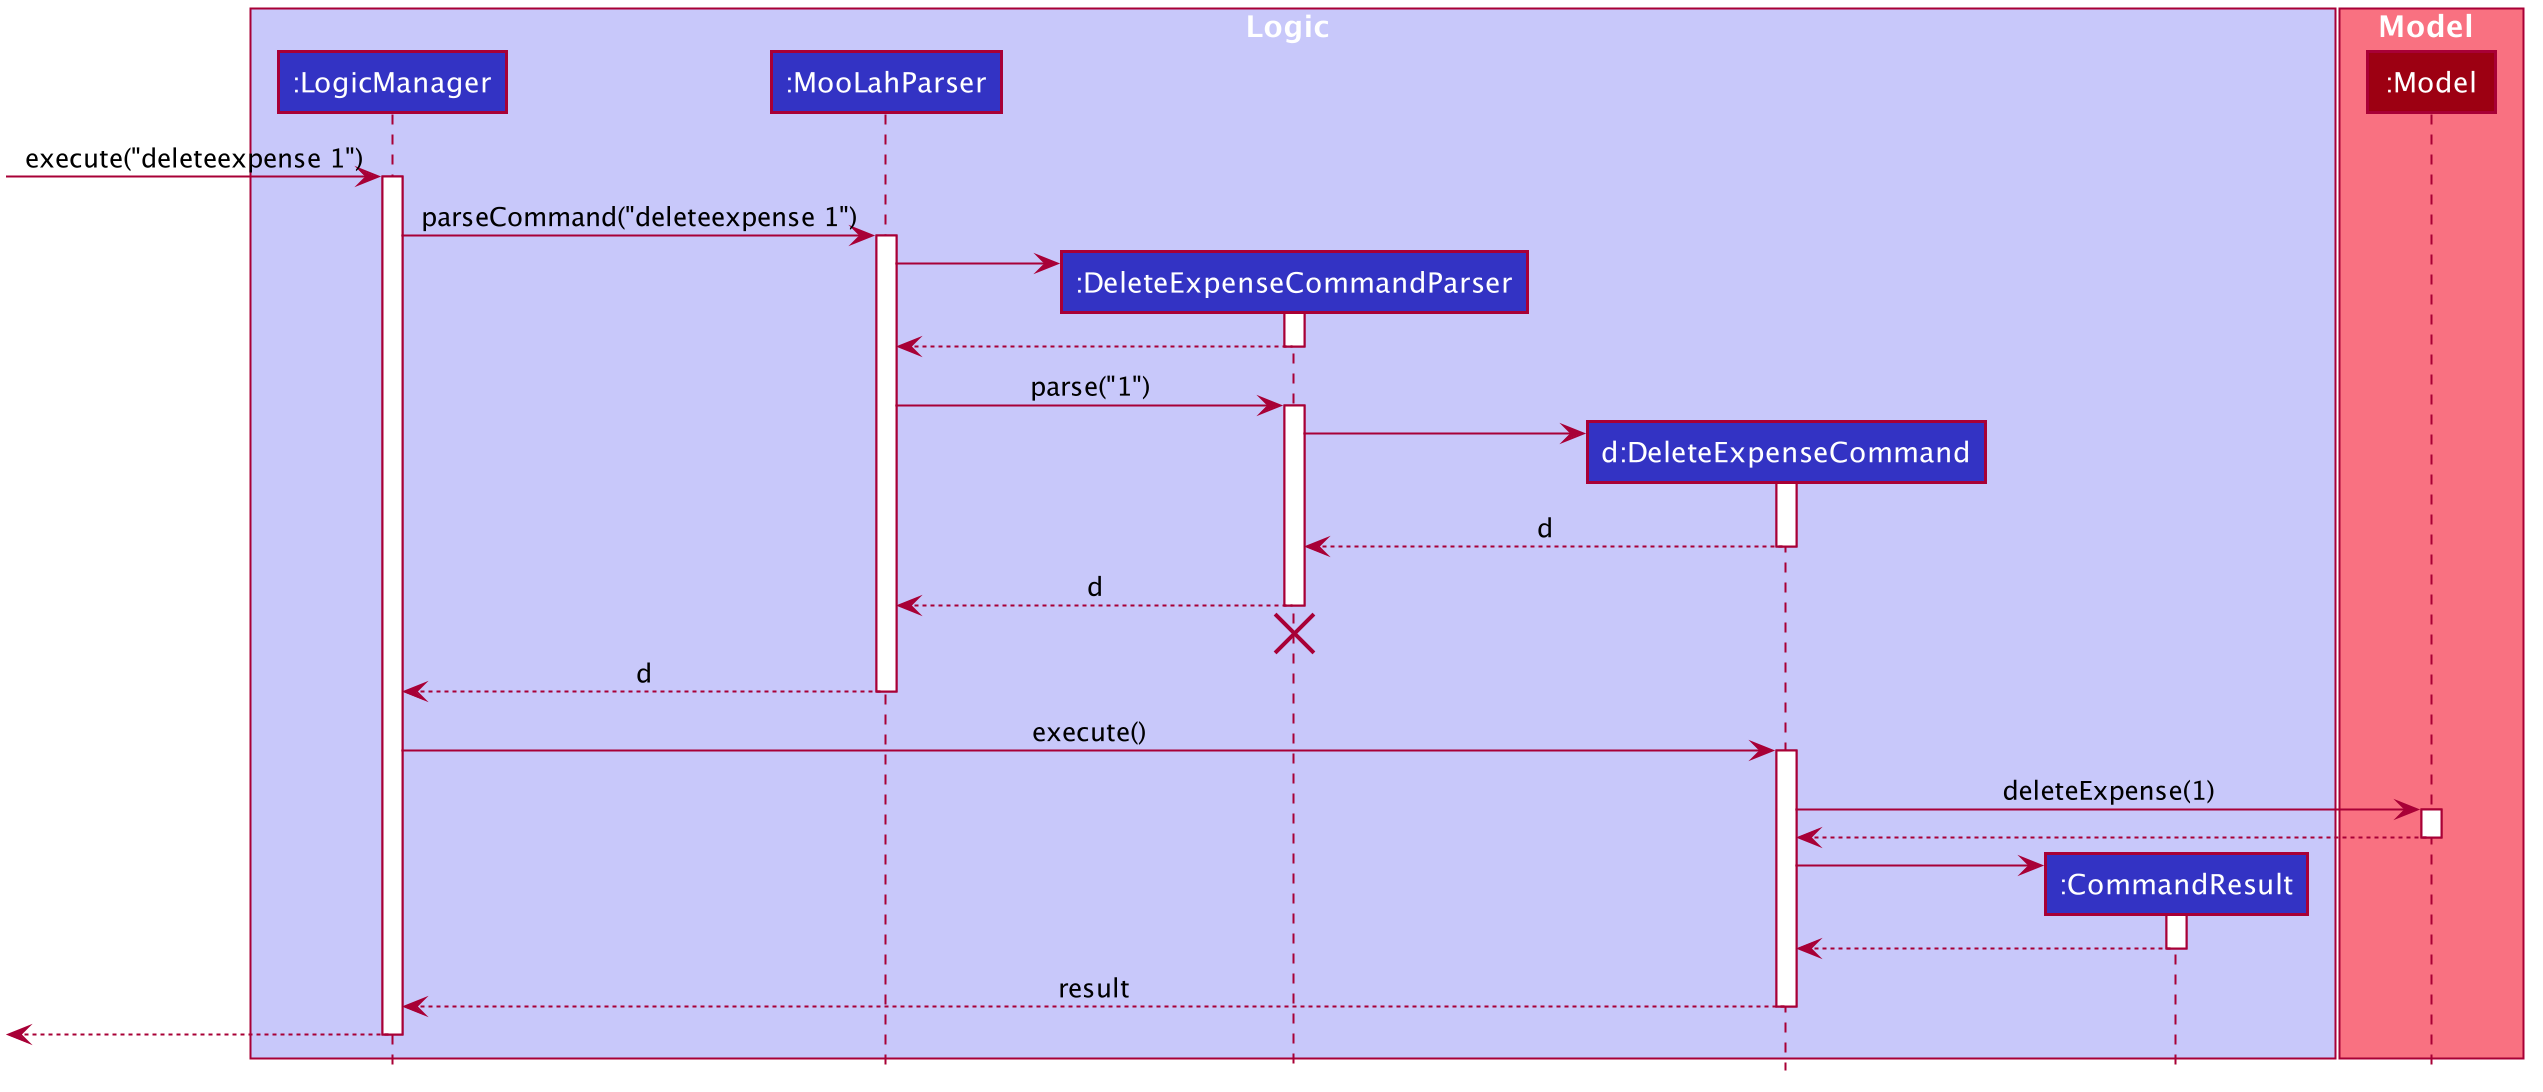
delete 1 Command
The lifeline for DeleteCommandParser should end at the destroy marker (X) but due to a limitation of PlantUML, the lifeline reaches the end of diagram.
|
3.4. Model component
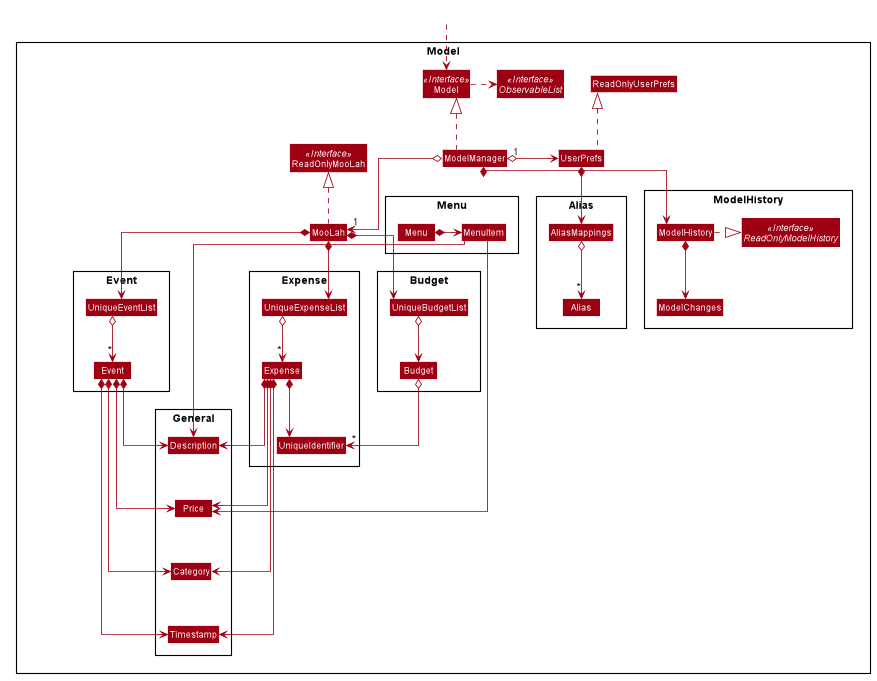
API : Model.java
The Model,
-
stores a
UserPrefobject that represents the user’s preferences. -
stores the MooLah data.
-
exposes an unmodifiable
ObservableList<Expense>that can be 'observed' e.g. the UI can be bound to this list so that the UI automatically updates when the data in the list change. -
exposes an unmodifiable
ObservableList<Budget>that can be 'observed' e.g. the UI can be bound to this list so that the UI automatically updates when the data in the list change. -
exposes an unmodifiable
ObservableList<Event>that can be 'observed' e.g. the UI can be bound to this list so that the UI automatically updates when the data in the list change. -
does not depend on any of the other three components.
3.5. Storage component
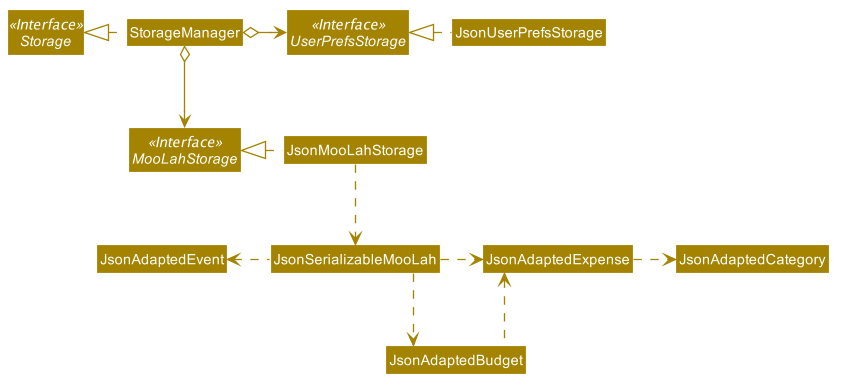
API : Storage.java
The Storage component,
-
can save
UserPrefobjects in json format and read it back. -
can save the MooLah data in json format and read it back.
3.6. Common classes
Classes used by multiple components are in the seedu.moolah.commons package.
4. Implementation
This section describes some noteworthy details on how certain features are implemented.
4.1. Undo and Redo feature
4.1.1. Implementation
The undo and redo functionality is facilitated by ModelHistory, which is available as an instance-level member of Model. It keeps track of the model’s history
by storing the changed fields of the model throughout execution, which will be represented as ModelChanges. Internally, ModelHistory stores the history by using two stacks of ModelChanges, namely, pastChanges and futureChanges.
With the addition of model history, Model can support these operations:
-
Model#applyChanges(ModelChanges)— Applies the given changes to the model. -
Model#commit(String, Model)— Saves the changes between the current model and the given previous model to the past changes history, keeping the previous model’s data should there be any differences. This adds the changes to the past history, and clears the future history. -
Model#rollback()— Restores the model one step back by applying the changes described in the immediate previous changes in history. -
Model#migrate()— Moves the model one step forward in history by applying the changes described in the immediate next changes.
To support these capabilities, ModelChanges offers these methods as well:
-
ModelChanges#compareModels(Model, Model)— Compares two models' data and creates a newModelChangesobject that describes the field data of the first model that is different with the second model. -
ModelChanges#revertChanges(Model)— Reverts the current changes with respect to the base model given.
Refer to the class diagram below for comprehensive list of the methods offered and the association of both classes:
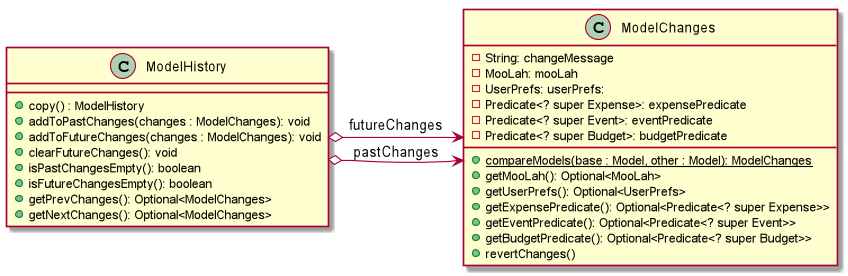
Typical field accessor and mutator methods are omitted for brevity, except when it returns a different type from the field’s type (e.g. ModelChanges#getMooLah()).
|
ModelHistory only stores changes of models that were (or are going to be) executed by model-manipulating - or simply, undoable - commands.
As some of the commands available are intuitively not undoable (e.g. help), every command is configured to extend either UndoableCommand or a non-undoable Command classes.
With the division, Model#commit(String, Model) will only be called if the command to be executed is an instance of UndoableCommand.
Given below is an example usage scenario and how the undo and redo functionality behaves at each step.
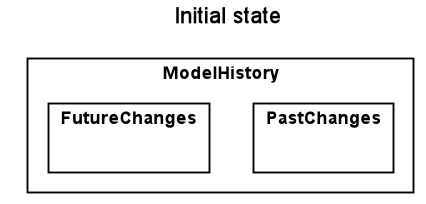
Step 1. The user launches the application for the first time. The current ModelHistory is now empty.
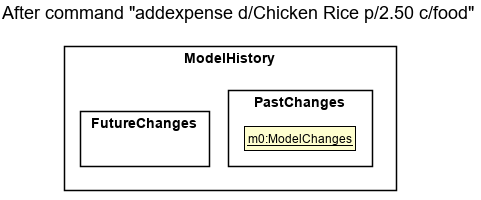
Step 2. The user executes addexpense d/chicken rice p/2.50 c/food command to add an expense.
The addexpense command, being an UndoableCommand, calls Model#commit(String, Model), which saves the state of the model just before the command executes to pastChanges, and futureChanges is cleared.
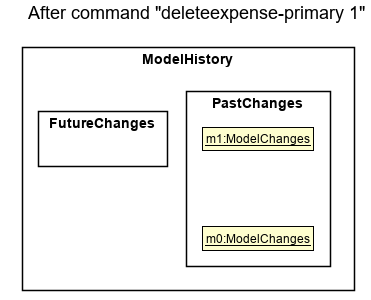
Step 3. The user executes deleteexpense-primary 1 to delete the first expense on the list. The deleteexpense-primary command, also an UndoableCommand, calls Model#commit(String, Model), inserting another entry to the pastChanges and clearing futureChanges again.
If a command fails its execution, it will not call Model#commit(String, Model), so the model will not be saved into ModelHistory.
|
Step 4. The user now decides that deleting the expense was a mistake, and decides to undo that action by executing the undo command. The undo command will call Model#rollback(), which will retrieve the immediate previous change in history, adding the reverting change to the future history of the model, and applies the change to the model.
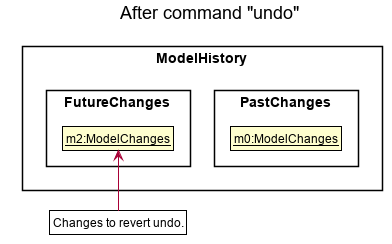
If pastChanges is empty, then there are no previous changes to roll back. The undo command uses Model#canRollback() to check if this is the case. If so, it will return an error to the user rather than attempting to perform the undo.
|
Step 5. The user then realizes the expense should be deleted after all, and wishes to redo the deletion by entering the redo command. The command will call Model#migrate(), which will get the immediate next change in history, adding the reverting change to the past history, and applies the change to the model.
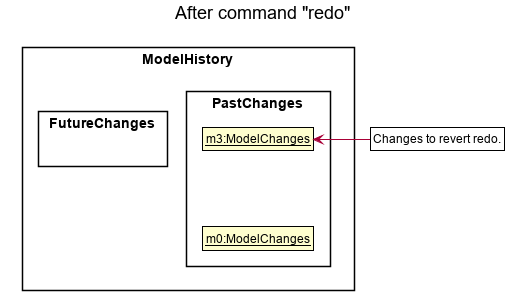
The following sequence diagram shows how the undo command works:
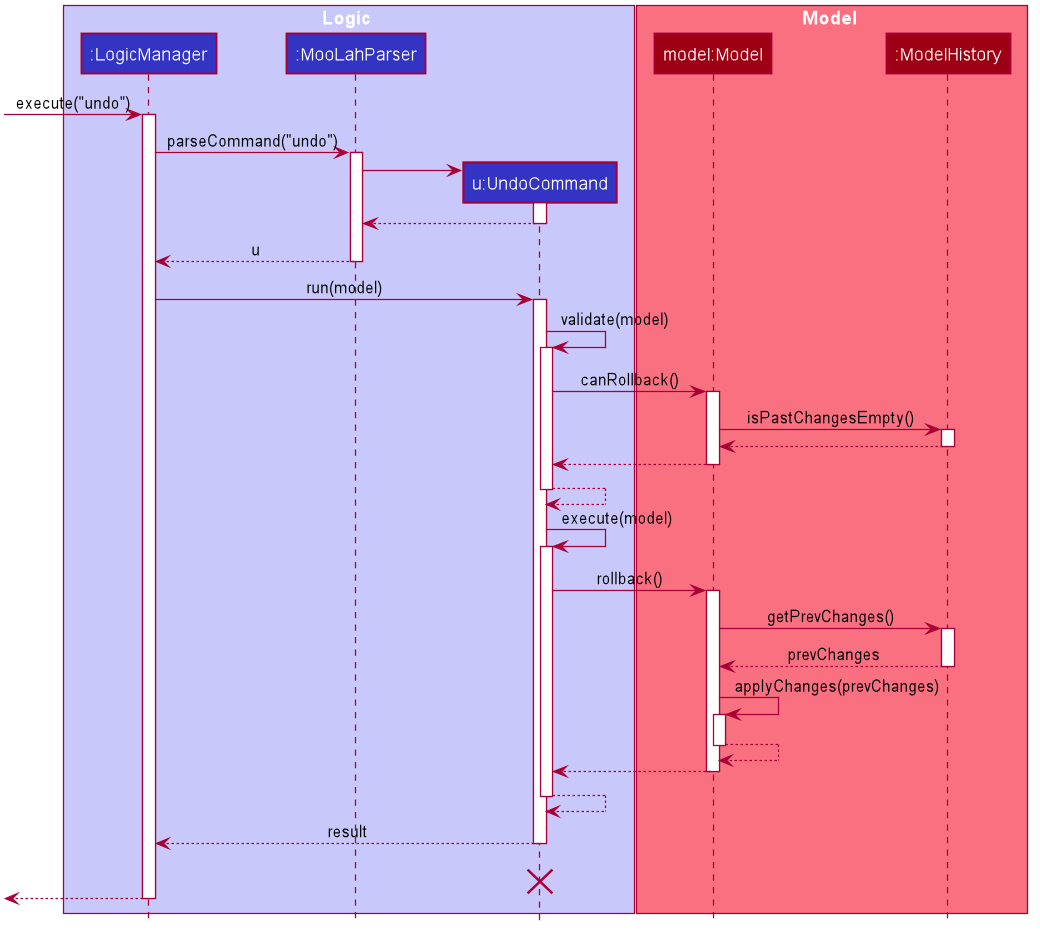
The lifeline for UndoCommand should end at the destroy marker (X) but due to a limitation of PlantUML, the lifeline reaches the end of diagram.
|
Inversely, the redo command calls Model#migrate(), which retrieves the immediate next changes in history, adds the reverting change to the past history, and applies the changes to the model.
If futureChanges is empty, then there are no snapshots to be redone. The redo command uses Model#canMigrate() to check if this is the case. If so, it will return an error to the user rather than attempting to perform the redo.
|
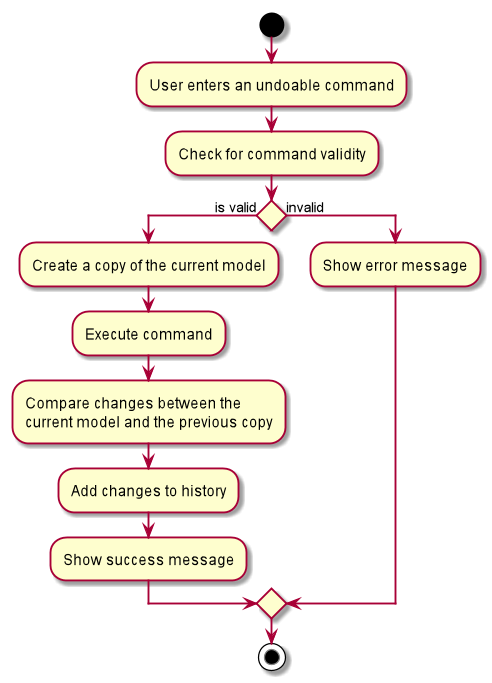
As explained earlier, additions of entry to ModelHistory will only be performed when the command being executed is an instance of UndoableCommand.
The following diagram briefly describes how the execution of undoable commands will do so:
4.1.2. Design Considerations
In implementing the undo and redo functionality, some design approaches and trade-offs have to be considered to account for feature efficiency in computation time and memory usage.
Aspect: How undo and redo executes
-
Alternative 1: Saves the model data.
-
Pros: It is easier to implement.
-
Cons: The approach introduces a component that will take up memory.
-
-
Alternative 2: Individual commands have their own counter-command that negate the effects.
-
Pros: This approach is quite intuitive (e.g. for
addmenuexpense, we can dodeleteexpense-primaryto counter it). -
Cons: It has to be ensured that the implementation of each individual command is correct.
-
-
Current implementation (Alternative 1): We choose this approach as it will be less likely to cause problems specific to restoring the state precisely to the state before the execution of a command, as some commands will create a problem specific on their own which might not be supported by the proposed counter-command. As an example, to undo
delete 3, we must re-add that expense to that specific position (third from beginning), which at the moment is not supported by theaddexpensecommand.
Aspect: How to store the model data
-
Alternative 1: Saves the entire model.
-
Pros: It is easier to implement.
-
Cons: The approach introduces a lot of memory usage and some data might not be necessary.
-
-
Alternative 2: Saves the members of the model that were (or are going to be) changed.
-
Pros: This approach is more conservative in memory usage, only saving fields that are changed means every data is necessary.
-
Cons: Every field must be immutable to preserve changes, which requires a rework on accessing and manipulating fields.
-
-
Current implementation (Alternative 2): We choose this approach as the time and memory resource trade-off is less significant compared to Alternative 1. As Alternative 2 stores only the data needed to correctly reflect the change, it requires less memory and also executes in less time as Alternative 1.
4.2. Menu-item Expenses Feature
The menu-item expenses feature is another way to add an expense to MooLah given the expense to be added is a food or drink that is from canteens in National University of Singapore (NUS) and said item is supported in MooLah.
4.2.1. Implementation
Each menu item is stored as a MenuItem object, which has a description and price. These items are then contained in Menu, within the list
of accepted menu items. Whenever the user enters the addmenuexpense command with a menu-item description, MooLah will
look up the list of expenses in Menu that matches the description, and if there is such menu item, it will add
See the class diagram below for available methods on Menu and MenuItem:

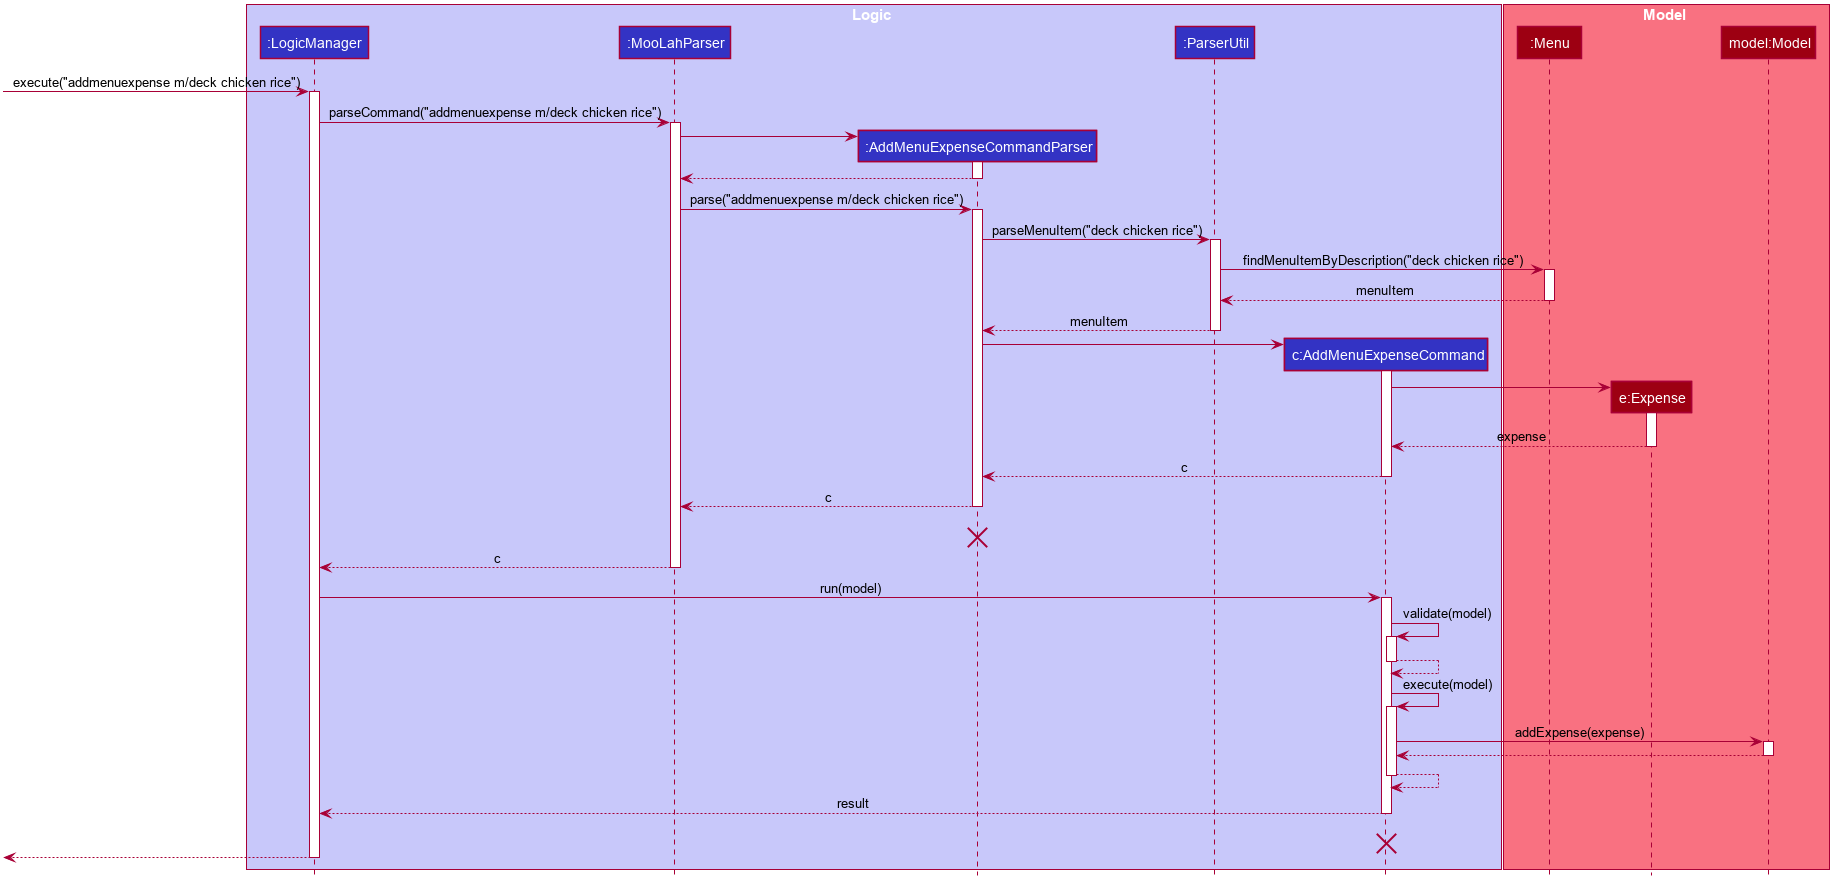
Given below is an example usage scenario and how the add menu-item expense feature is processed within MooLah:
4.2.2. Design Considerations
Aspect: The command the feature should be under
-
Alternative 1: Modify the general add expense command to accept menu-item expense format and user-defined expense format.
-
Pros: This approach is quite natural for end-users to use as menu-item expense is essentially a shorthand for user-defined expense.
-
Cons: MooLah has to support command option groups to enable multiple sets of required prefixes on the same command word.
-
-
Alternative 2: Create a new command for the adding menu-item expenses
-
Pros: This approach is easier to implement.
-
Cons: End-users now have two different commands to add expense, which is not too user-friendly.
-
-
Current implementation (Alternative 2): As of now, MooLah has not yet supported mutually-exclusive command formats. The time and resource to develop multiple formats, compared to adding a new command, will be much expensive, as it will take a major rework on how autocomplete processes user inputs to perform the former. Thus, we decided to implement Alternative 2 instead.
4.3. Budgeting Feature
The budgeting feature allows users to: (i) add, delete and modify budgets; (ii) monitor spending by the budget’s progress bar and pop up notifications; (iii) easily modify or remove expenses from the budget; (iv) switch period to view past expenses; and (v) switch the primary budget to flexibly track expenses under different budgets.
4.3.1. Basics
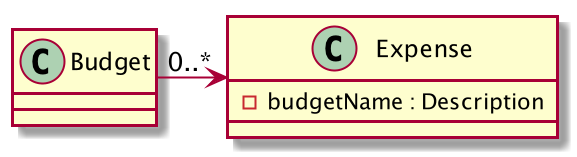
Budgets form a partition of all expenses. That is, an Expense must belong to one and only one Budget,
and all expenses from all Budget must add up to the total number in the general expense list.
Each Expense keeps track of its own Budget through the budgetName attribute — this is possible because
UniqueBudgetList disallows duplicate budget names. On the other hand, each Budget keeps track of a list of Expense
added to this budget, as shown in the figure below.
4.3.2. Add, Edit, Delete, Clear Budgets
There are five commands related to the addition, modification and removal of budgets, namely:
AddBudgetCommand, EditBudgeCommand, DeleteBudgetByIndexCommand, DeleteBudgetByNameCommand,
and ClearBudgetsCommand.
Here is the class diagram of AddBudgetCommand:
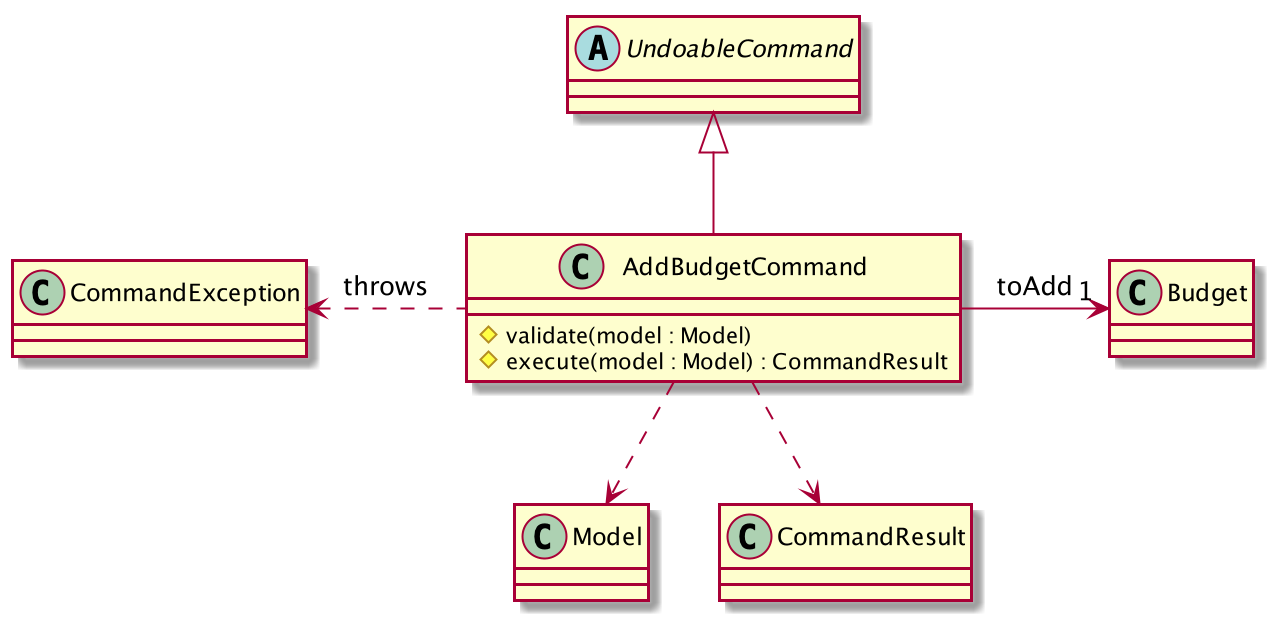
As shown in the figure above, AddBudgetCommand has 2 methods:
(i) validate(model), which checks whether the command is legal (i.e. will not result in duplicate budgets being added
to MooLah), and throws CommandException to notify user of the illegal input if any;
(ii) execute(model), which runs this command in model and successfully adds a new Budget.
The following sequence diagram shows how the add budget operation works:
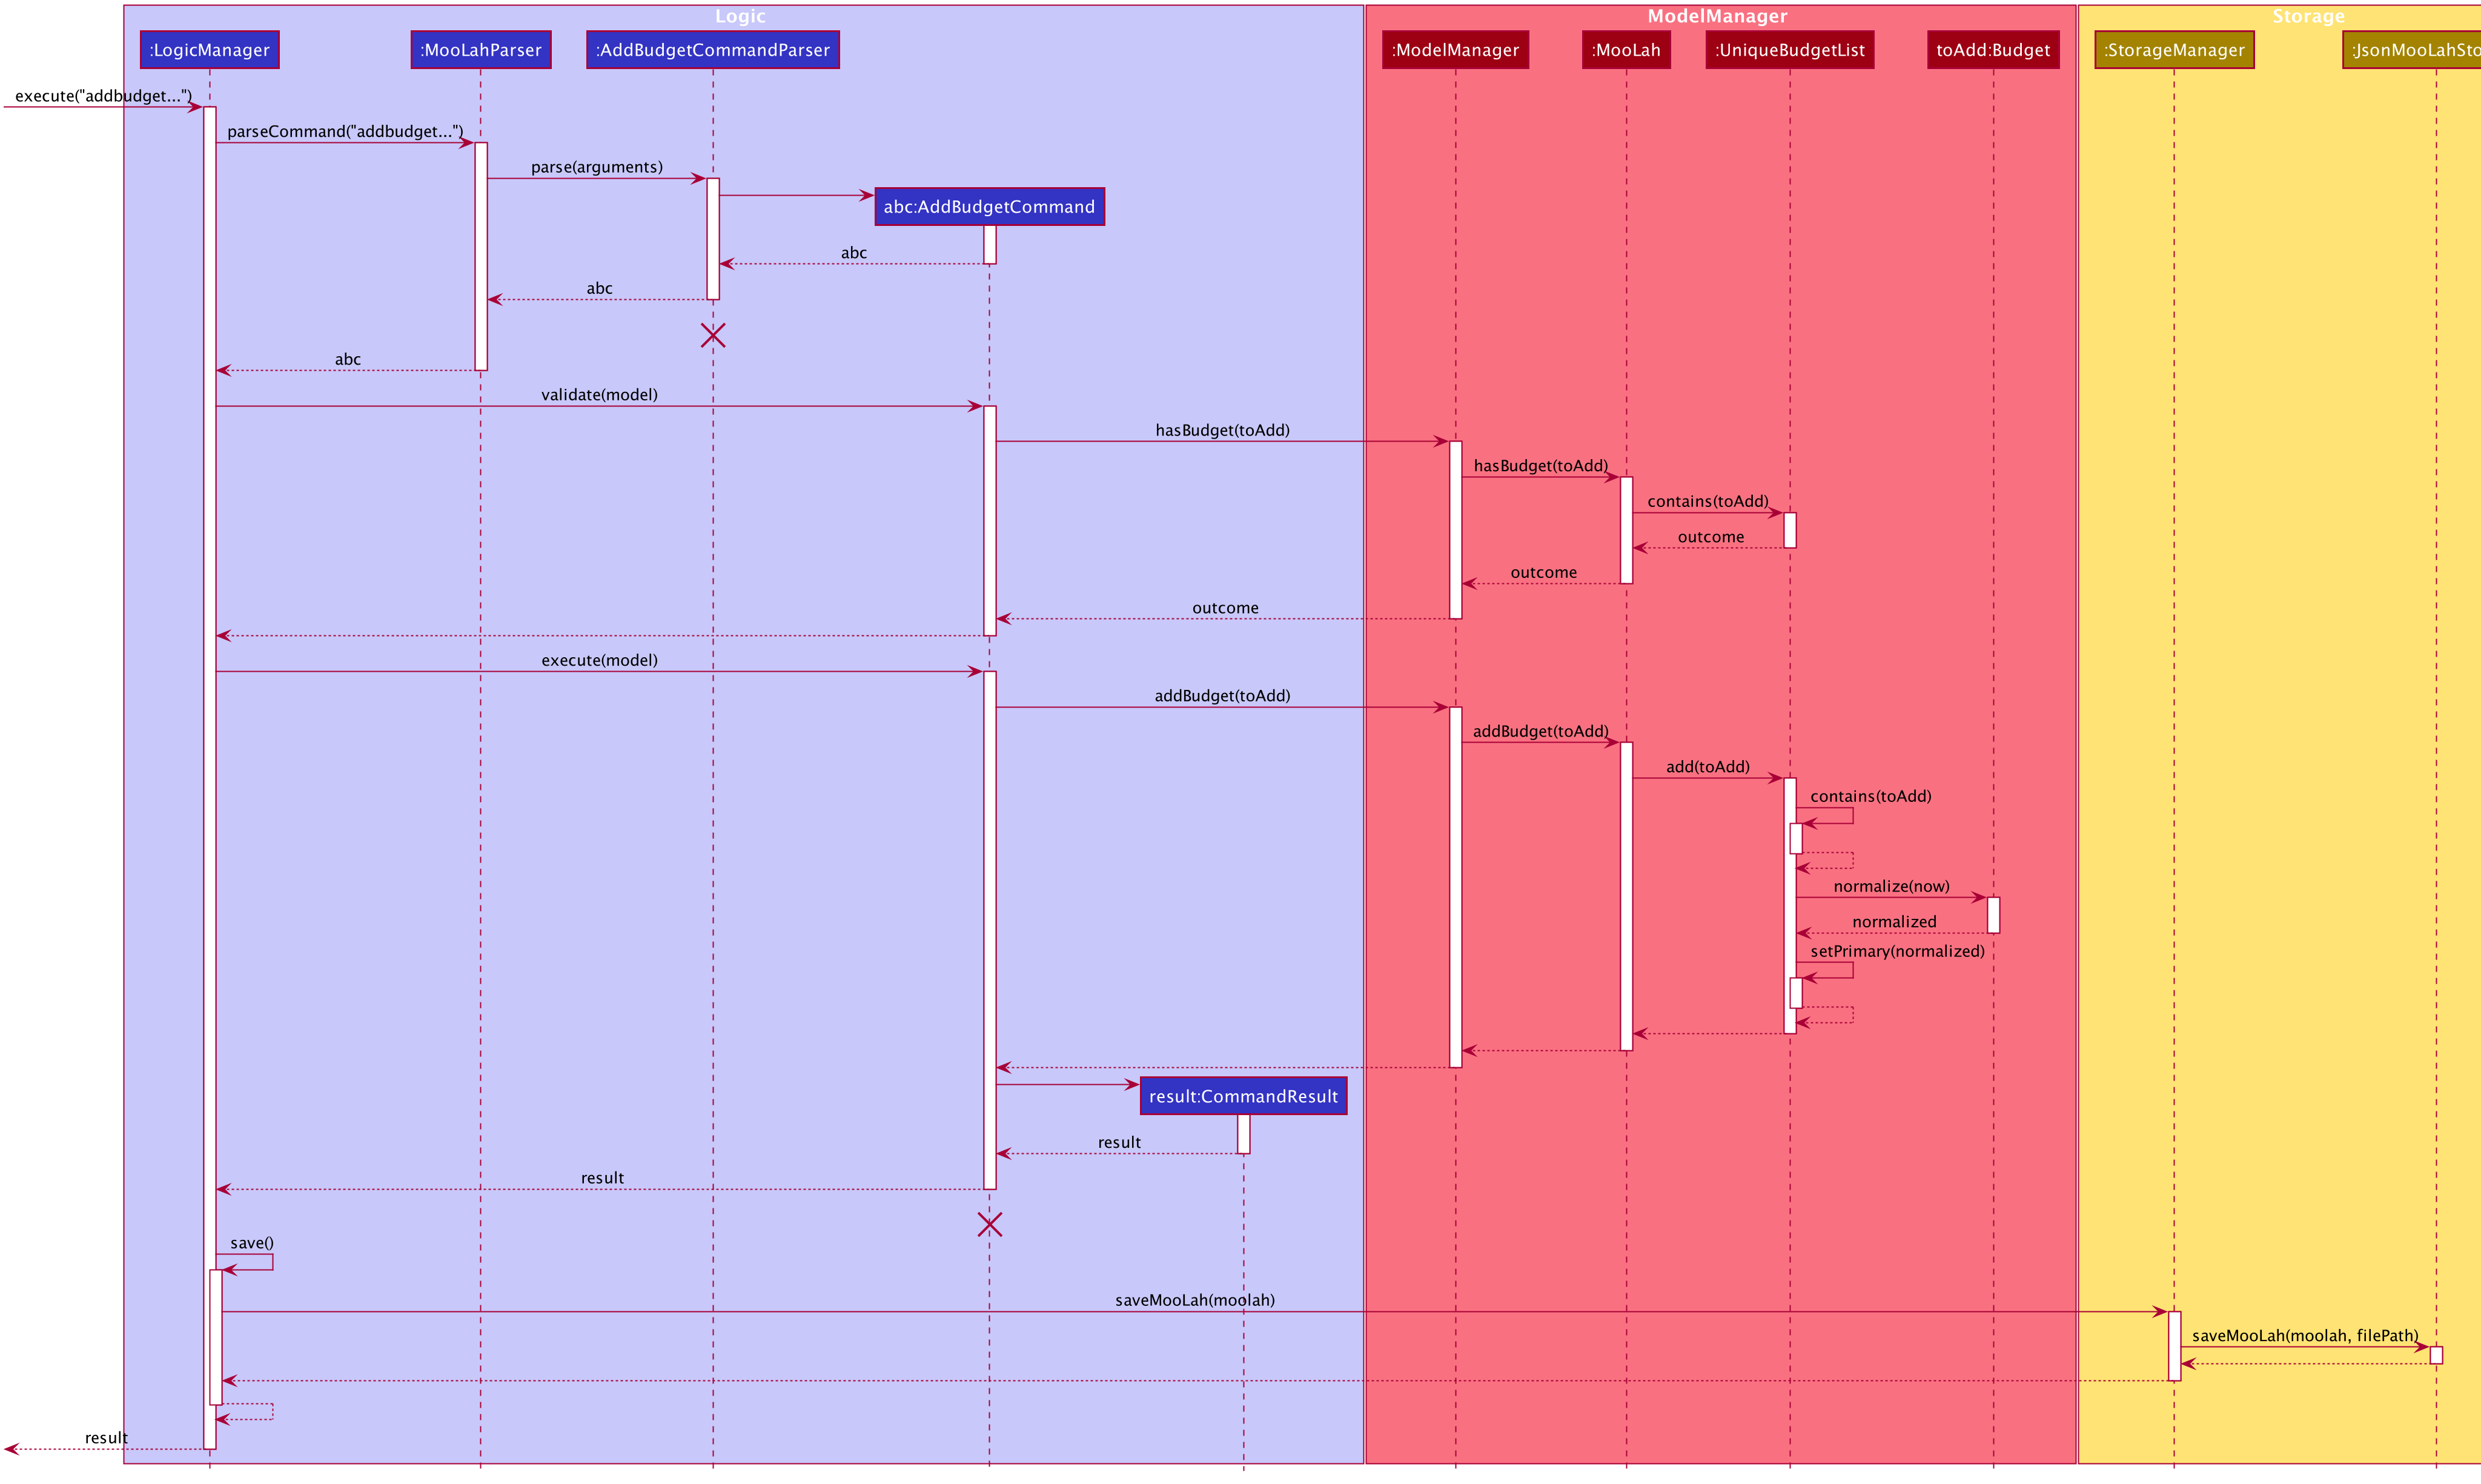
The lifeline for AddBudgetCommandParser and AddBudgetCommand should end at the destroy marker (X) but due to
a limitation of PlantUML, the lifeline reaches the end of diagram.
|
As shown in the figure above, when user inputs "addbudget …", LogicManager executes the String, and MooLahParser
creates the corresponding CommandParser which parses the input into an AddBudgetCommand. AddBudgetCommand then
validates itself by checking if there is an identical Budget already existing in MooLah. If no duplicate budgets are
found, it executes the command, adding the new Budget to MooLah. After that, AddBudgetCommand creates a CommandResult
and passes it back to LogicManager. LogicManager then saves the updated MooLah as Json file, and returns the
CommandResult to GUI to be displayed to user.
The implementation of other commands follows a similar flow as AddBudgetCommand, differing only in the parameters and corresponding
methods in ModelManager. A noteworthy implementation in EditBudgetCommand is that it has a inner class EditBudgetDescriptor
to record the updated attributes of the budget, which is then used in the method EditBudgetCommand#createEditedBudget(Budget, EditBudgetDescriptor)
to create an edited Budget, maintaining non-updated attributes the same as the original Budget.
When a Budget is edited, the original budget’s expenses will be transferred to the updated budget through
Budget#transferExpensesTo(Budget other). The transfer process does two things: (i) set the expenses’s budgetName
to the new budget’s name; (ii) add the expenses to the new budget’s expense list. Similarly, when a Budget is deleted,
all its expenses will be transferred to Default Budget through the same method.
4.3.3. Primary Budget and SwitchBudgetCommand
At any time, there is one, and only one, primary budget in MooLah. All expenses added will go to this primary budget.
If the user wants to track expenses under a different budget, he switches to the target budget first, before adding the expense.
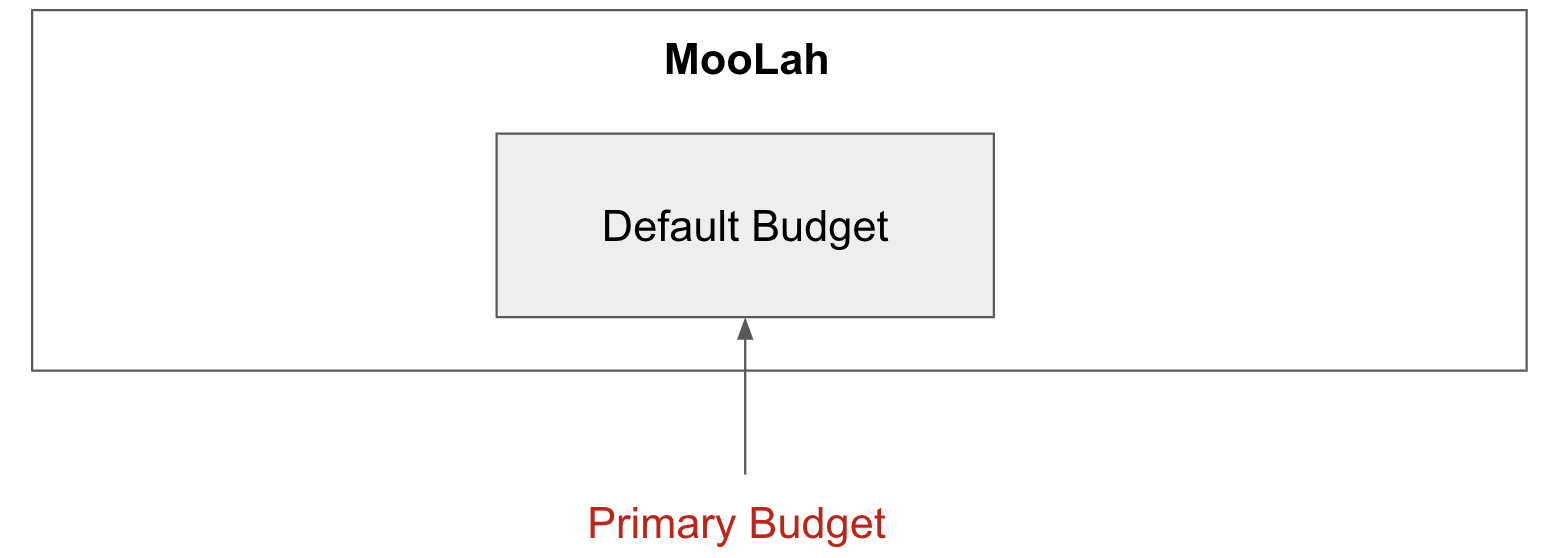
A newly created budget is automatically set to primary.
MooLah creates a Default Budget upon first launching. If no budget is created by the user, expenses will be tracked
under this Default Budget, which has a huge budget limit (10^21) and budgeting period (100 years).
The SwitchBudgetCommand takes in a budget name and switches primary budget to that budget.
Given below is an example usage scenario of SwitchBudgetCommand:
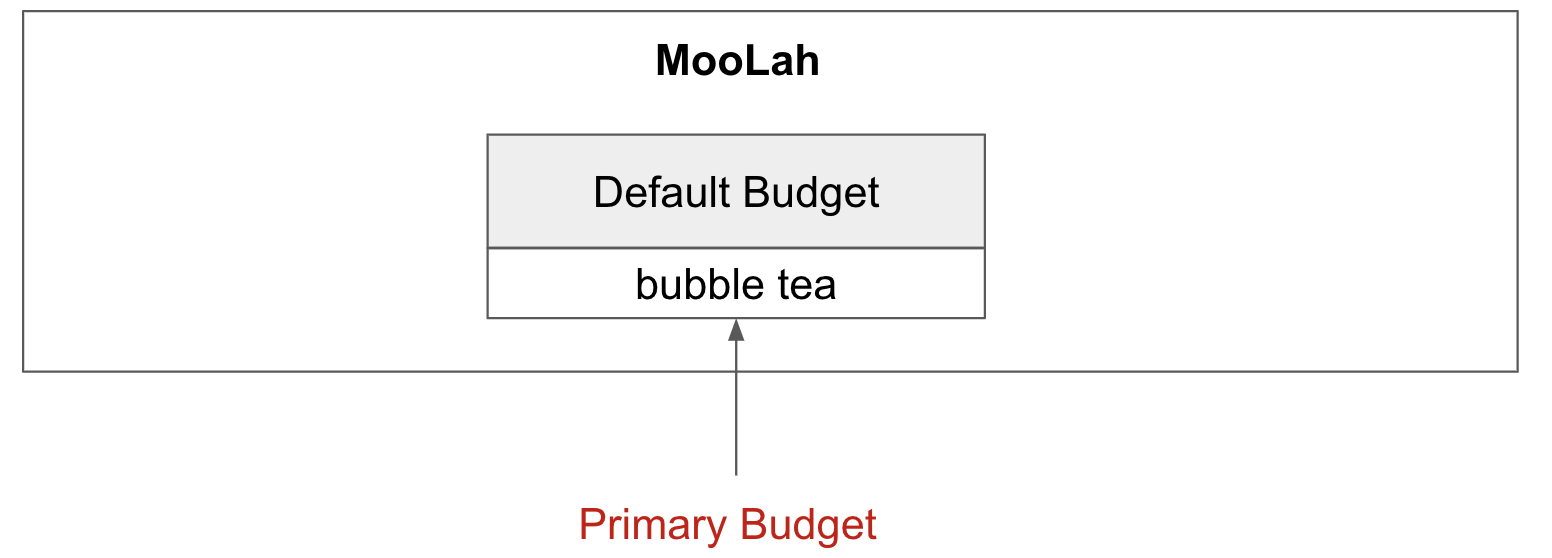
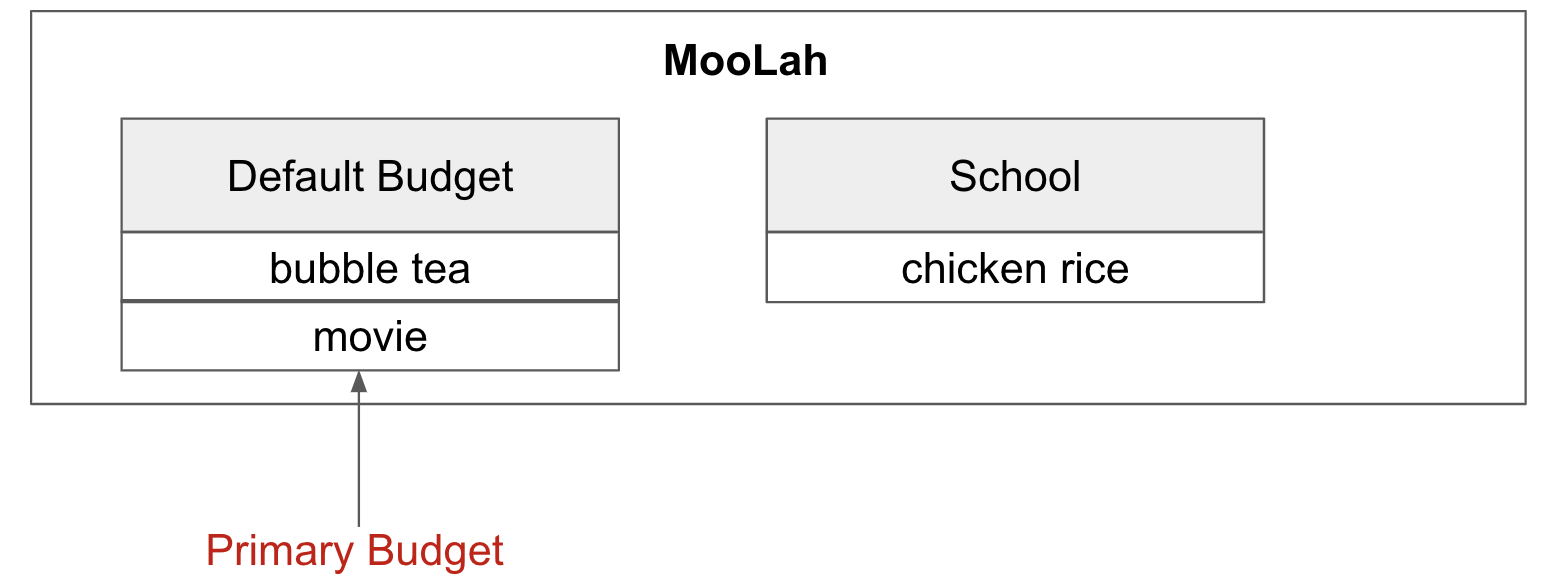
Step 1. The user launches MooLah for the first time. The default budget will be created and set as the primary budget.
Step 2. The user adds an expense "bubble tea". Since the default budget is the primary one, this expense will go under default budget.
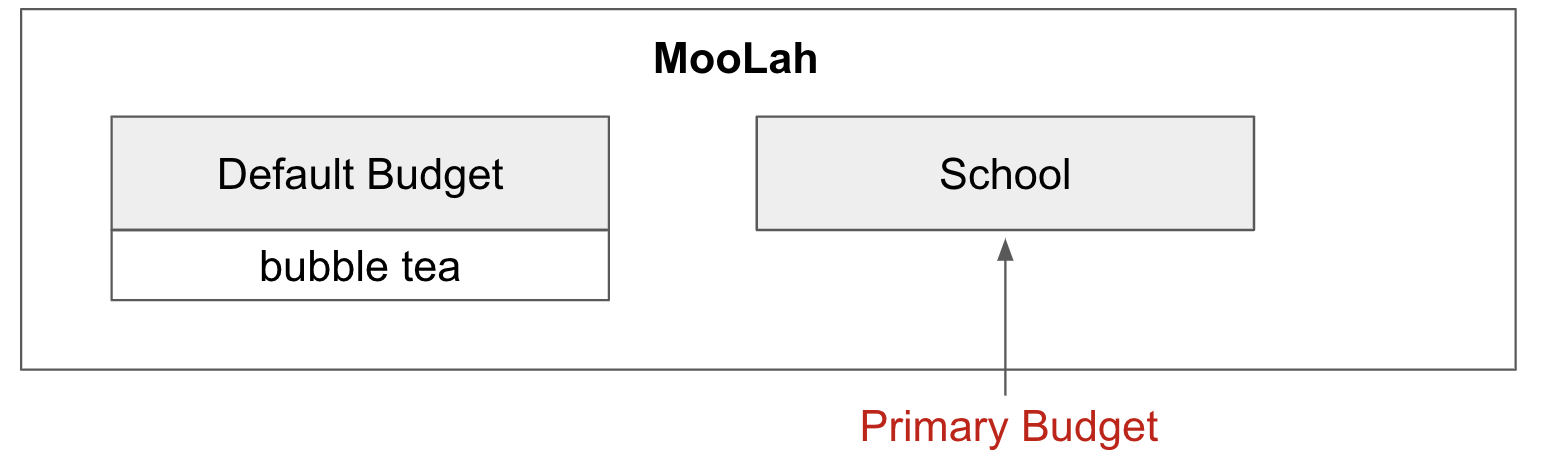
Step 3. The user creates a budget "School". Since "School" is newly added, it will be set as the primary budget.
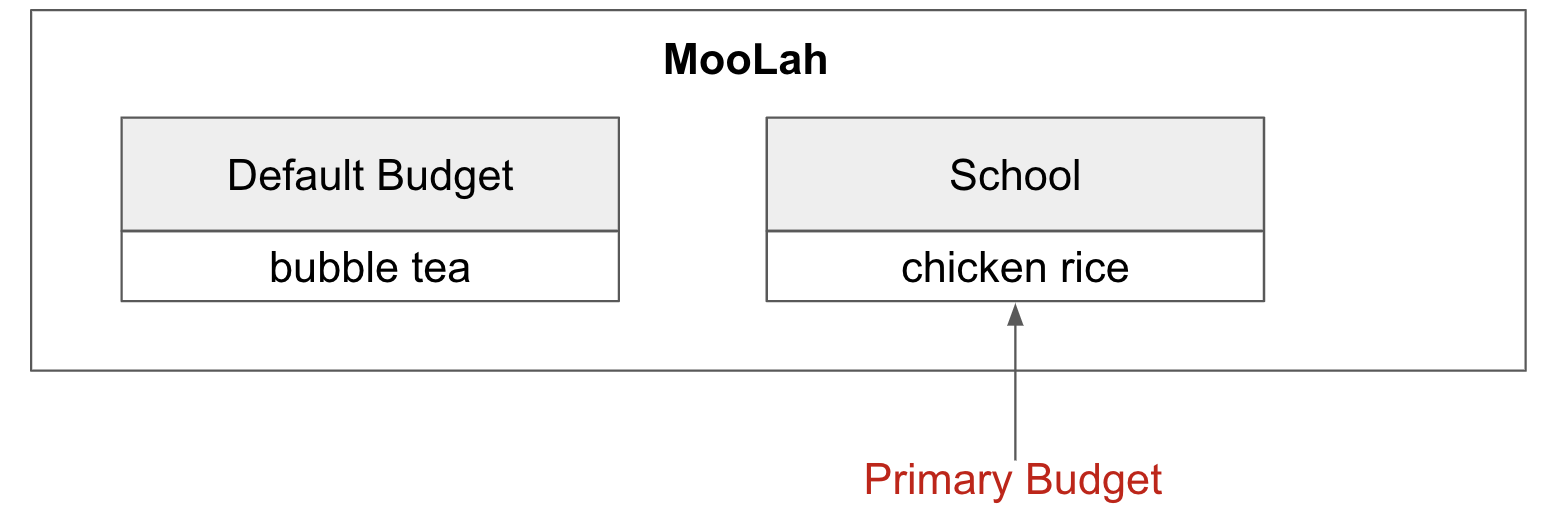
Step 4. The user adds an expense "chicken rice". Since "School" is the primary budget, this expense will go under "School".
Step 5. The user now wants to add another expense "movie", but does not want it tracked under "School". As such, the
user executes switchbudget d/default budget. The default budget is now the primary budget.
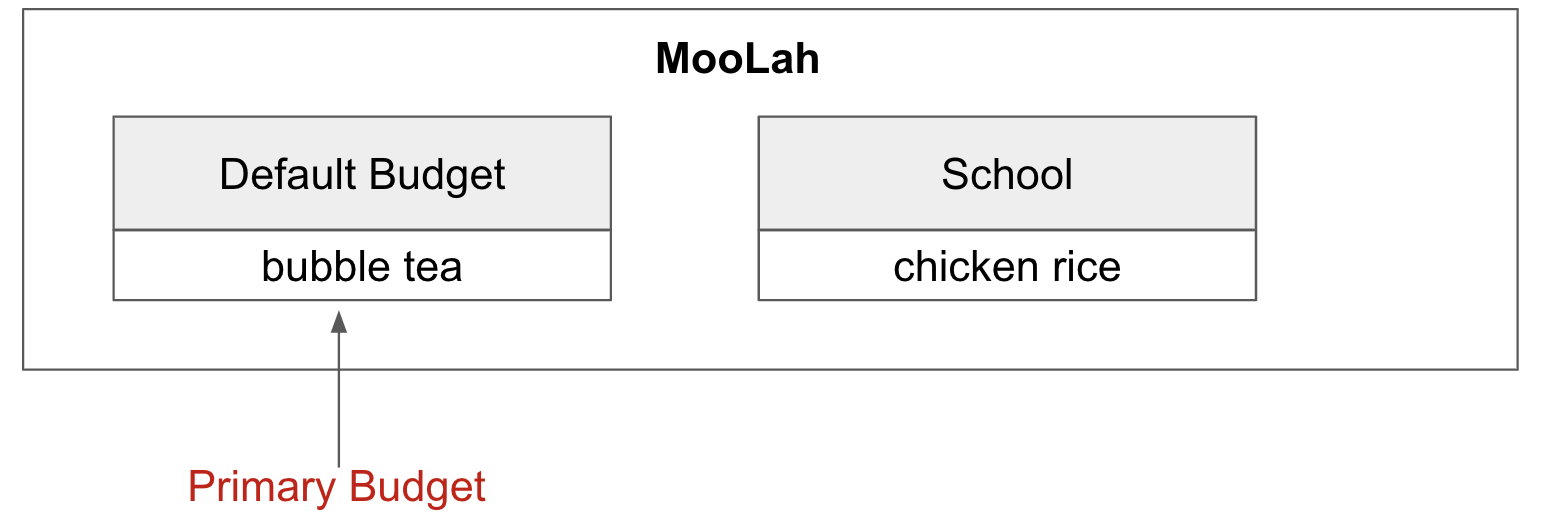
Step 6. The user adds the expense "movie", which is tracked under the current primary budget - default budget.
4.3.4. BudgetWindow and SwitchPeriodCommand
A budget is like a sliding window that moves along the time axis. The window has a fixed size determined by
BudgetPeriod, an enum class with five values: DAY, WEEK, MONTH, YEAR, INFINITY (for Default Budget).
Only expenses within the current window are shown in the app. Every time the budget refreshes, the window "slides"
to the next period, starting with an empty screen that gradually gets populated with newly added expenses over time.
This is achieved through the BudgetWindow class.
Here is the class diagram of BudgetWindow:
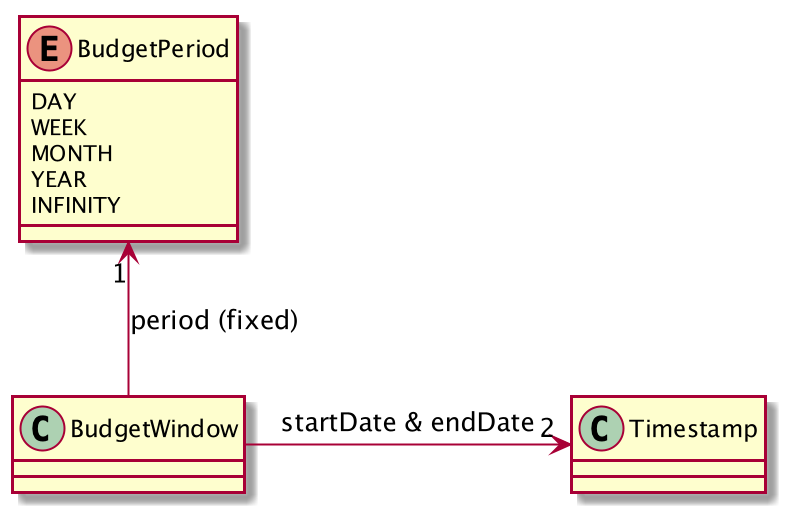
As shown in the figure above, BudgetWindow has 3 attributes: startDate, endDate, and period. The start and end
dates are modifiable, but the period is fixed. This corresponds to the above-mentioned "sliding window" concept.
A budget keeps a list of all expenses ever been tracked by this budget, including historical ones. Additionally,
it has a method Budget#getCurrentPeriodExpenses() that filters from this list expenses within the current
budgeting period, which in turn get to be shown on MooLah’s GUI.
When users want to view expenses in a past period, they can do so by executing SwitchPeriodCommand. This command
takes in a Timestamp and switches the budget window to a period anchored by that Timestamp. This is achieved by
BudgetWindow#normalize(Timestamp anchor) method.
Given below is an example usage scenario of SwitchPeriodCommand:
Step 1. The user has a monthly budget "school" that recurs on the 5th of each month. Suppose the current date is
10 Nov. As a result, the current budgeting period will be 5 Nov - 4 Dec.
Step 2. The user wants to view expenses in September. As such, the user executes switchperiod t/20-09
(20-09 is interchangeable with any other dates within 5 Sep - 4 Oct). This command calls
BudgetWindow#normalize, which shifts the window’s start and end dates to 5 Sep and 4 Oct respectively,
while maintaining the fixed period — MONTH. As a result, the user sees expenses tracked under the budget during 5 Sep - 4 Oct.
The BudgetWindow#normalize method is also called upon adding a new Budget to MooLah. No matter how
far the start date inputted by the user is from now, it will be normalized to the current period, such that expenses added
subsequently will correctly be reflected in the budget panel.
Each budget, once added, will recur infinitely. This is achieved by Budget#refresh(), along with the Timekeeper class.
Every 0.05 second, Timekeeper checks if the system time is at day break, and call Budget#refresh() if necessary. Subsequently,
BudgetWindow#normalize is called; the anchor passed in is current time. As a result, the Budget is
successfully normalized to the current period.
4.3.5. ListBudgetsCommand
ListBudgetsCommand updates Model’s FilteredBudgetList with a Predicate to show all budgets. The command returns a CommandResult with view
request to BudgetListPanel.PANEL_NAME. Subsequently, MainWindow#changePanel(PanelName) will switch the currently
shown panel to BudgetListPanel.
ListBudgetsCommand has the same effect as "view budget list".
4.3.6. UI Component of Budget
There are three classes related to the UI display of budgets:
-
BudgetCard, which shows the budget name, period, and progress bar — GUI representation of aBudget; -
BudgetListPanel, which displays a list ofBudgetCard— called throughListBudgetsCommandor "view budget list"; -
BudgetPanel, which displays aBudgetCardat the top, and a list of current period expenses below — called throughview primary budget.
The progress bar in BudgetCard shows the proportion used against the budget limit. This is calculated by
Budget#calculateProportionUsed(), which divides the sum of all current period expenses against the budget limit,
returning a Percentage that wraps the result (rounded to the nearest integer).
Besides, the budget also gives popup notification when proportion used reaches 50%, 90%, and 100%. These 3 status
correspond to Budget#isHalf(), Budget#isNear() and Budget#isExceeded(). Before each command in MooLah is executed, the
initial values of these 3 booleans are recorded by LogicManager#recordInitialPrimaryBudgetStatus(), which returns a
boolean array of size 3. At the end of each command, the final values of these 3 booleans are recorded again by
LogicManager#recordFinalPrimaryBudgetStatus(). The two arrays are then passed into MainWindow#showWarningIfAny()
for a comparision, and if any values have changed, MainWindow#showPopupMessage() will show the corresponding pop up
notification to remind the user of the budget progress.
4.3.7. Storage of Budgets
Budget objects are stored in Json format, through the JsonAdaptedBudget class. The Json file has the same properties
as the budget, except: (i) it flattens the BudgetWindow field into start date, end date and period, for clearer display;
(ii) it stores a list of UniqueIdentifier to expenses, instead of a list of JsonAdaptedExpense.
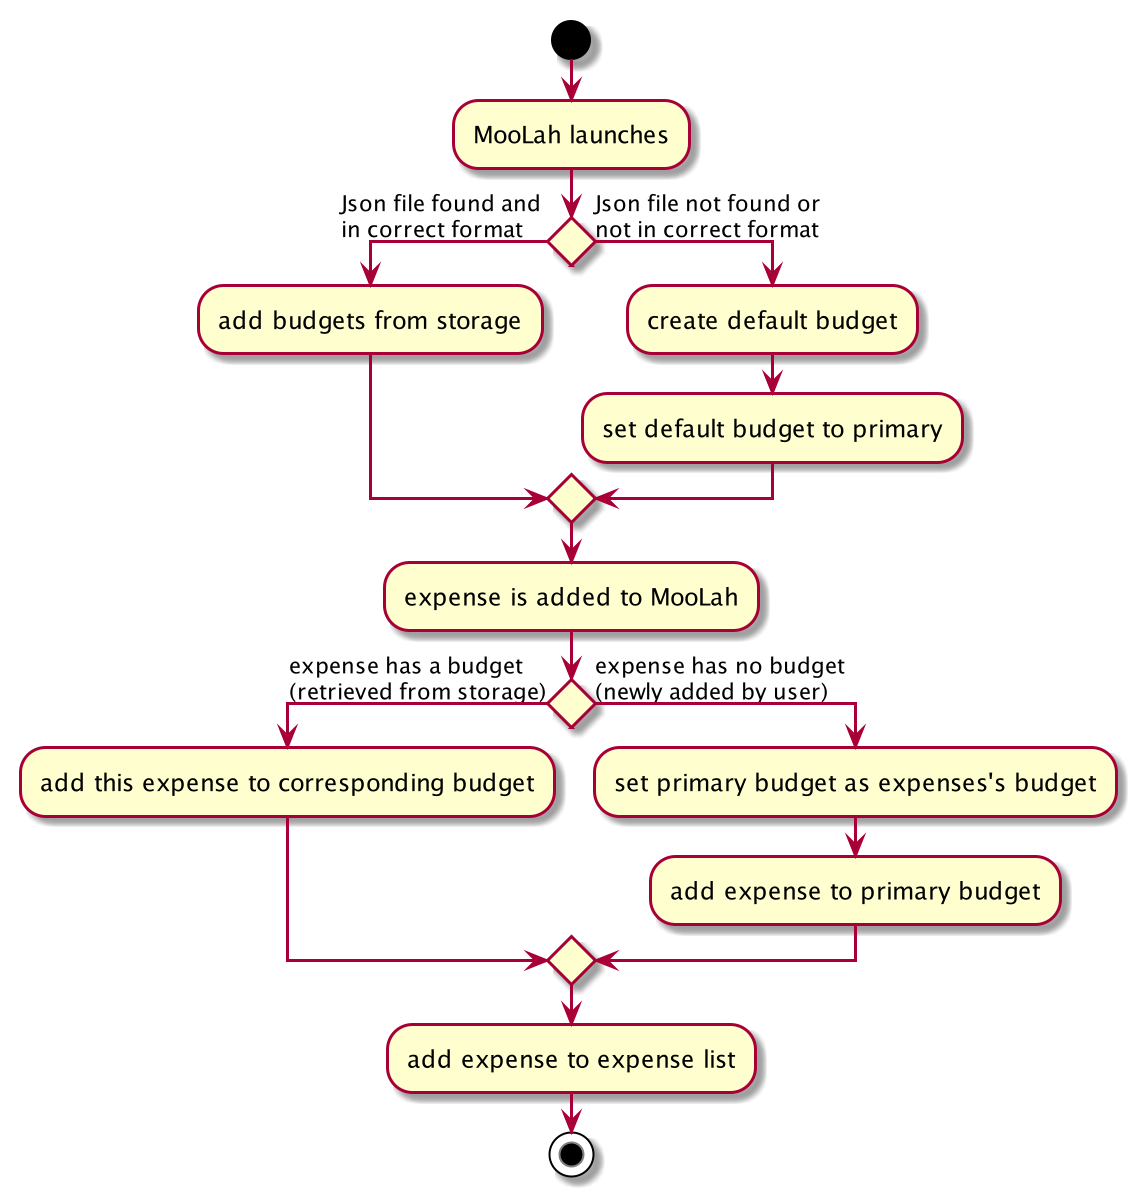
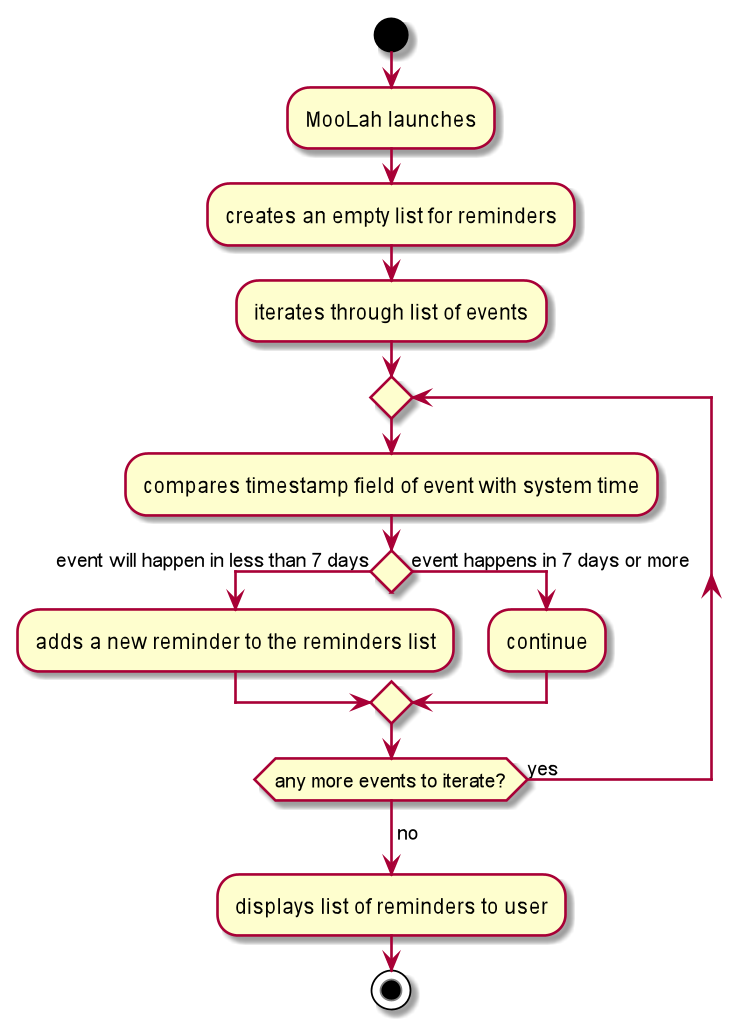
The following activity diagram summarizes what happens to budgets when the app launches and when a new expense is added:
4.3.8. Integration with Undo-Redo
Budgeting-related commands integrate well with Undo-Redo feature, by extending UndoableCommand. Undoable commands are
those modifying data in MooLah, for example, AddBudgetCommand and EditBudgetCommand. On the other hand, commands that
only result in GUI changes, such as ListBudgetsCommand, are not undoable.
A difficulty here is to make every undo (or redo) change immediately reflected on GUI. Since undo rollbacks models, this dictates that
every change must result in a new Budget object being created and replacing the old one. Otherwise, even though the
change is effective in the back end, it might not show in the front end because the Budget in two models points to
the same object. This issue is handled by Budget#deepCopy(), which is widely called from UniqueBudgetList, in every method
that modifies the existing budgets.
4.3.9. Design Considerations
Aspect: Since Budget already keeps a list of Expense, should Expense have a Budget field?
-
Alternative 1:
Expensehas aBudgetfield-
Pros: Easier to manage expenses, as budget is directly referred to by the expense.
-
Cons: Causes cyclical dependency, and reduces testability. Also, this will cause infinite loop when creating
JsonAdaptedExpenseandJsonAdaptedBudget.
-
-
Alternative 2:
Expensedoes not have any reference toBudget-
Pros: Less coupling.
-
Cons: When reconstructing MooLah from Json file, system does not know which budget to add the past expenses to.
-
-
Solution (Current implementation): Each
Expensekeeps abudgetNamefield which indicates the name of theBudgetit is tracked under. SinceUniqueBudgetListdisallows duplicate budget names, a name is sufficient to identify aBudget. Besides, sincebudgetNameis ofDescriptiontype instead ofBudgettype, it is easy to convert toString, and resolves the problem of infinite loop when creating Json files. Also, the resultingJsonAdaptedExpensein storage files will not be too long, since thebudgetNameproperty stores only the budget name instead of the fullBudgetobject.
Aspect: Can one Expense be tracked under multiple Budget? Or under no Budget at all?
-
Alternative 1: Every
Expensemust be tracked under one, and only oneBudget.-
Pros: Budgets would be a partition of all expenses, which makes generating statistics (pie charts, etc.) easier.
-
Cons: Reduces flexibility in tracking expenses - users would not be able to track expenses that fall under multiple budgets.
-
-
Alternative 2: Allow
Expensewith multipleBudget, or without anyBudget.-
Pros: Users would enjoy more flexible budgeting experience.
-
Cons: This might result in duplicate calculation of expenses and difficulty in generating pie charts, as statistics revolves around budgets.
-
-
Solution (Current implementation): Adopt Alternative 1. Every
Expensemust be tracked under one and only oneBudget. If theExpenseis added before adding anyBudget, aDefault Budgetwith a huge limit and period is created for tracking all expenses without a proper user-definedBudget. This ensures that the main screen shows a budget status bar at all times. Besides, it leads to neater statistics.
Aspect: How should JsonAdaptedBudget keep track of the budget’s expenses?
-
Alternative 1:
JsonAdaptedBudgetstores a list ofJsonAdaptedExpense-
Pros: More intuitive, improving readability of Json file. Also eases reconstruction of MooLah from storage file, since
JsonAdaptedExpensecan be easily converted to model typeExpense. -
Cons: Json file is subject to user modification. If expenses are modified such that those in general expense list differ from their counterparts in budget’s expense list, this will cause data inconsistency and introduce bugs into MooLah.
-
-
Alternative 2:
JsonAdaptedBudgetstores a list ofUniqueIdentifier-
Pros: Guards against accidental user modification of Json file.
-
Cons: More hassle when reconstructing MooLah from storage, since
JsonAdaptedBudget#toModelTypewill need to refer to MooLah’s expense list, identify those expenses by theirUniqueIdentifier, and add them to theBudget.
-
-
Solution (Current implementation): Adopt Alternative 2. Since every expense has a unique identifier, a list of
UniqueIdentifier, supplemented with a list of MooLah’s general expenses, is sufficient to correctly reconstruct those expenses tracked under this budget. The benefit of protecting MooLah from external Json modification outweighs the extra hassle in reconstructing MooLah from storage.
4.4. Events feature
4.4.1. Implementation
The Events feature allows users to add events that are supposed to occur on a future date.
On launch, MooLah will remind users of upcoming events. While the app is open, MooLah will also notify the user about any events that have transpired, and allow them to automatically add these events as expenses.
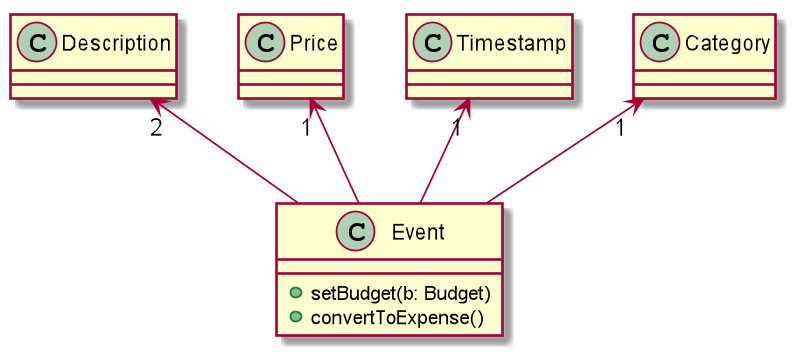
Like expenses, events hold two Descriptions (one for its details and one for the budget it belongs to), a Price, a Timestamp
and a Category. The setBudget method of Event is used for the Event to remember which budget it was added to. This facilitates
the potential conversion of the Event into an Expense through the convertToExpense method. This method is called when the user
accepts the automated addition of an expense from the corresponding event, into the budget that the event was added into a while back.
Since Event’s fields are a subset of that of Expense, all its fields are passed into the Expense constructor during the conversion, and a
unique identifier is then generated to complete the creation of the expense, allowing it to be added to MooLah.
The Events feature supports the addevent, deleteevent, editevent and listevent command words.
As mentioned earlier, MooLah displays reminders of upcoming events during launch. The implementation is shown below:
To allow for precise timekeeping of expenses and events as well as accurate prompting of transpired events, MooLah tracks system time every 0.05 seconds using a Timer running
on a parallel thread. Using another Timer, MooLah then checks for transpired events every 2 seconds; an event is then deemed to have transpired if its timestamp has gone past system time.
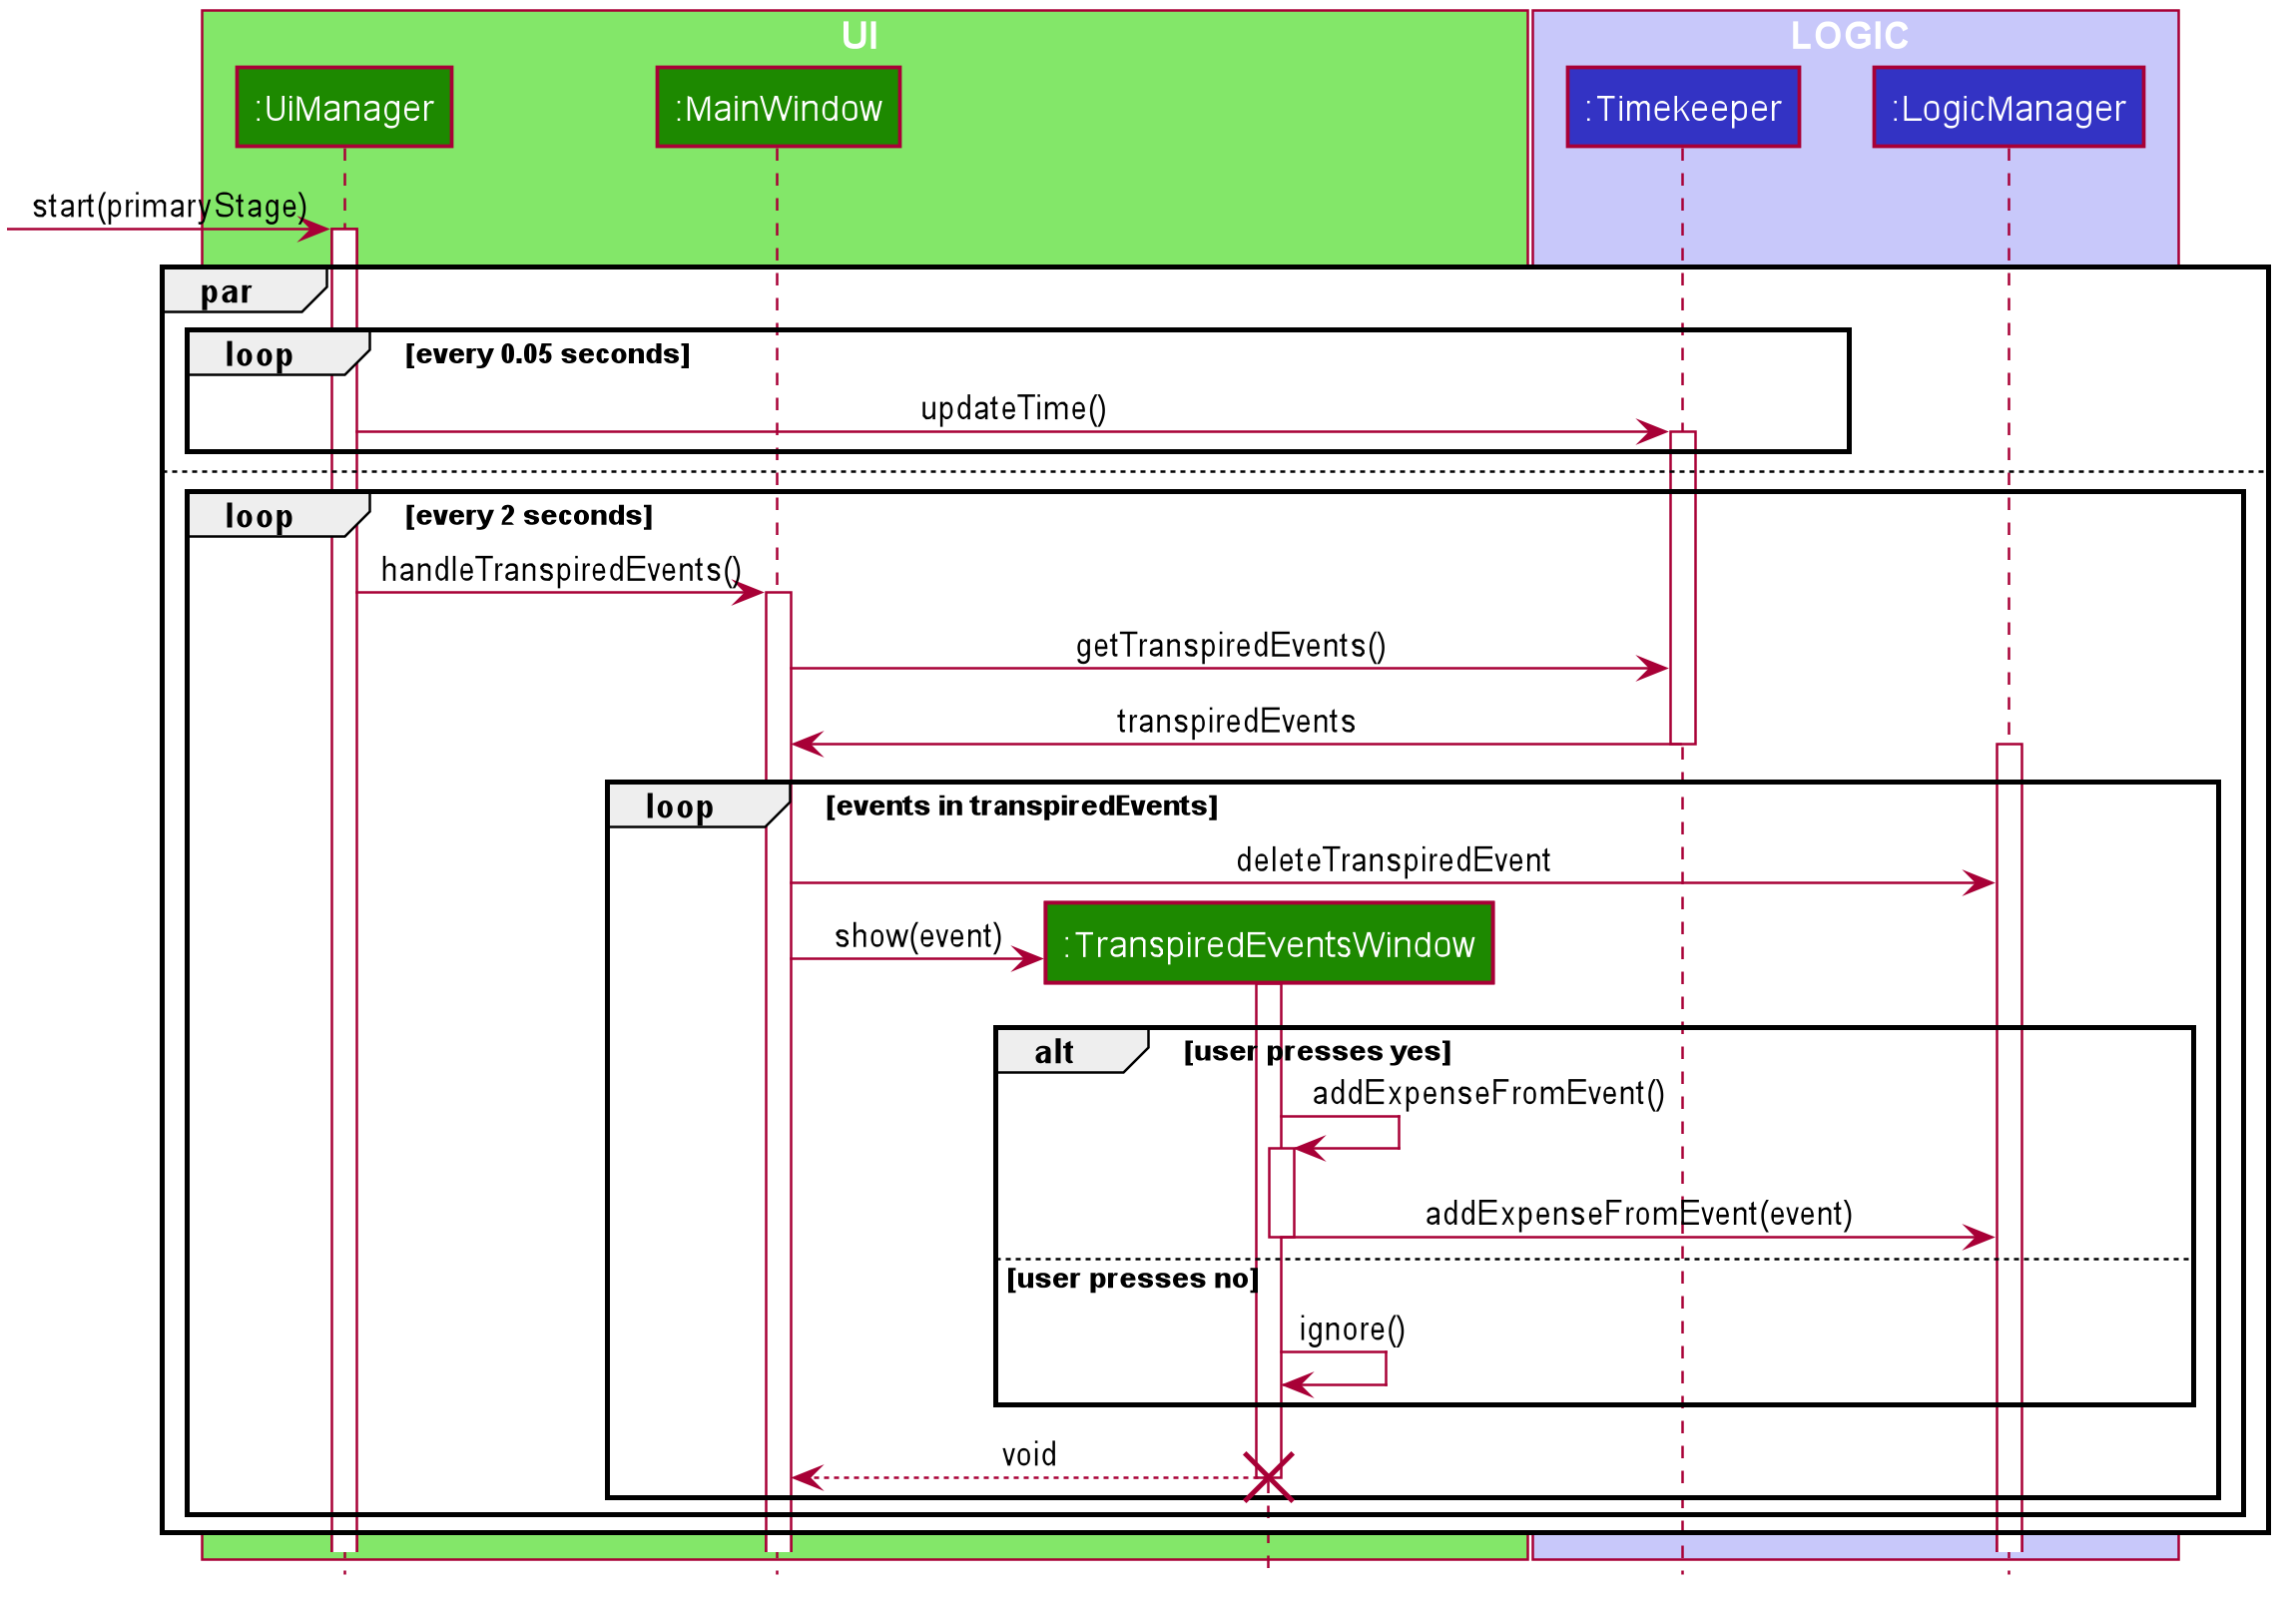
The following sequence diagram shows how MooLah handles transpired events:
-
When MooLah launches, the
startmethod ofUiManageris called. Every 0.05 seconds,UiManagercallsupdateTimeof Timekeeper to update system time. Concurrently,UiManageralso calls thehandleTranspiredEventsofMainWindowevery 2 seconds, which fetches all transpired events and notifies the user about them. It does so by first obtaining the transpired events from theTimekeeperclass. -
Once the transpired events have been obtained, for each transpired event, a new
TranspiredEventWindowwill be constructed. The transpired event is deleted from the model and will then be passed viashow, a method of the newly constructedTranspiredEventWindow.showwill create a popup window that details the transpired event, and asks the user whether it should be added as an expense. This popup window will have a 'Yes' and 'No' button. -
If the user presses the 'Yes' button, the event is passed to the
addExpenseFromEventmethod ofLogicManager, where it is then converted into its corresponding expense, and a command to add the expense is run. -
If the user presses the 'No' button, the expense is not added.
-
After pressing either button, the popup window closes.
4.4.2. Design Considerations
Aspect: What command words should the Events feature use?
-
Alternative 1:
addevent,deleteevent, etc.-
Pros: Makes it clear to the user that events are separate from expenses
-
Cons: Somewhat clunky and redundant, especially since expenses and events share the same fields
-
-
Alternative 2:
add,delete, etc. (i.e. same command words as adding expenses)-
Pros: More streamlined, makes use of the fact that expenses and events share the same fields
-
Cons: The distinction between events and expenses is more blurry to the user
-
-
Solution (Current Implementation): Adopt Alternative 1. Although Alternative 2 is more intuitive, it is not suited to our current implementation of generic command words. Since command words such as
addanddeletenow result in different commands based on which panel the user is on, MooLah’s parser would not know whether users want to add an event or expense if they typeaddwhile on an event or expense panel. This necessitates the splitting of expense and event commands into two separate command words.
Future Implementation (Coming in v2.0)
Users can set their expenses to recur. Recurring expenses will generate events daily/weekly/monthly (based on the user’s decision) that can then be added as expenses when their due dates are reached.
4.5. Statistics Feature
4.5.1. Implementation
The statistics feature allows users to have an alternative view for the entries in MooLah.
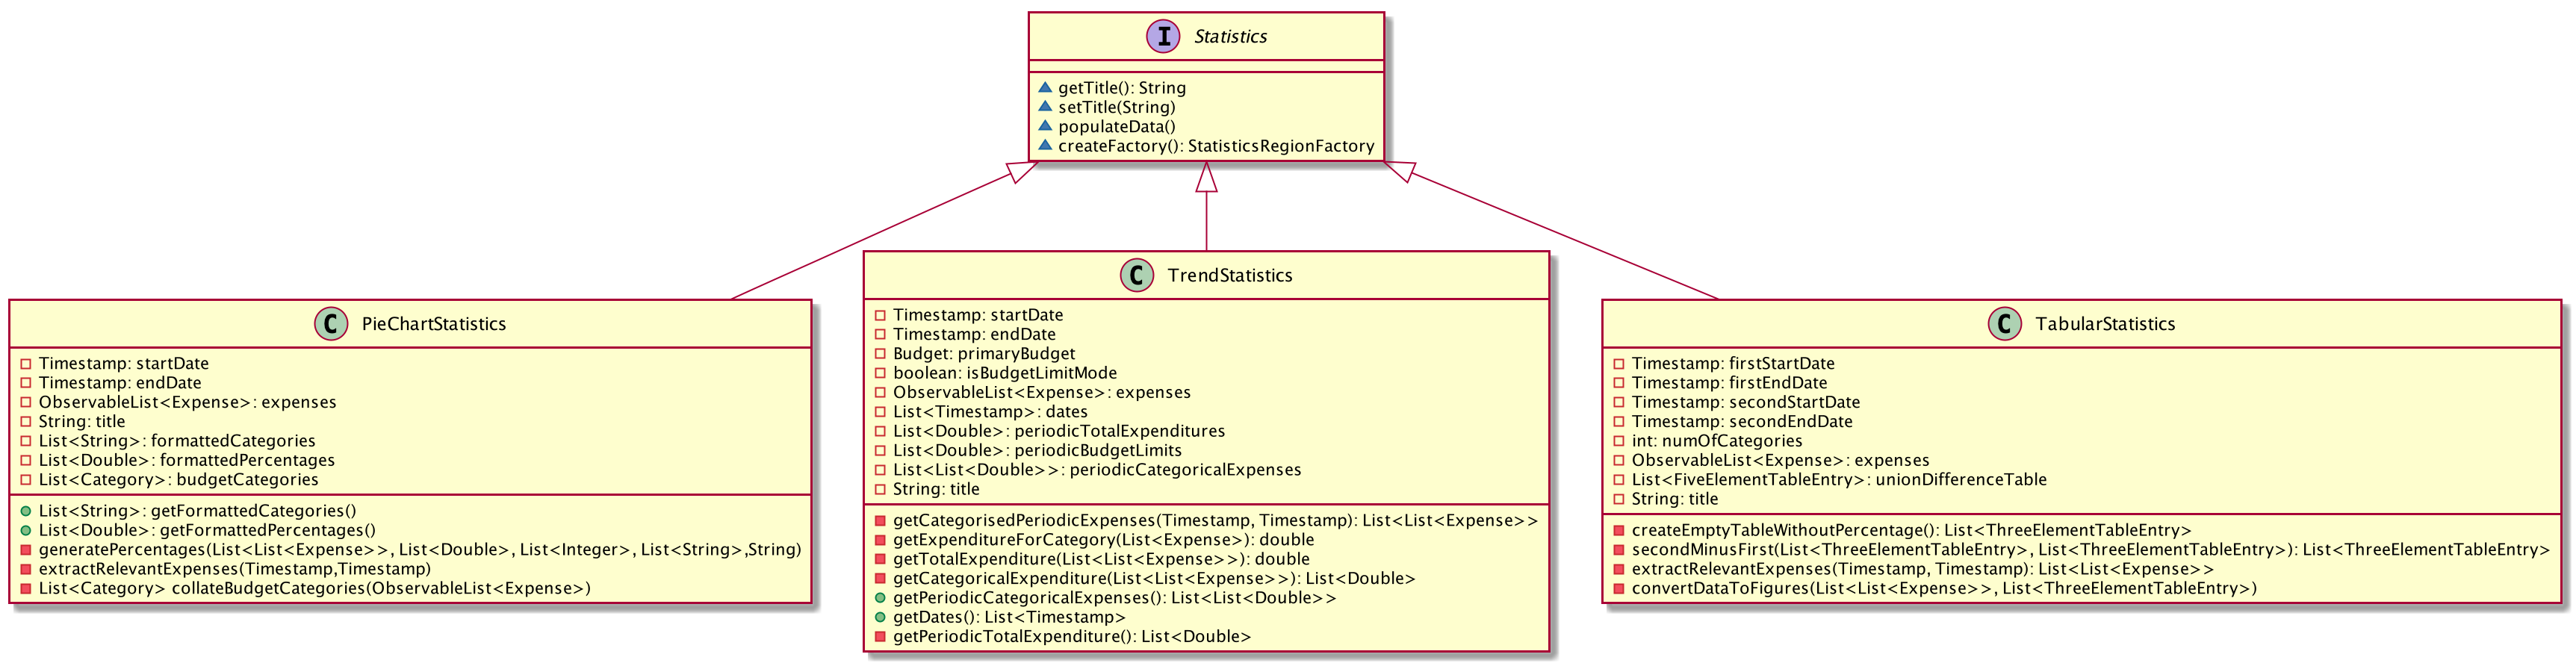
It is facilitated by the Statistics interface, which is part of the model package, and is implemented by 3 classes
PieChartStatistics, TabularStatistics and TrendStatistics. Each of the implementing classes will be invoked when
their respective parsers detect its corresponding command word, which is statsbasic, statscompare and statstrend.
The prefix configurations vary greatly between them as well as the visual representation they create.
Given below is a class diagram to summarise the relationship between Statistics and its implementing classes.
The main entries that Statistics interacts with are Expense class and the Budget class. The entire statistics features only
supports the generating of statistics from only the current budget and responds to the different methods called by
the current Budget object. Every successful interaction will force a switch to the Statistics Panel, where each of
their different visual representations will be generated.
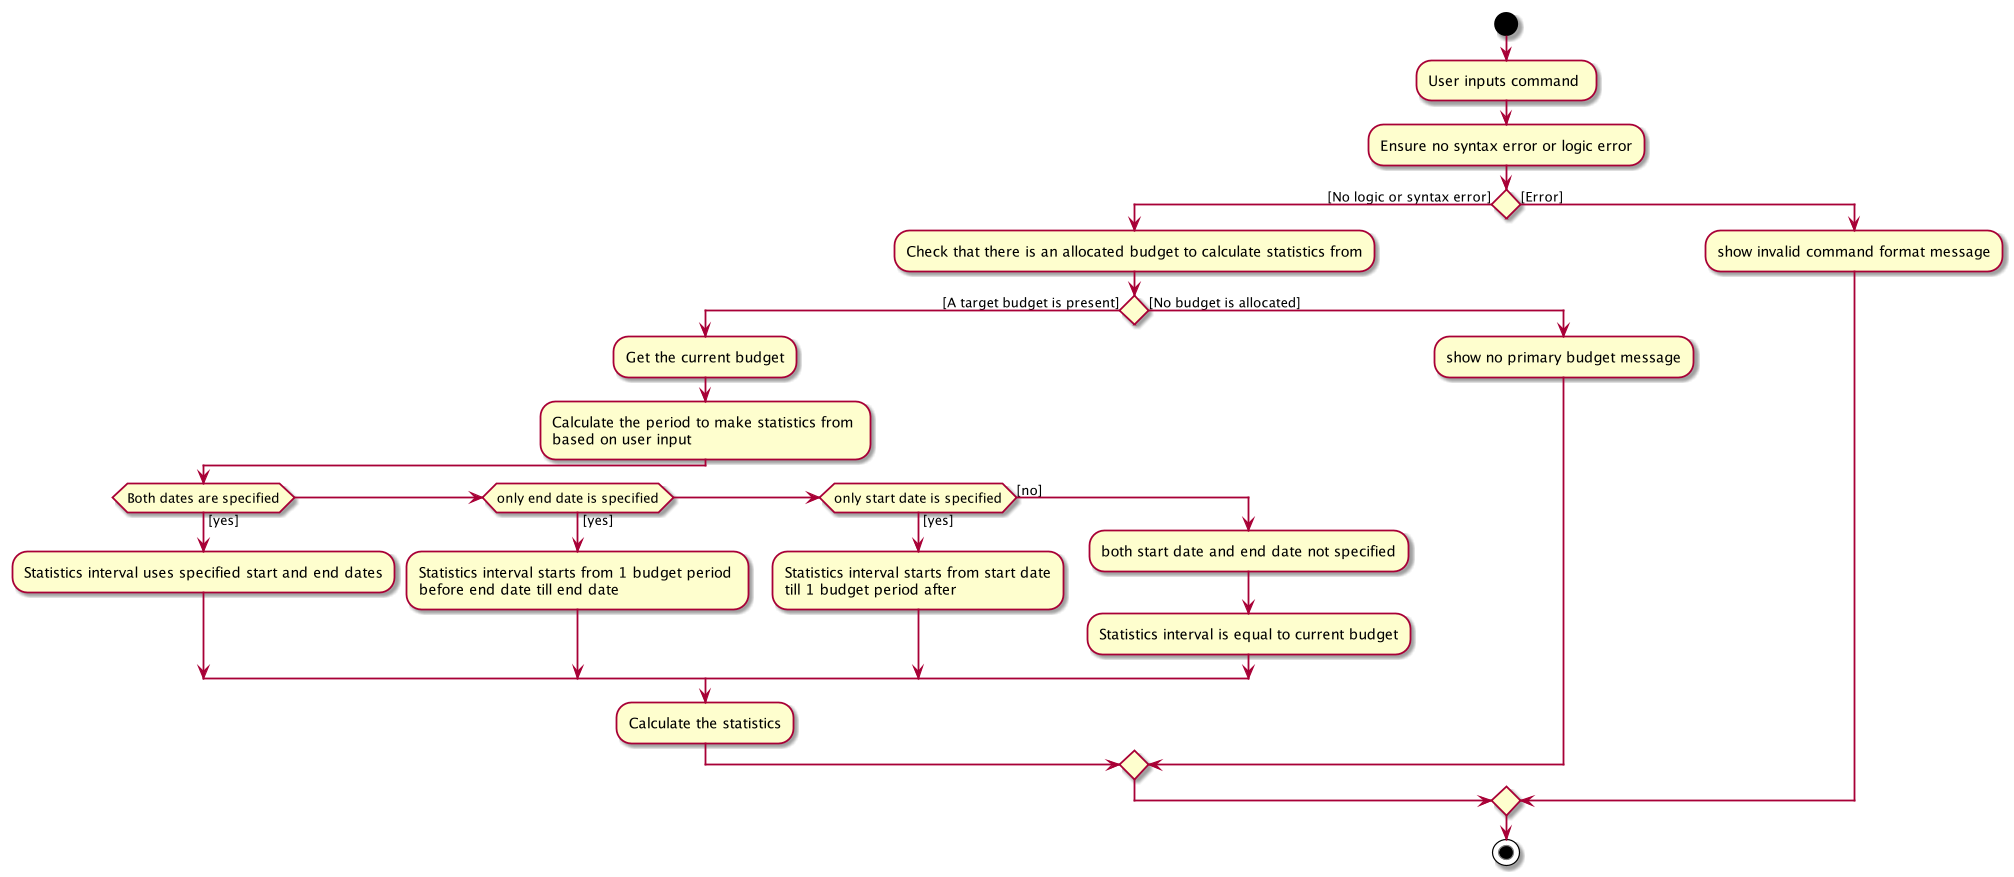
The following activity diagram summarizes how statistics are shown from a current budget after possible user inputs to modify the attributes of the budget.
In the following sections, the implementation details of one of the more complicated command words will be discussed, as well as its design considerations.
4.5.2. statsbasic
The purpose of the statsbasic command word is to request MooLah to visualise the total expenditure across
expenses of different categories as a percentage of the total expenditure of all expenses tracked under the budget
where the command is called. The visual representation used here will be a PieChart.
Given below is an example usage scenario and how the statsbasic command word is handled by MooLah.
Step 1. The user enters the command statsbasic sd/01-10-2019 ed/01-11-2019 to visualise the total percentage of each category
as a percentage of total expenditure across all categories, in the primary budget.
The command is received by MooLahParser, which then creates a StatsCommandParser object,
to subsequently help to parse the input by the user.
Step 2. The newly created StatsCommandParser calls parse("stats sd/01-10-2019 ed/01-11-2019"),
which in turns calls ArgumentTokenizer#tokenize("sd/01-10-2019 ed/01-11-2019", PREFIX_START_DATE, PREFIX_END_DATE) to
split the arguments into its preamble(the start date and end date). This returns an ArgumentMultimap object, argMultimap containing the split input.
Step 3. The StatsCommandParser object creates a StatsDescriptor object desc to hold the start date and end date that was specified by the user.
Depending on the presence of start date and end date, desc will be filled in differently.
If the start date and end date is both specified by the user, the end date will be checked to not be before the start date.
If the end date happens to be before the start date, a ParseException will be thrown
Step 4. The filled desc will be returned to the LogicManager where a new StatsCommand object, statsCommand will be created with desc
Step 5. The LogicManager calls StatsCommand#run(), where the StatsCommand will be validated before getting executed.
Step 6. During execution, StatsCommand calls ModelManager#getPrimaryBudget() to retrieve the primary budget to calculate statistics from.
After which, StatsCommand will call createPieChartStatistics, which takes in desc and the primary budget.
Step 7. To construct the time interval required for statistics, information from desc is being processed.
If there are unspecified inputs inside desc, the time interval will be constructed with some information from the primary budget.
Step 8. The PieChartStatistics object will be created with the constructed interval as well as the expenses the primary budget tracks.
After which, StatsCommand will call the PieChartStatistics implementation of populateData() to fill up its other fields
Step 9. StatsCommand calls ModelManager#setStatistics(statistics) which updates the Statistics attribute in ModelManager.
Step 10. A CommandResult is then created and returned to LogicManager, which will then force a switch
to the Statistics Panel where a Pie Chart will be generated.
The following sequence diagram shows how the statsbasic operation works:

Figure 1. Sequence Diagram for executing a StatsCommand
Figure 2. below illustrates the details from Steps 2 to 4.
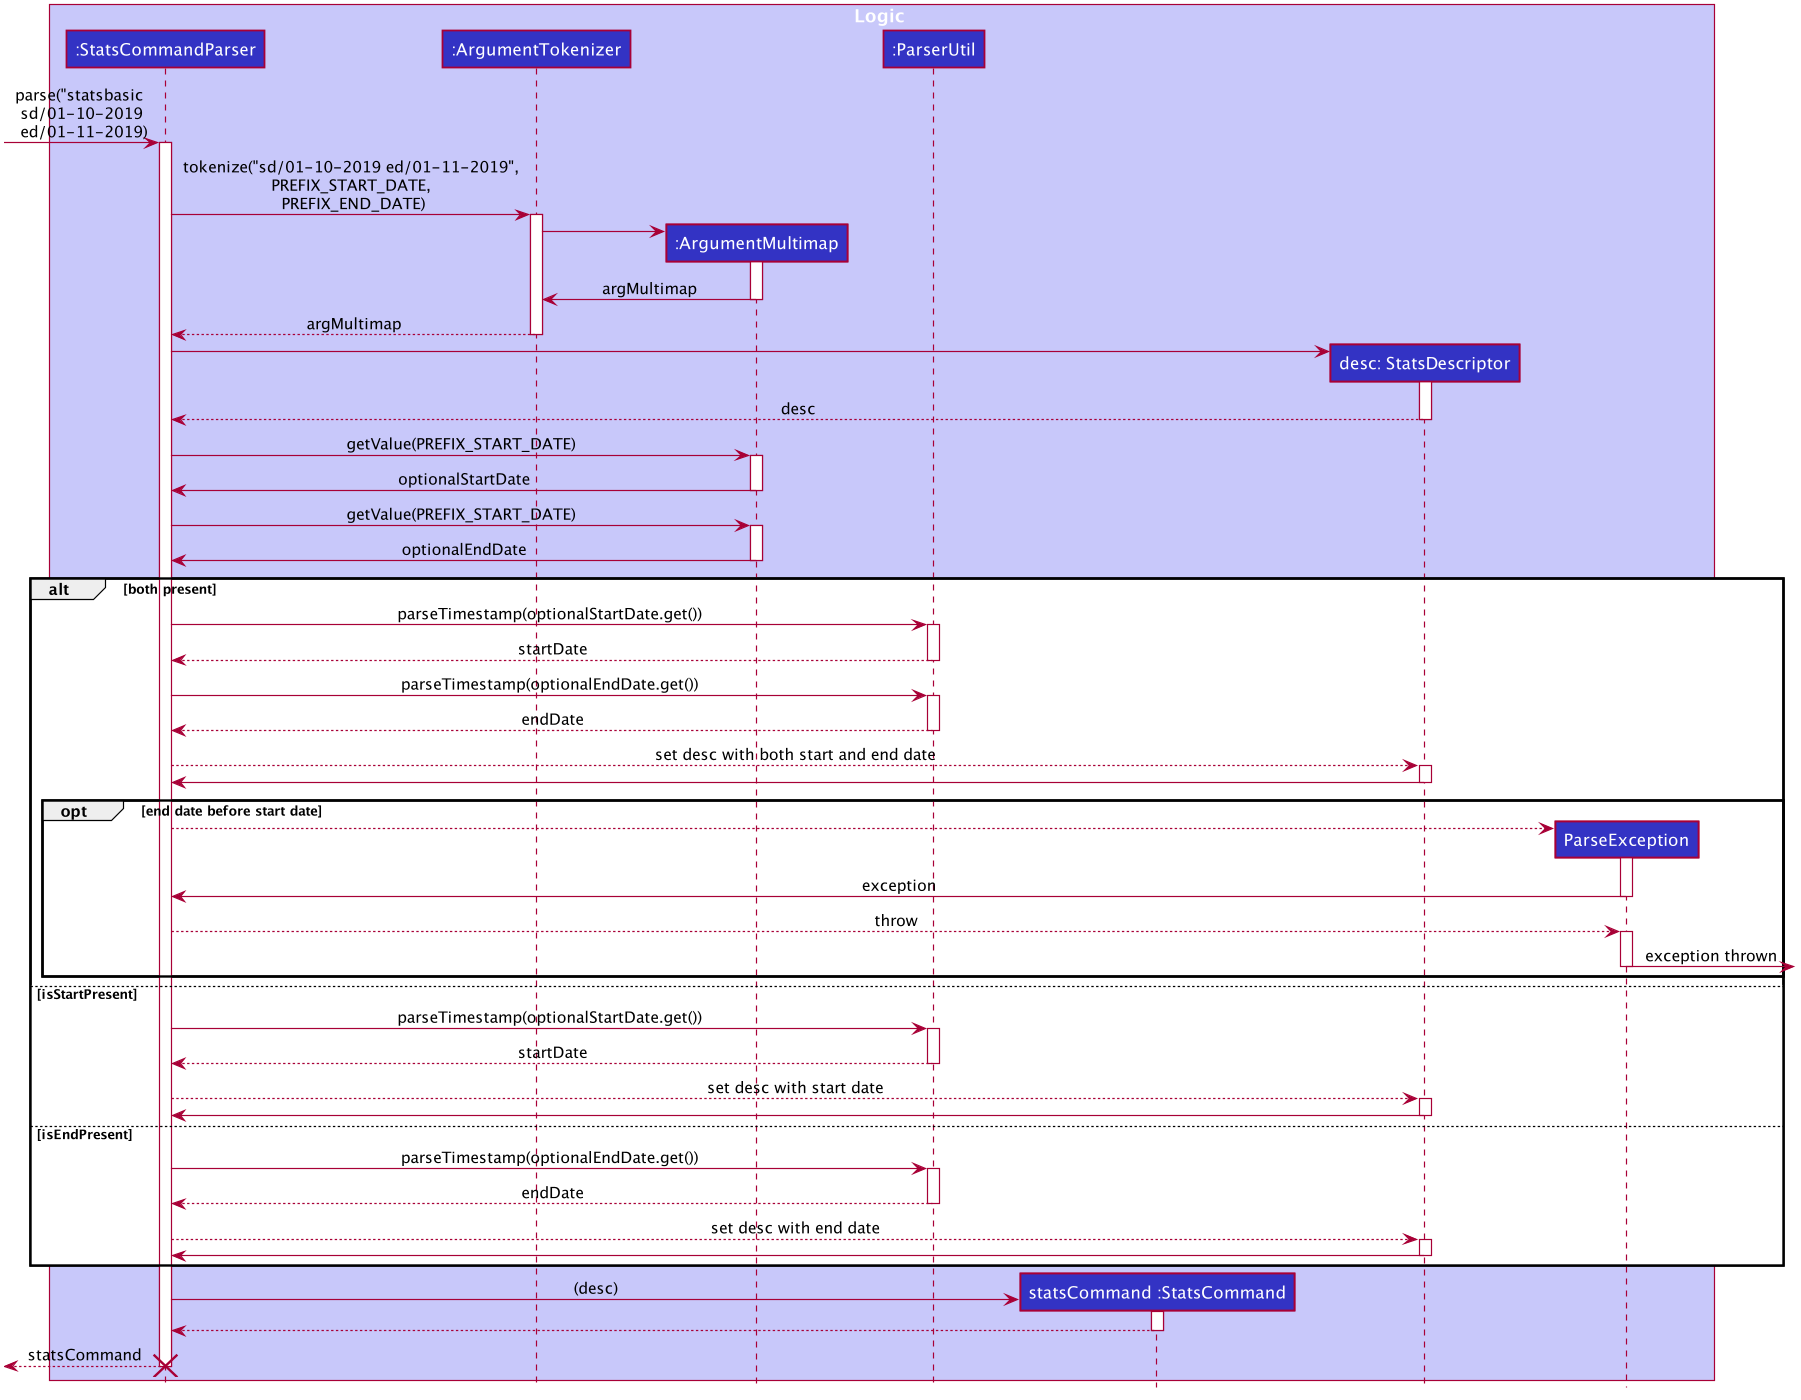
Figure 2. Reference Diagram for creating a StatsCommand
Figure 3. below illustrates the details from Steps 6 to 9.
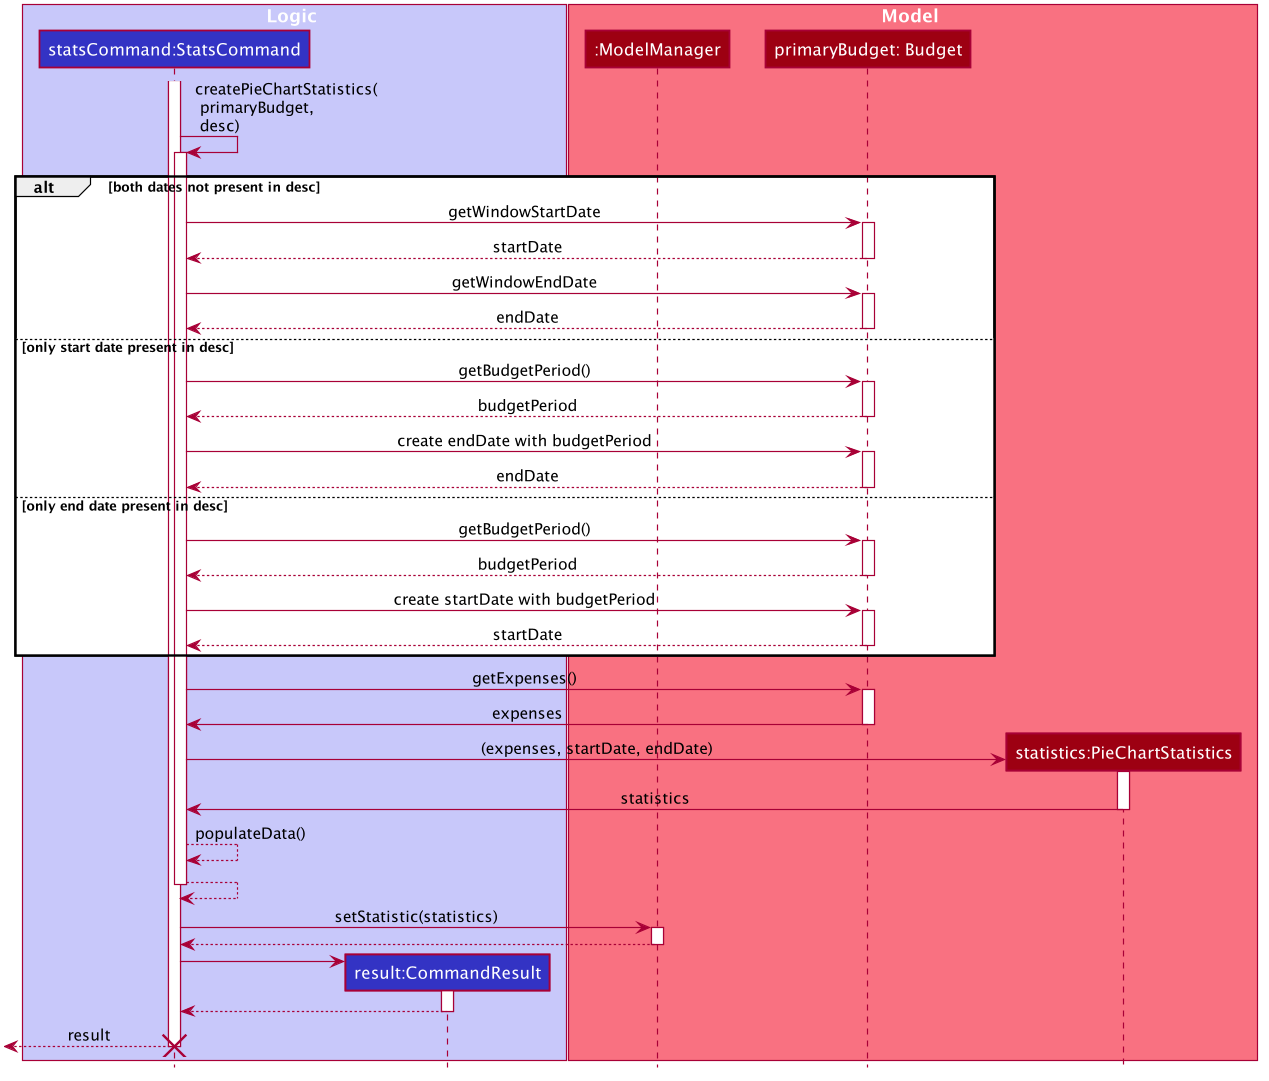
Figure 3. Reference Diagram for creating a StatsCommand
4.5.3. Design Considerations
When designing the interaction of the command word statsbasic, decisions have to be made on the most
suitable visual representation for statsbasic particular use case.
-
Alternative 1: Table view
-
Pros: Sequential view, can capture number of entries
-
Cons: May be a duplicate of the
ListExpensecommand, just grouping expenses via categories
-
-
Alternative 2: Pie chart
-
Pros: Offers a visual view of size to represent the expenditure under each category
-
Cons: Loses the elements of number of entries in each category
-
-
Solution (Current Implementation): Adopts Alternative 2. It is important that every aspect of the user experience gets covered, and what
MooLahbefore the inclusion ofStatisticsis the appreciation of percentage expenditure in each category of expenses. Expenses can already be observed in its chronological order usingListExpensewhile individual view of expenses under a category can be accessed usingFindExpense. Offering a visual view on expenditure under each category complements with the existing implementation of sequential view in the primary budget.
Future Implementation (Coming in v2.0)
For each of the command words, users will be given the option to choose a Visual Representation method they prefer
if the use case allows for it, instead of the default option we have prioritised.
Currently, statistics under statsbasic mode can only be displayed in a pie chart,
and users may have different preferences for formats. The current implementation for MooLah
is such that only expenses up to the current date will be included and any expenses after the current date
is considered an event, which is not tracked by statistics. The inclusion of events in statistics
can be a possible complementary feature to a prediction feature to pre-empt users about their incoming expenses.
Last of all, more modes can be added to all existing commands, such as comparing with periods across different budgets
other than being restricted within the same budget
4.6. Alias feature
The Alias feature allows users to assign inputs they may use very often to a shortcut, and execute the input by entering
the shortcut, (a.k.a Alias), in place of the full or partial command.
4.6.1. Implementation
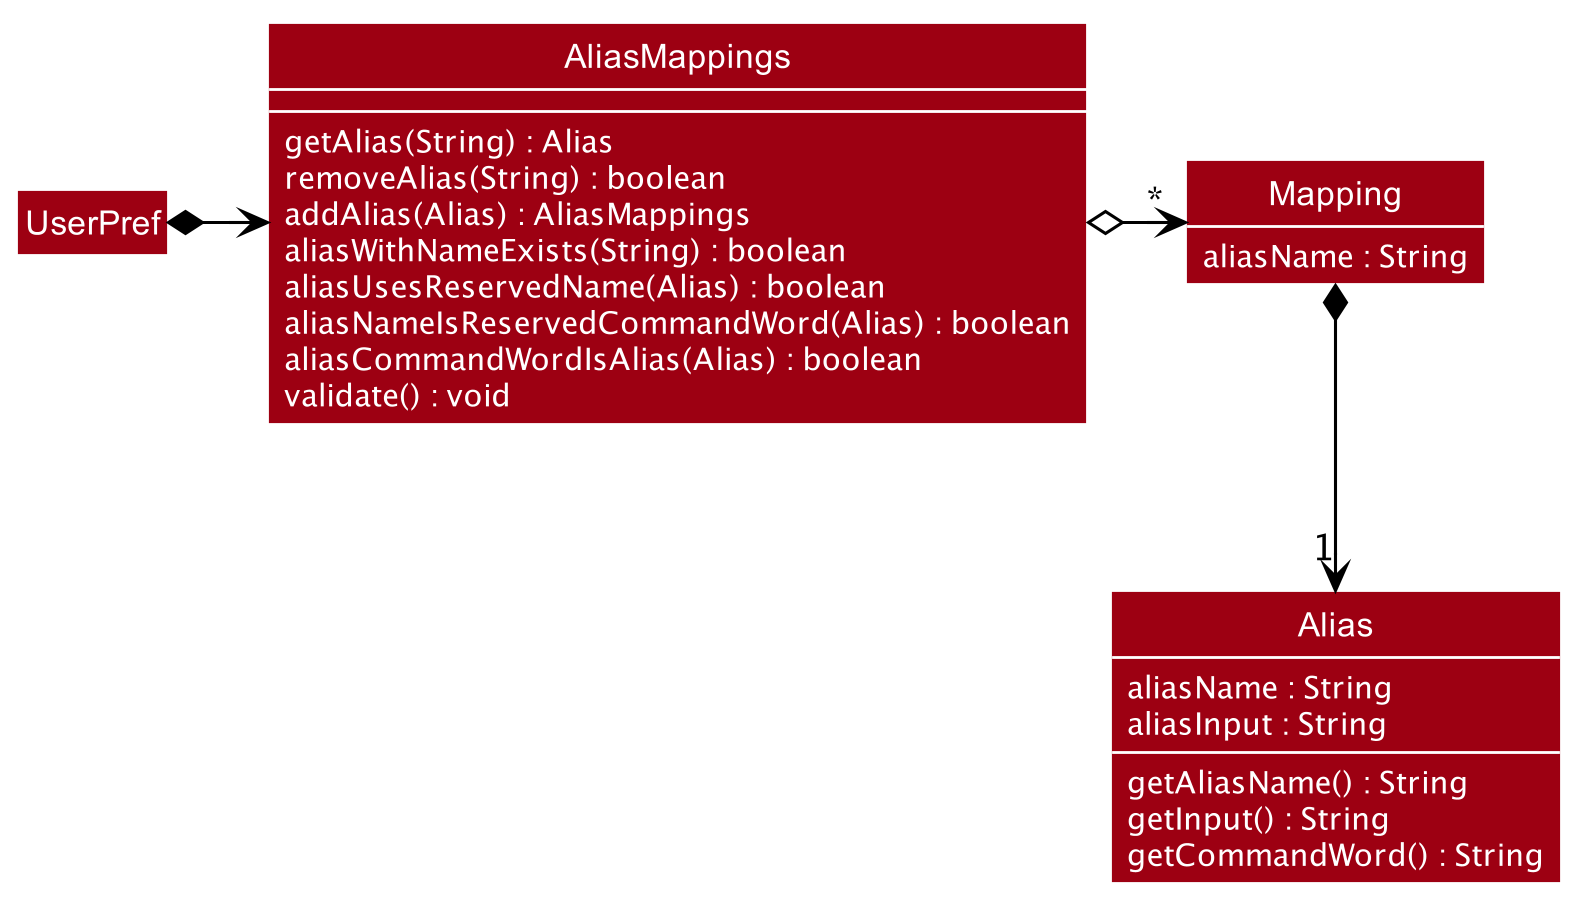
These user defined Aliases are saved in an AliasMappings object within UserPref as seen in the above diagram.
Internally, the AliasMappings object stores an Alias in a Map<Strings, Alias> object. With the addition of AliasMappings object to UserPref,
UserPref supports these additional operations:
-
UserPref#addUserAlias(Alias)— Saves a specifiedAliasto the user preferences for future use. -
UserPref#hasAlias(String)— Query if the there is anAliaswith this name already defined. -
UserPref#getAlias(String)— To get anAliaswith this name if it exists. -
UserPref#aliasNameIsReservedCommandWord(Alias)— To query if thisAliasis uses a name which clashes with existing built-in commands. -
UserPref#aliasCommandWordIsAlias(Alias)— To query if thisAliasinputbegins with anotherAlias, this is used to validate that anAliaswill not cause an infinite loop by chaining multiple aliases in a loop. -
UserPref#getAliasMappings()— To access theAliassaved by the user. -
UserPref#setAliasMappings(AliasMappings mappings)— To overwrite all theAliassaved by the user.
Alias creation
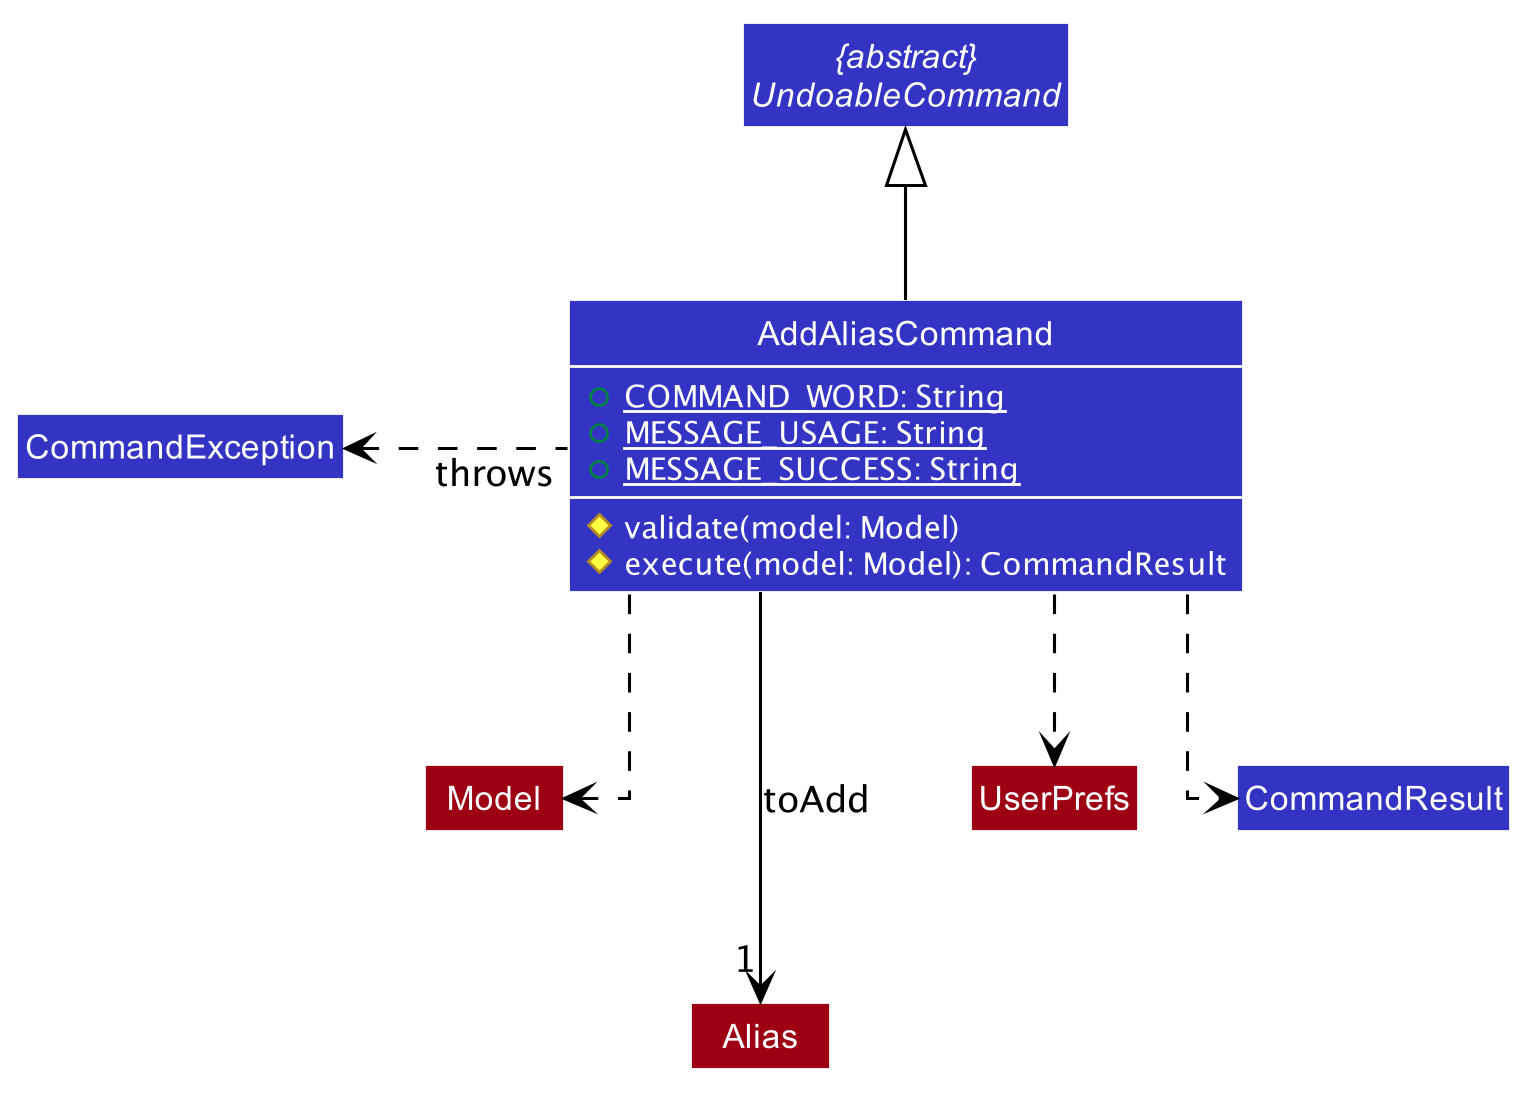
In order for the user to save an Alias, they first define it using the AddAliasCommand. The AddAliasCommand command extends
UndoableCommand to allow users to undo defining an Alias. The following sequence diagram describe in more detail how an Alias
is added.
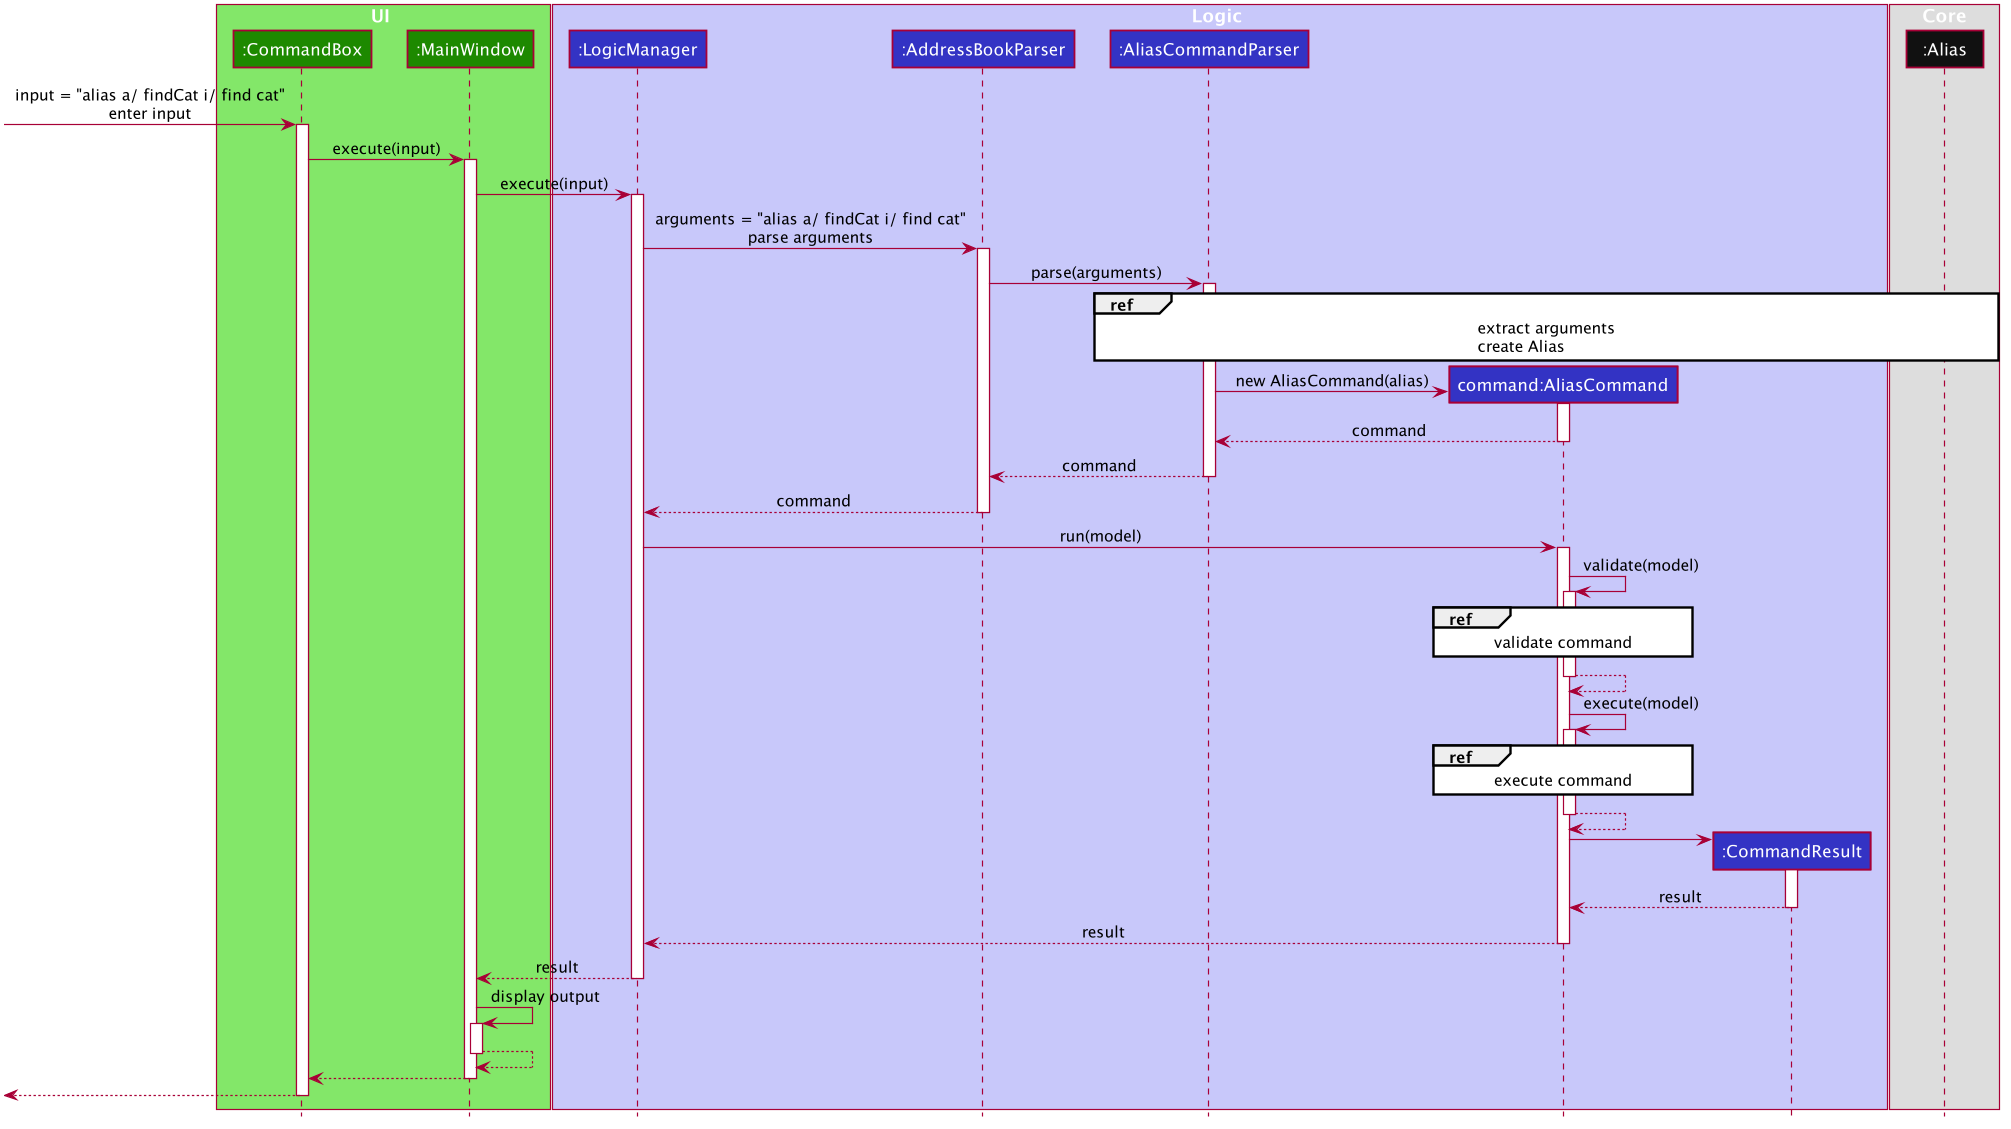
-
The user enters a command with the following syntax
addalias a/ <name> i/ <input>. -
The
UIpasses this command string to theLogicManagerwhich passes it onto theMooLahParser. -
The parser extracts the argument string and passes it to an
AliasCommandParser.
ref : extract arguments create alias
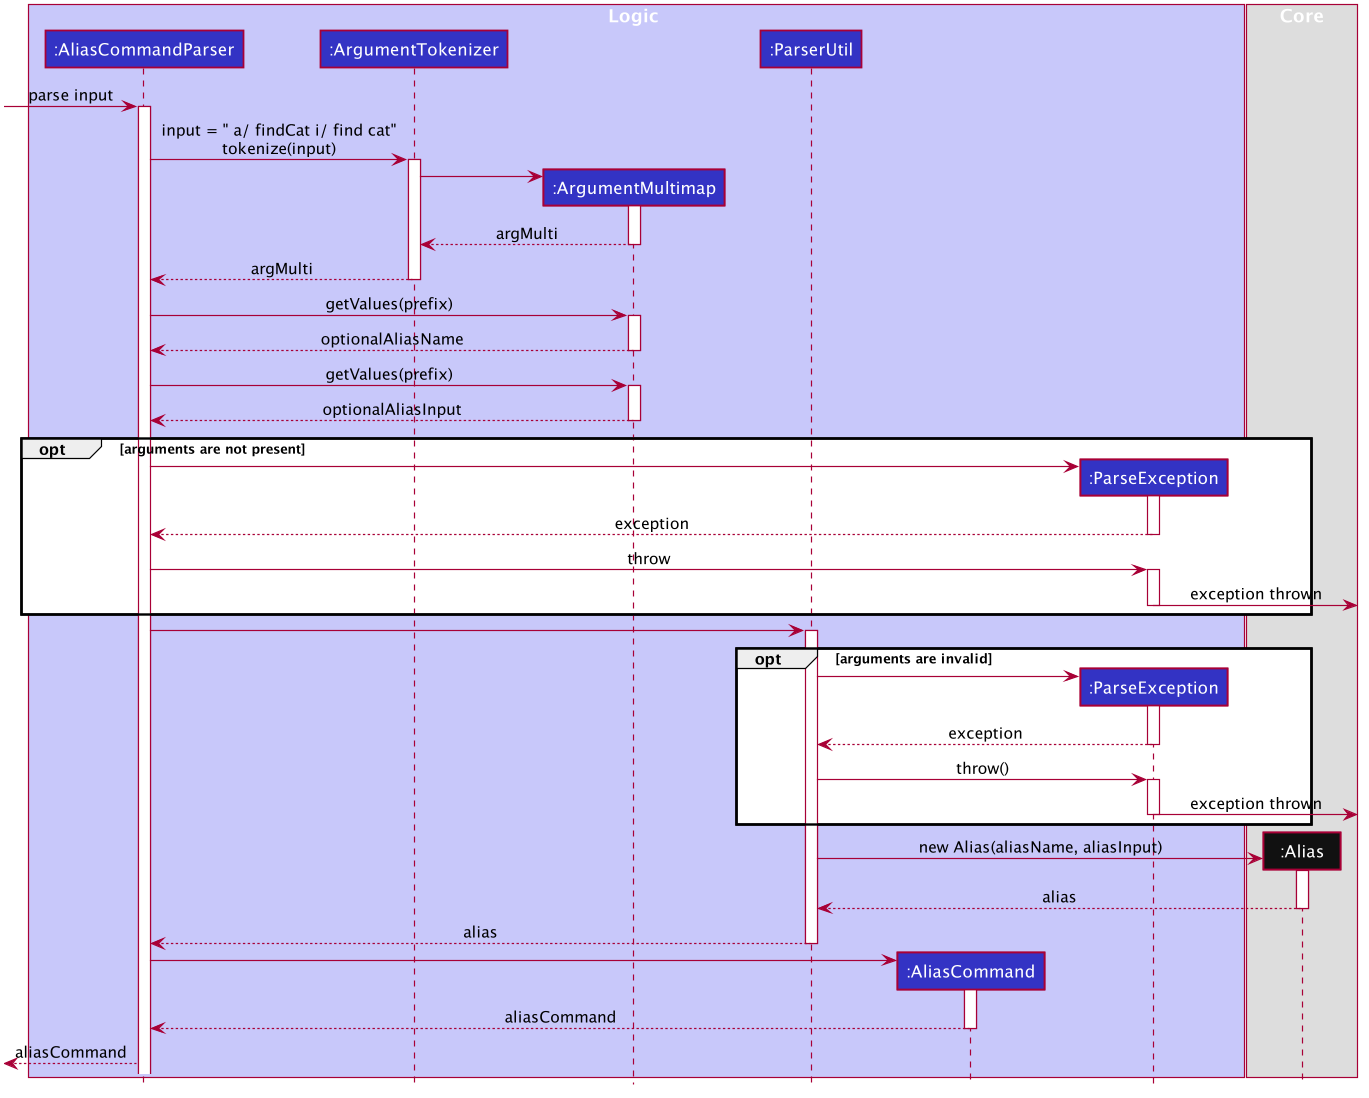
-
The
AliasCommandParseruses theArgumentTokenizerto tokenize the argument string and extract thealias nameandinputfields into anArgumentMultimap. -
The arguments are obtained and to create a new
Aliasusing the theAliasparser inParserUtil. -
An
AddAliasCommandis created containing this newAliasto add to theUserPref. -
This is passed back to the
LogicManagerto callAddAliasCommand#run().
ref: validate command
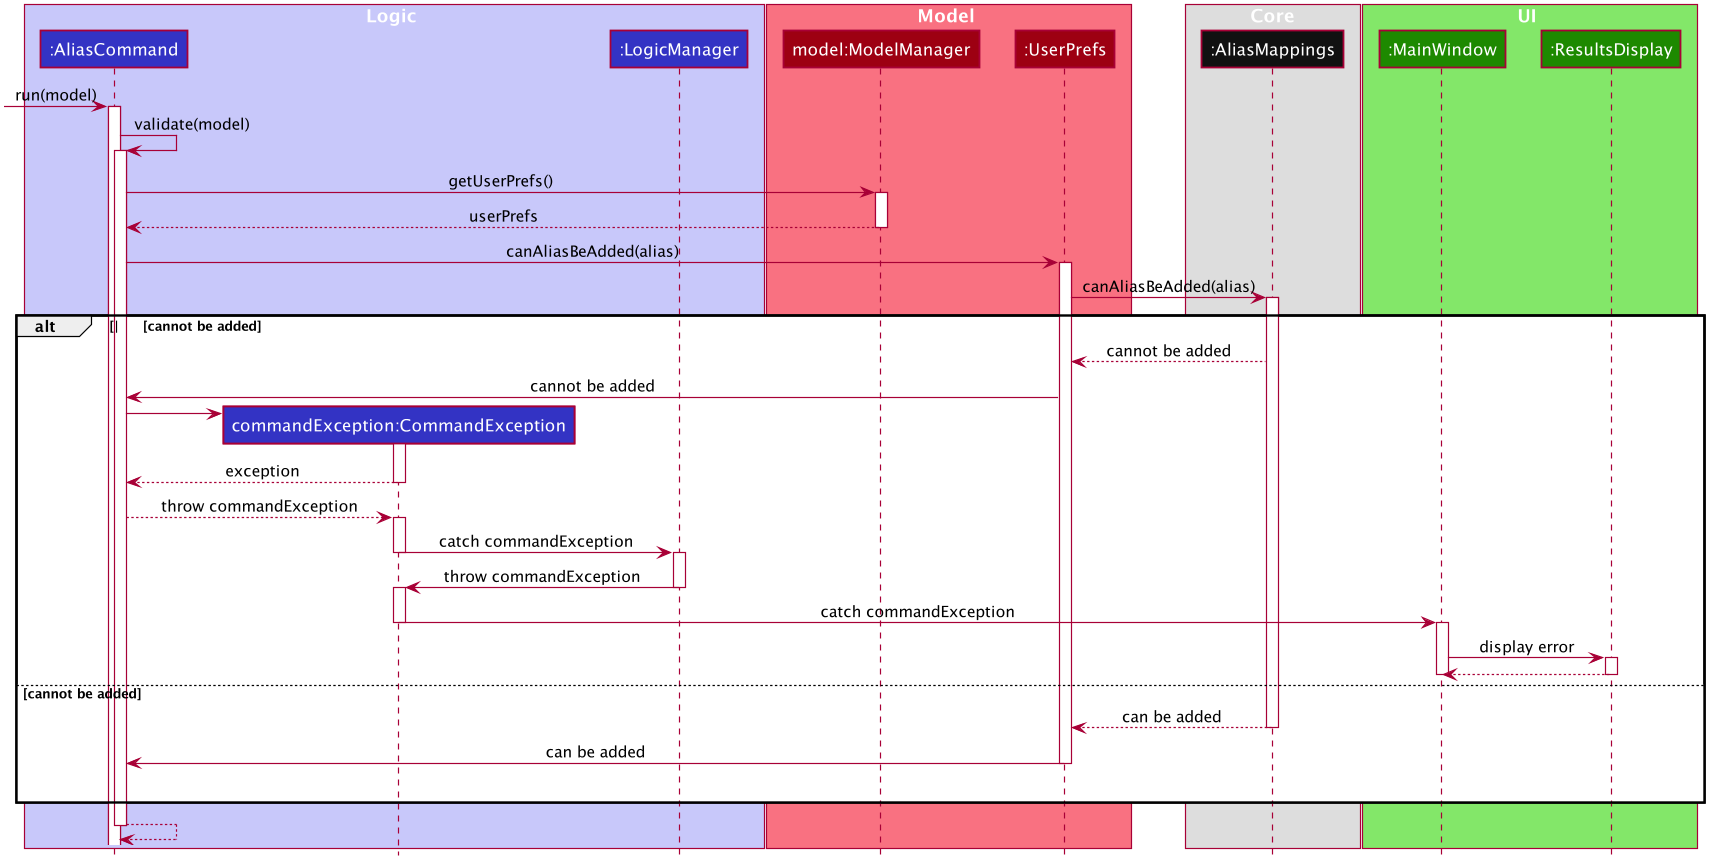
-
The
AddAliasCommandis validated usingAddAliasCommand#validate(). TheAliasis checked to ensure it does not-
a. Have a clashing name used by an existing
Commandas a CommandWord. -
b. Have an input beginning with a supported
Alias.
-
-
If it is not valid, an exception is thrown.
ref: execute command

-
If it was validated that the
Aliascan be added. -
The
Aliasis then added to theAliasMappingsobject withinUserPref. -
The
Aliasis now usable by the user.
Usage of aliases in input
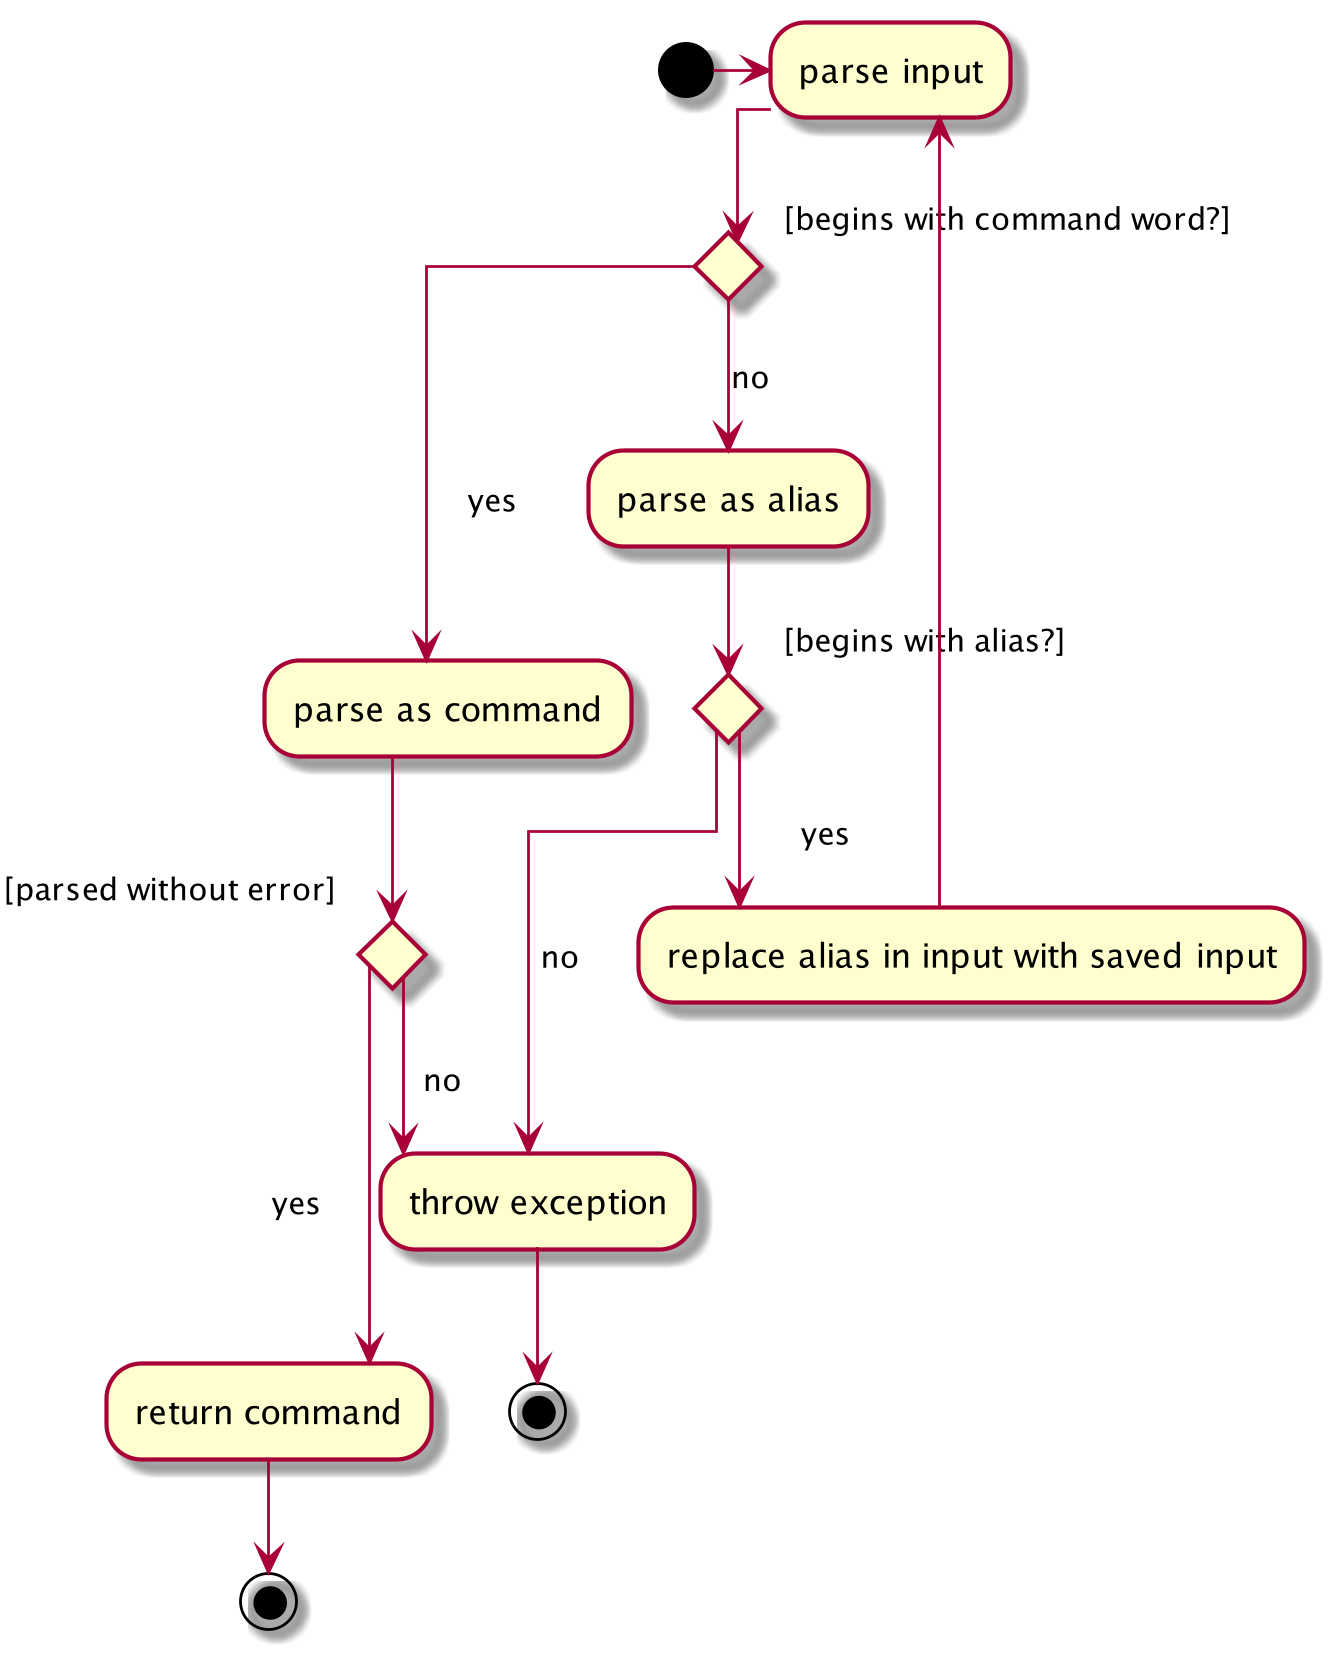
When a user enters an input to be executed, the MooLahParser will do the following:
-
Attemps to parse the
inputas an input which begins with a validCommandWord -
If that fails, it will try to parse it as an input which begins with an
Alias.-
If it successfully does so, it replaces the alias in the original
inputwith theinputstored in theAlias. -
Finally, the
MooLahParserre-parses the modifiedinput.
-
-
If this too fails, an exception is thrown indicating that the command was invalid
4.6.2. Design Considerations
Potential Recursive aliases
As users may modify the data files of MooLah, they may modify the aliases directly. As such it was necessary to validate that the modified aliases will not cause infinite recursion. This is done by traversing between aliases which chain to each other and ensuring that none of them lead back to themselves. Otherwise, if it is detected that an alias can loop to itself, the alias data is reset.
Aspect: Why can an Alias only be used at the beginning of an input versus anywhere within an input.
-
Alternative 1(Chosen): Beginning only
-
Pros: Easier to determine which word is the shortcut.
-
Pros: Easier to detect recursion due to alias chaining.
-
Cons: Less flexible in term how the shortcut can be used i.e. it can only replace or prefix an input.
-
-
Alternative 2: Anywhere in input
-
Pros: A wider variety of shortcuts can be defined by the user
e.g.addexpense deckChicken 2.50, wheredeckChickenmaps tod/ chicken rice c/ food p/. -
Cons: Harder to detect recursion due to alias chaining.
-
Cons: Parsing becomes more complicated and alias words become unusable in other contexts. e.g. defining an
Aliasmappingbustosbs busprevents an input such assmrt busfrom being parsed properly as it would be replaced withsmrt sbs busby the parser.
-
-
Solution (Current Implementation): The biggest factor in choosing
Alternative 1is to make it easier to prevent possible recusion due to alias chaining, which would potentially be a fatal bug in the application. Additionally, while it may be possible to determine which one the user means judging by the context in which it was used. However, that is far out of the scope of the module and would require much more processing of user input.
Another alternative would have been to have an alias name follow the following convention 'aliasName' (i.e. some character before and after)
clear what is an Alias within an input.
The purpose behind this feature was to make CLI input less troublesome, so users do not need to type in the full input string to carry out commands they may use frequently.
In v2.0 we want to look into using data analysis track users' input habits in order to make suggestions on possible shortcuts or Aliases they may find convenient to have.
Aspect: Data structure to store Aliases.
-
Alternative 1: List
-
Pros: Less space needed to store same amount of data
-
Cons: Takes time to loop through the list to get the right output.
-
-
Alternative 2(Chosen): Map
-
Pros: Simple to access
-
Cons: More space needed.
-
-
Solution (Current Implementation): As the user can define multiple aliases, it was important for the internal structure of
AliasMappingsto allow accessing the aliases by name.
If an ArrayList was used, the numbering each alias would change if new ones were added and old one removed or replaced. Map was used to prevent this problem as the name is used as the index. This avoids the need to loop through all the 'Alias' defined.
It also makes it easier to prevent sharing of alias names between aliases and a Map’s key set cannot contain duplicates, and makes it easier to handle overwriting of existing aliases with same name.
4.7. Easier Command-Line feature
4.7.1. Necessity of feature.
Due to the constraints of this project, the application had to be designed such that the main interaction between the user and the application was the Command Line Interface. However, this required the user to be able to remember the commands as well as the syntax for these commands, or be forced to heavily refer to the user guide or to refer to the error messages.
The Easier Command-Line feature was implemented to remove the need to refer to the user guide just to find out the syntax needed to use a command, as well as to provide some quality-of-life features found in most Command Line Interfaces not present in the original Address Book 3. This feature consists of several features:
-
Syntax highlighting
-
Input Suggestion and auto complete
-
Input History
-
Context based Generic Commands
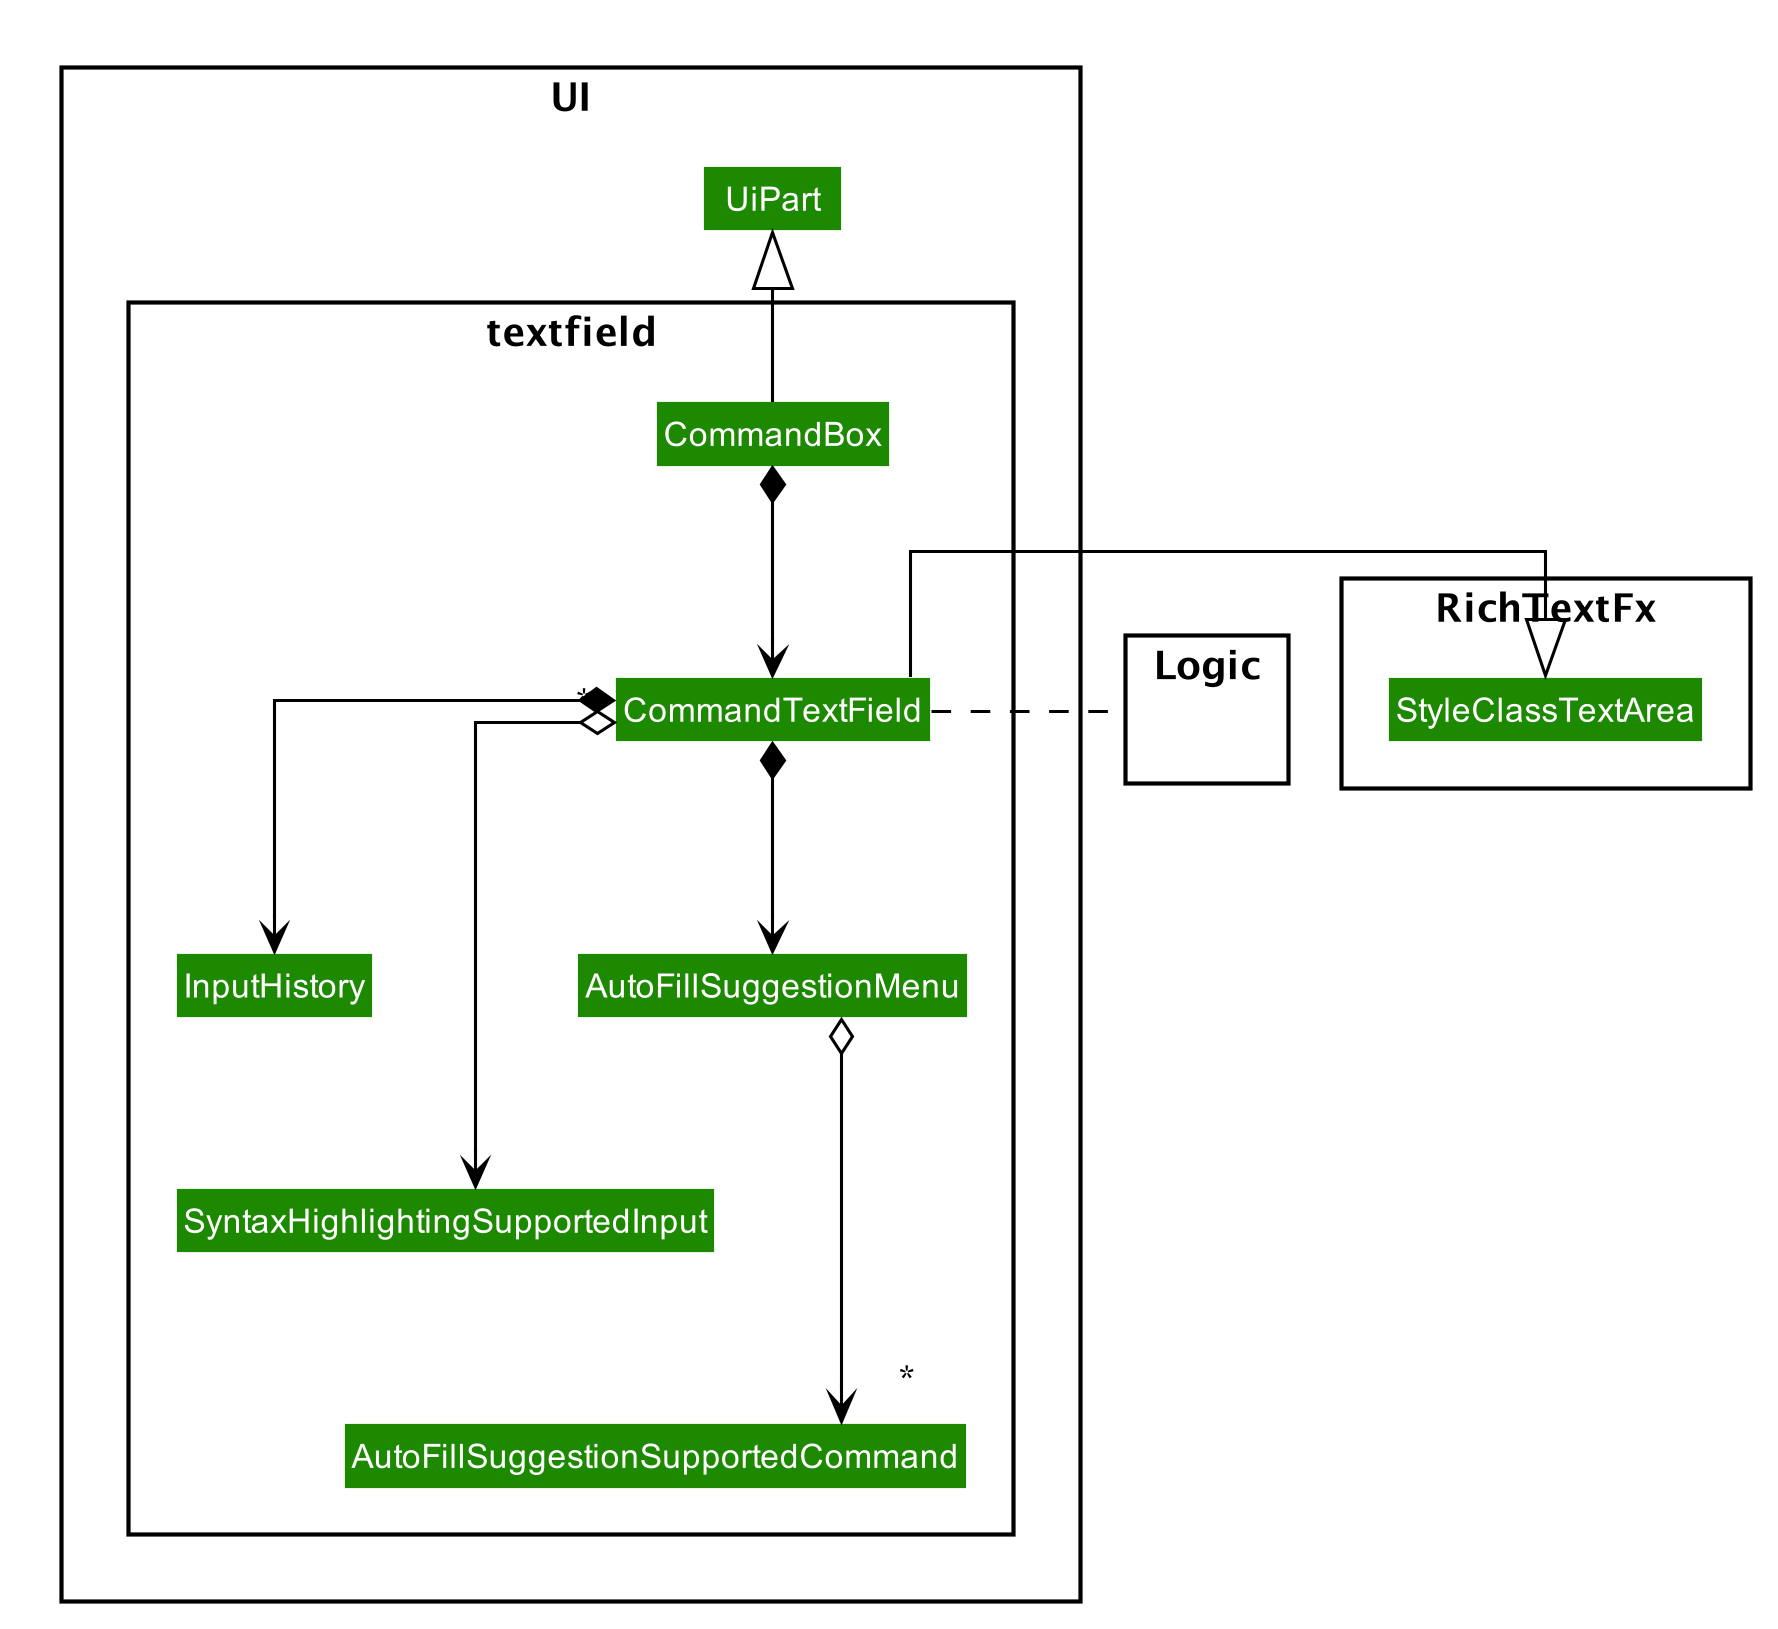
4.7.2. Syntax highlighting Implementation
The Syntax highlighting feature was implemented to make it easier to differentiate the different arguments after typing as well as to implement some basic realtime input validation. This feature utilises RichTextFX’s StyleClassTextArea to apply different styles to different regions of the text, and regular expressions to determine how to to highlight user input.
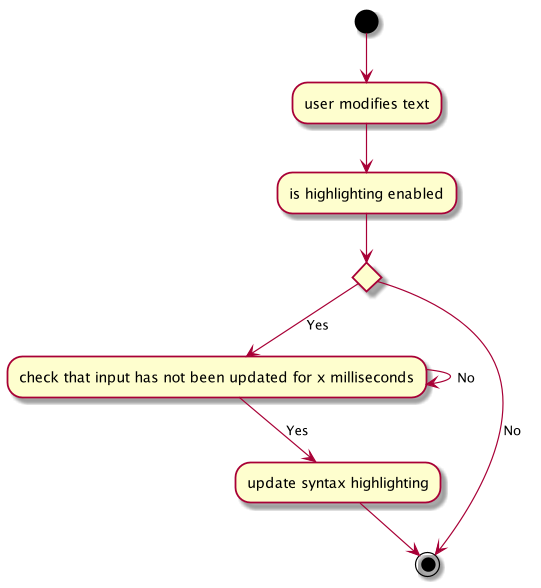
As it would be quite resource intensive to recalculate the syntax highlighting every time the user types, the updated highlighting is only computed after a delay of 300 milliseconds after the user stops typing.
When the MainWindow is initialized and the inner UI parts are created, the commands which are supported by the syntax
highlighting feature are configured. Each SyntaxHighlightingSupportedInput object contains a CommandWord to highlight
prefixes the command supports. When it is created it creates a regex pattern such as below.
(?<command-word>COMMAND)|(?<prefix0>PREFIX0)|(?<prefix1>PREFIX1)|...

(?<command-word>addalias)|(?<prefix0> a/)|(?<prefix1> i/)(?<arg>\S+)
This pattern is used to find the command word in the user input, as well as the prefixes.
4.7.3. Syntax highlighting Design Considerations
Aspect: How long should the delay between updating text and recomputing highlighting?
-
Alternative 1: Text is re-highlighted immediately upon a change to the text
-
Pros: Looks much more natural without a delay
-
Cons: Much more resource intensive as typing involves multiple changes to the text.
-
-
Alternative 2 (Chosen): Text is re-highlighted after a delay
-
Pros: Can reduce the computations needed to highlight the text.
-
Cons: Does not look at natural, and is less helpful in validating input.
-
-
Solution (Current Implementation): In the end, despite the fact alternative 1 was more natural looking, alternative 2 was chosen as this option would make the application less taxing for less powerful systems.
Aspect: Extent of input validation
-
Alternative 1: All parts of the input are validated (including the arguments)
-
Pros: This would make it more obvious to the user what is valid
-
Cons: This is more resource intensive
-
-
Alternative 2 (Chosen): Only the command word and prefixes are validated.
-
Pros: Less resource intensive while still being helpful to the user
-
Cons: Not as helpful to the user.
-
-
Solution (Current Implementation):
In the end, despite the fact alternative 1 provides more use to the user, input is already validated when it is parsed, and the error provides sufficient details on what is wrong with the user input. Validation by constantly parsing the text and then applying some sort of style to indicate an invalid input does not give as detailed information on why the input is invald. While it may be a nice feature to have, it may not be worth the resources required to repeatedly calculate the positions I should move my bones.
In future implementations, MooLah v2.0 should support better real time parsing of input and support validation of input without requiring the user to enter the command as well as a more functional input field.
4.7.4. Suggestion Feature Implementation.
The Suggestion feature is the main part of this feature and provides users with suggestions of valid inputs they may need. There are three states of the suggestion feature
-
Disabled
-
Suggesting command word
-
Suggesting prefixes
When the user chooses to disable the feature, the suggestion feature does not analyse the user input.
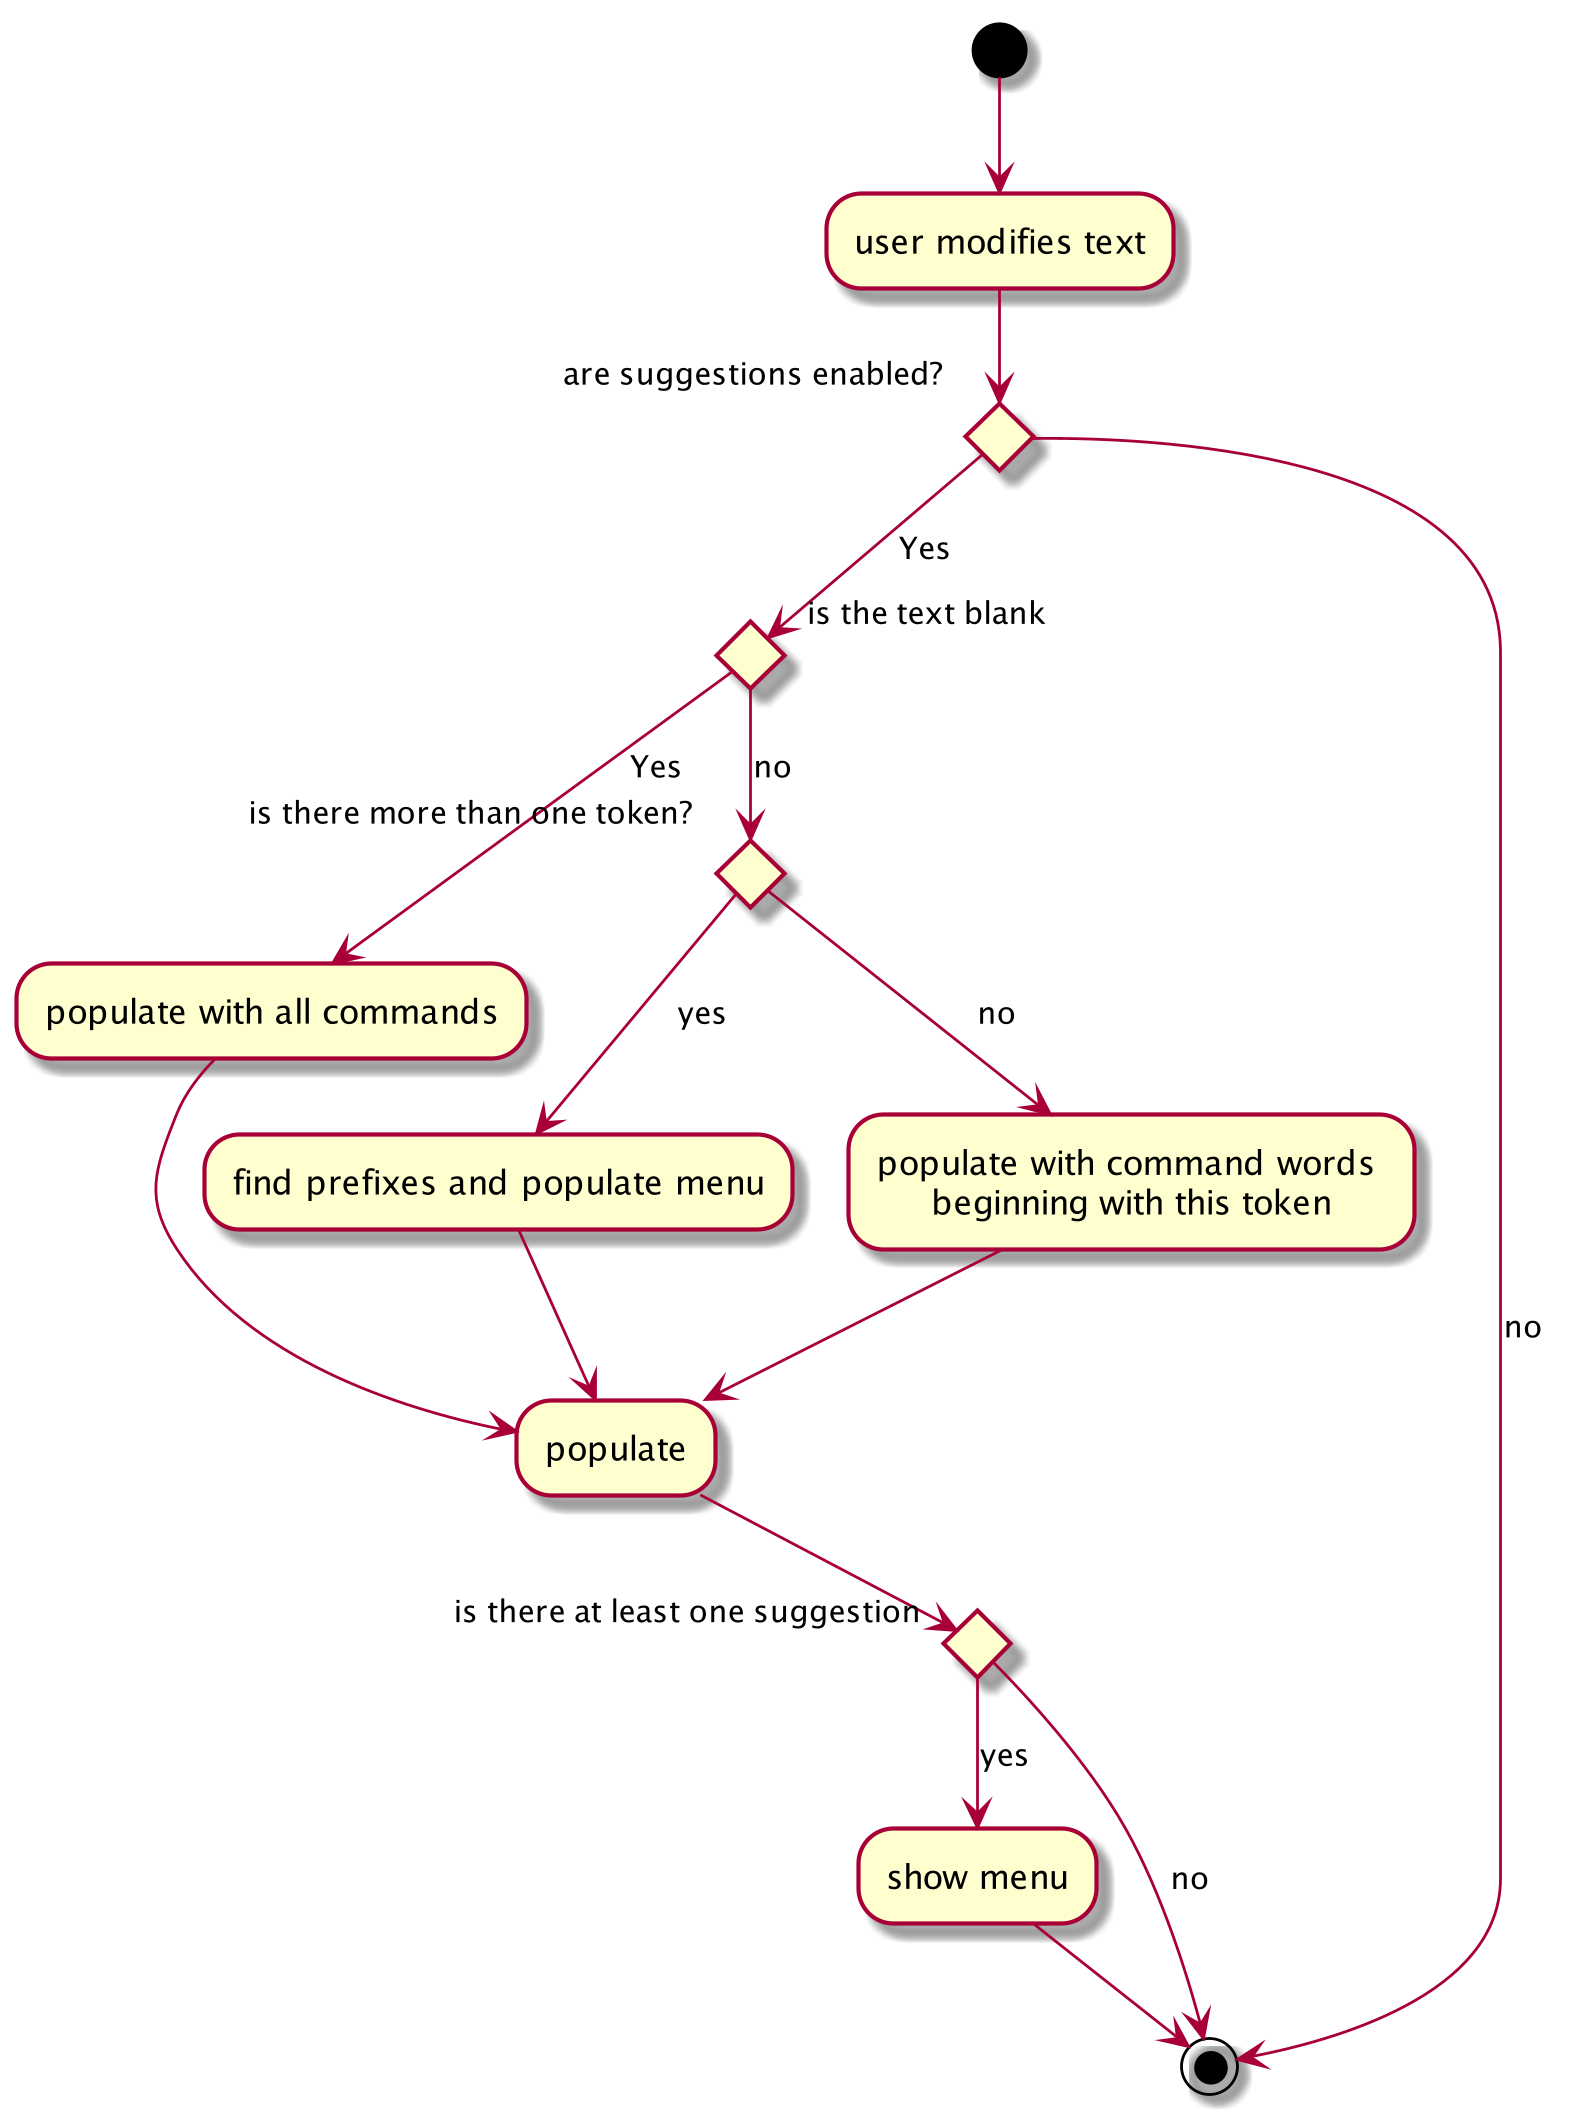
When the user chooses to enable it, if the user has only entered one or zero tokens (a string of characters without spaces), the suggestion menu will be populated with command words which begin with the user input. If the user has entered multiple tokens, and the command word (first token) if a valid command, the suggestion menu searches for the command’s supported prefixes and populates the menu with the prefixes the user has not entered yet.
This feature uses the ArgumentTokenizer from the Logic to determine what prefixes are present in the input
and which ones have yet to be provided by the user.
4.7.5. Suggestion Feature Design Considerations
Aspect: Automatically complete upon typing, or show suggestions and auto complete upon selection
-
Alternative 1: Auto complete upon typing
-
Pros: This would make result in the least keystrokes required to enter a command.
-
Cons: Requires a lot of logic for behaviour of autocomplete depending what the user is typing or deleting form the input and a very rigid syntax for commands.
-
-
Alternative 2(Chosen): Show suggestions and complete upon selection
-
Pros: Gives user more information on what commands are available and allows for more options for command syntax.
-
Cons: Requires more steps to use suggestion
-
-
Solution (Current Implementation):
Between the two, Alternative 1 was the first way this feature was implemented. However, as the number of commands increased, the time taken to generate the suggestions increased to a point where suggestions were not shown immediately. Alternative 2 was chosen as this method is less prone to bugs, less resource intensive, and allows the menu to display more information for the user such as what each prefix stands for.
In the future, MooLah v2.0 will support suggestions for arguments on top of prefixes and command words.
4.7.6. Input History Feature Implementation.
This feature enables users to re-enter previous input without having to retype the entire input.
It is a relatively simple feature which saves user input into a list and iterates through the list when the user
presses the up or down arrow keys. When a user enters a new input, the position of the iterator is reset.
4.7.7. Generic Command Implementation
This feature allows allows different commands to use the same command word. As MooLah has around 30 commands with only the current
features, it may becomes a problem that command words become very long in order to make it clear what the command
does when there are multiple commands which do similar things in different context. This feature reduces the ambiguity of
a command by enabling certain common command words to behave differently depending on which panel of the UI the user is viewing.
4.8. Logging
We are using java.util.logging package for logging. The LogsCenter class is used to manage the logging levels and logging destinations.
-
The logging level can be controlled using the
logLevelsetting in the configuration file (See Section 4.9, “Configuration”) -
The
Loggerfor a class can be obtained usingLogsCenter.getLogger(Class)which will log messages according to the specified logging level -
Currently log messages are output through:
Consoleand to a.logfile.
Logging Levels
-
SEVERE: Critical problem detected which may possibly cause the termination of the application -
WARNING: Can continue, but with caution -
INFO: Information showing the noteworthy actions by the App -
FINE: Details that is not usually noteworthy but may be useful in debugging e.g. print the actual list instead of just its size
4.9. Configuration
Certain properties of the application can be controlled (e.g user prefs file location, logging level) through the configuration file (default: config.json).
5. Documentation
This section contains information on how to edit, publish, convert documentation, as well as relevant tools and settings.
Refer to the guide here.
6. Testing
This section contains information on running tests and troubleshooting.
Refer to the guide here.
7. Dev Ops
This section contains information on project workflow and useful automation tools.
Refer to the guide here.
Appendix A: Product Scope
Target user profile:
-
has a need to track a significant number of expenses
-
lives on a monthly allowance
-
wants to save money
-
has difficulty remembering important dates, such as friends' birthdays or anniversaries
-
prefer desktop apps over other types
-
can type fast
-
prefers typing over mouse input
-
is reasonably comfortable using CLI apps
Value proposition:
-
manage expenses faster than a typical mouse/GUI driven app
-
optimized for students in National University of Singapore
-
make prediction for future spending based on extrapolation from past statistics and upcoming important dates (Coming in v2.0)
-
customizable categories, budgets and aliases
-
flexible forms of viewing a summary of expenses
-
give input suggestions while typing
-
more convenient time format
Appendix B: User Stories
Priorities: High (must have) - * * *, Medium (nice to have) - * *, Low (unlikely to have) - *
| Priority | As a … | I want to … | So that I can… |
|---|---|---|---|
|
full-time university student without any stable income |
record my expenses |
track my spending and practice financial management skills |
|
non-money minded person |
view a list of all my previous expenses |
be better at tracking my expenses |
|
user |
categorize my expenses by types (e.g. Transport, Food, etc.) |
differentiate expenses easily |
|
YEP (Youth Expedition Project) organizer who is in charge of logistics for my overseas project |
delete a previous expense |
I do not keep track of expenses that have been reimbursed by Youth Corps Singapore |
|
non-money minded person |
save the expenses data locally |
still keep track of my expenses even after closing the App |
|
foodie who frequently goes out with friends and pays for grab/restaurant bills |
quickly find a particular entry by typing a keyword |
refer to a previous expense and know how much money my friend needs to pay me back |
|
someone who is not good at managing my money |
view budget breaking expenses |
quickly know which expenses make up a big part of my budget |
|
forgetful person |
get notified of upcoming birthdays/anniversaries |
budget for these special dates |
|
lazy person |
specify tax rate and let the app calculates the total price for me when entering expense |
I can know the after-tax price when ordering in restaurants |
|
money-minded user |
extrapolate from daily/weekly expenses to monthly expenses |
have a rough gauge on future spending and plan budgets accordingly |
|
user |
manually input my expenses in an external file and import these expenses into the App |
track previous expenses that occur before I start using the App |
|
user |
request for periodic statements |
revise and reflect on my past expenses |
|
busy person |
add repeated expenses by selecting a previous expense and adding as a current expense |
save time when using the App |
|
financially dependent student |
export my past expenses |
my parents can see my spending |
|
lazy user |
let the App predict the tags for my expenses |
use automated suggestions provided to me for better categorizaton |
|
person working part time/TA-ing/etc |
let the App add to my earnings automatically based on salary |
track my income as well |
|
foreign student on exchange in NUS |
input my spending in SGD and have it automatically converted to my local currency |
better track my spending in a currency I’m more comfortable with |
|
visual person who easily gets confused by a large amount of text and prefers graphic illustrations |
view my monthly expenses in pie charts |
better understand the weightage of spending in different categories in a more direct and efficient manner |
|
user |
update details of a past expense |
correct erroneous past expenses without having to delete it and add again |
|
lazy user |
schedule recurring expenses |
avoid having to key in the same information all the time. (However, I want to be able to confirm details of the expense.) |
|
busy person |
let the App use the current time for an expense if I do not specify a time |
avoid always having to manually key in a time for my expense |
|
busy person |
enter the time as yesterday, one hour ago, etc |
save effort by using convenient and flexible time formats |
|
non-money minded person |
receive warnings when I’m close to or exceeding my budget |
adjust my expenses to prevent overspending |
|
careless person who is prone to typos |
undo my previous command |
I do not enter the wrong amount for my expenses |
|
careless person who is prone to typos |
redo my previous command |
I do not delete expenses by accident |
|
non-money minded person |
set periodic budgets |
discipline my spending |
|
non-money minded person |
set categorical budgets |
exceptional expenses (e.g. healthcare or sponsored expenses) are not tracked under default budget to prevent confusion |
|
non-money minded person |
let the App suggest some budgeting tips for me |
be better at tracking my expenses |
|
forgetful person |
receive email reminders if I haven’t input my expenses for a few days |
do not forget to track my expense |
|
someone who spends a lot of time in public spaces in school |
easily hide my budgeting information on the application quickly |
others could not see the details on my screen |
|
busy person |
input my expenses by scanning a receipt |
can save more time than manually typing in the expenses |
|
NUS student, and lazy person |
add expense from school canteens by saying e.g. “deck steamed chicken rice” |
don’t need to enter the details and prices |
|
non-financially independent student |
hide some details when exporting expenses |
do not share exact details with my parents but instead include them as an anonymous expense |
|
non-money minded person |
let the App help me make saving plans for future expenses |
start saving early |
|
user |
group certain expenses, e.g. group chicken rice and milo as lunch, but both remain separate entries as well |
manage related expenses together |
|
advanced CLI user |
add aliases to my common inputs |
avoid typing the similar things every time |
|
user |
let the App predict frequent similar expenses and prompt me to enter them |
do not miss expenses while I’m not using the App |
|
busy student who may need to close the App to settle some other matters |
let the App remember what I had typed into the command line last time I closed the App |
resume when I reopen the app |
Appendix C: Use Cases
(For all use cases below, the System is MooLah and the Actor is the user, unless specified otherwise)
Use case: Adding a budget
MSS
-
User requests to add a budget and specifies budget name, amount, start date and period
-
MooLah shows success in creating new budget
-
GUI switches to the budget panel and sets it as current primary budget for displaying and calculating expenses
Use case ends.
Extensions
-
1a. User misses any of the necessary parameters: budget name, amount, start date or period
-
1a1. MooLah shows an error message and reminds the user to complete the parameters.
-
1a2. User re-enters the command with new data.
-
Steps 1a1-1a2 are repeated until the parameters entered are correct and complete.
Use case resumes at step 2.
-
Use case: Adding an event
MSS
-
User adds an event.
-
MooLah tells the user that the event has been successfully added.
Use case ends.
Extensions
-
2a. The event is formatted incorrectly (e.g. the date is invalid).
-
2a1. MooLah shows an error message.
Use case ends.
-
-
3a. The same event has been previously stored.
-
3a1. MooLah shows an error message.
Use case ends.
-
Use case: Viewing Statistics summary
MSS
-
User requests to view statistics
-
MooLah prompts user for start date
-
User enters start date
-
MooLah prompts user for end date
-
User enters end date
-
MooLah displays the statistics requested Use case ends
Extensions
-
*a. MooLah detects incorrect date format
-
*a1.MooLah throws Exception
Use case ends.
-
-
5a. The user enters a start date, but does not enter an end date
-
5a1. MooLah displays the statistics 1 month after start date
Use case ends.
-
-
5b. The user does not enter a start date, but enters an end date
-
5b1. MooLah displays the statistics 1 month before end date
Use case ends.
-
C.1. Use case: Viewing Statistics compare
MSS
-
User requests to view statistics
-
MooLah prompts user for date 1
-
User enters date 1
-
MooLah prompts user for date 2
-
User enters date 2
-
MooLah prompts user for period
-
User enters period
-
MooLah displays the statistics requested Use case ends
Extensions
-
*a. MooLah detects incorrect date format or missing parameters
-
*a1.MooLah throws Exception
Use case ends
-
Use case: Adding an alias
MSS
-
User assigns an Alias name for some input.
-
MooLah confirms that the input is alias name is valid.
-
MooLah saves the alias to the user’s preferences.
-
MooLah informs the user that the alias was successfully created.
Use case Ends.
Extensions
-
1a. Alias name is invalid.
-
1a1. MooLah informs the User that the alias name is invalid.
Use case Ends
-
-
2a. An Alias with the same name exists.
-
2a1. MooLah overwrites the existing Alias with the same name in the User’s preferences.
Use case resumes from step 4.
-
Use case: Using an alias
MSS
-
User types alias into CLI.
-
User enters the command
-
MooLah attempts to execute the input mapped to the alias.
Use case ends.
Extensions
-
1a. Users enters additional details after alias name
-
1a1. User enters the command
-
1a2. MooLah attempts to execute the input mapped to the alias with the additional details appended.
Use case ends.
-
Use case: Spending beyond budget
MSS
-
User adds an expense to a budget.
-
MooLah displays the updated expense list.
-
MooLah finds that the total amount spent in the budget exceeds the allocated budget amount.
-
MooLah warns the User that they have overspent.
Use case ends
Appendix D: Non Functional Requirements
-
Should work on any mainstream OS as long as it has Java
11or above installed. -
Should be able to hold up to 1000 expenses without a noticeable sluggishness in performance for typical usage.
-
A user with above average typing speed for regular English text (i.e. not code, not system admin commands) should be able to accomplish most of the tasks faster using commands than using the mouse.
-
Should be at the least usable for a novice to command line interfaces.
-
The system should respond within two seconds after user types in a command.
-
Data entered must not be volatile (i.e. can only be changed at the user’s command).
-
Past data must be saved permanently unless deleted at the user’s command.
-
Should adhere to the project scope (e.g. Not required to have digital wallet support).
-
Should be able to work without internet connection.
Appendix E: Glossary
- Mainstream OS
-
Windows, Linux, Unix, OS-X
- Alias
-
A user-defined keyword that represents a specific Expense, acting as a quality-of-life replacement for common Expenses.
- Command-Line Interface
-
A means of interacting with a computer program where the user issues commands to the program in the form of successive lines of text.
Appendix F: Product Survey
Budgie
Author: STUCK
Pros:
-
Remembers and approximates frequently entered expenses
-
Provides temporary budget accounts for special occasions (i.e. vacationing, sponsored events)
-
Pleasing and easily navigable interface due to a relatively small number of features
Cons:
-
Expenses are kept very simple: There is no way to enter the location of the expense or place a tag on it
-
Does not link to any financial accounts or digital wallets
Wally
Author: Wally Global Inc.
Pros:
-
Almost every foreign currency is supported, and can be converted to and from each other
-
Each expense can be tagged with an accompanying photo (e.g. a receipt)
-
Can set a password
-
Can split group payments
Cons:
-
Complex interface due to the large amount of features
YNAB (You Need A Budget)
Author: You Need A Budget LLC
Pros:
-
Portions of a budget can be transferred to another easily in cases of underspending/overspending
-
Innovative way of budgeting: every single dollar from your income must be assigned a 'job' (e.g. fun money, subscriptions)
-
Can set budgeting goals
Cons:
-
Can be rather stressful due to its obsession to categorise every single dollar you earned that month
Appendix G: Instructions for Manual Testing
Given below are instructions to test the app manually.
| These instructions only provide a starting point for testers to work on; testers are expected to do more exploratory testing. |
G.1. Launch and Shutdown
-
Initial launch
-
Download the jar file and copy into an empty folder
-
Double-click the jar file
Expected: Shows the GUI with a set of sample expenses. The window size may not be optimum.
-
-
Saving window preferences
-
Resize the window to an optimum size. Move the window to a different location. Close the window.
-
Re-launch the app by double-clicking the jar file.
Expected: The most recent window size and location is retained.
-
G.2. Adding an expense
Adding an expense to MooLah
-
Prerequisites: None.
-
Test case:
addexpense d/chicken p/3.50 c/food
Expected: An expense "chicken" with price $3.50 and category "food" is added to MooLah. Details of the expense shown in the result display message. -
Test case:
addexpense d/chicken p/3.50
Expected: No expense is added. Error details shown in the result display message. -
Other incorrect addexpense commands to try:
addexpense,addexpense d/chicken
Expected: Similar to previous.
G.3. Editing an expense
Editing an expense while all expenses are listed
-
Prerequisites: List all expenses using the
listexpensecommand. Multiple expenses in the list. -
Test case:
editexpense 1 d/abc
Expected: First expense’s description is edited to "abc". Details of the edited expense shown in the result display message. -
Test case:
editexpense 1
Expected: No expense is edited. Error details shown in the result display message. -
Other incorrect editexpense commands to try:
editexpense,editexpense d/abc,editexpense x d/abc(where x is larger than the list size)
Expected: Similar to previous.
G.4. Deleting an expense
Deleting an expense while all expenses are listed
-
Prerequisites: List all expenses using the
listexpensecommand. Multiple expenses in the list. -
Test case:
deleteexpense 1
Expected: First expense is deleted from the list. Details of the deleted expense shown in the result display message. -
Test case:
deleteexpense 0
Expected: No expense is deleted. Error details shown in the result display message. -
Other incorrect delete commands to try:
deleteexpense,deleteexpense x(where x is larger than the list size)
Expected: Similar to previous.
G.5. Adding a menu-item expense
Adding an expense from a menu-item instead of manually define the expense data.
-
Prerequisites: None.
-
Test case:
addmenuexpense m/deck chicken rice
Expected: An expense "Deck Chicken Rice" is added to the list. Details of the expense added is shown in the result display. -
Test case:
addmenuexpense m/bubble tea
Expected: No expense is added as the description provided does not match any supported menu items in MooLah.
G.6. Undo and redo
Undo and redo operations to an undoable command.
-
Prerequisites: None.
-
Test case:
undo
Expected: MooLah will display an error stating that nothing can be undone. -
Test case:
addexpense d/pasta p/7.0 c/foodcontinued withundo
Expected: The addition of the "pasta" expense will be undone. MooLah will display the undo message in the result display. -
Test case:
addbudget d/fun p/300 sd/05-09 pr/monthcontinued withundoand thenredo
Expected: The "fun" budget will continue to be added to MooLah.
G.7. Adding a budget
Adding a budget to MooLah
-
Prerequisites: None.
-
Test case:
addbudget d/school p/100 sd/01-10 pr/month
Expected: A budget "school" is added to MooLah, and set as primary budget. The GUI is switched to the Budget Panel. -
Test case:
addbudget d/school p/100
Expected: No budget is added. Error details shown in the result display message. -
Test case:
addbudget d/default budget
Expected: No budget is added. Error details shown in the result display message. -
Other incorrect addbudget commands to try:
addbudget,addbudget p/100,addbudget d/school p/0Expected: Similar to previous.
G.8. Editing a budget
Editing a budget in MooLah while all budgets are listed
-
Prerequisites: List all budgets using the
listbudgetcommand. Multiple budgets in the list. -
Test case:
editbudget 2 d/abc
Expected: Second budget’s description is updated to "abc". -
Test case:
editbudget 2 p/400
Expected: Second budget’s limit is updated to 400. Percentage in progress bar is updated accordingly. -
Test case:
editbudget 1 d/abc
Expected: No budget is edited. Error details shown in the result display message. -
Other incorrect editbudget commands to try:
editbudget 2,editbudget x(where x is larger than the list size)
Expected: Similar to previous.
G.9. Deleting a budget
-
Deleting a budget by index while all budgets are listed
-
Prerequisites: List all budgets using the
listbudgetcommand. Multiple budgets in the list. -
Test case:
deletebudget-id 2
Expected: Second budget is deleted from the list. Details of the deleted budget shown in the result display message. -
Test case:
deletebudget-id 1
Expected: No budget is deleted. Error details shown in the result display message. -
Other incorrect deletebudget-id commands to try:
deletebudget-id,deletebudget-id x(where x is larger than the list size)
Expected: Similar to previous.
-
-
Deleting a budget by name
-
Prerequisites: None.
-
Test case:
deletebudget d/school(suppose budget "school" exists)
Expected: Budget "school" is deleted from MooLah. Details of the deleted budget shown in the result display message. -
Test case:
deletebudget d/default budget
Expected: No budget is deleted. Error details shown in the result display message. -
Other incorrect deletebudget commands to try:
deletebudget,deletebudget d/x(where x does not exist)
Expected: Similar to previous.
-
G.10. Switching the primary budget
Switching the primary budget to another budget
-
Prerequisites: None.
-
Test case:
switchbudget d/school(suppose budget "school" exists and is not primary)
Expected: Budget "school" becomes the primary budget. GUI switches to primary budget panel. -
Test case:
switchbudget d/holiday(suppose budget "holiday" is already primary)
Expected: No action taken. Error details shown in the result display message. -
Other incorrect switchbudget commands to try:
switchbudget,switchbudget d/x(where x does not exist)
Expected: Similar to previous.
G.11. Switching budget period
Switching the budget period to view past expenses
-
Prerequisites: None.
-
Test case:
switchperiod t/01-09
Expected: Period of primary budget is switched to the period containing 1 Sep. -
Test case:
switchperiod t/now
Expected: Period of primary budget is switched to the period containing the current date. -
Test case:
switchperiod t/01-12
Expected: No action taken. Error details shown in the result display message. -
Other incorrect switchperiod commands to try:
switchperiod
Expected: Similar to previous.
G.12. Listing all budgets
Listing all budgets in MooLah
-
Prerequisites: None.
-
Test case:
listbudget
Expected: GUI switches to budget list panel to show a list of all budgets. The primary budget is marked with red border. -
Test case:
listbudget d/abc
Expected: No action taken. Error details shown in the result display message.
G.13. Clearing all budgets
Clearing all budgets in MooLah
-
Prerequisites: None.
-
Test case:
clearbudget
Expected: GUI switches to the budget list panel. All budgets except default budget are deleted. Default budget is marked with red border.
G.14. Deleting an expense from budget panel
-
Prerequisites: Go to primary budget panel using the
view priamry budgetcommand. Multiple expenses in the list. -
Test case:
deleteexpense-primary 1
Expected: First expense is deleted from the list. Details of the deleted expense shown in the result display message. -
Test case:
deleteexpense-primary 0
Expected: No expense is deleted. Error details shown in the result display message. -
Other incorrect deleteexpense-primary commands to try:
deleteexpense-primary,deleteexpense-primary x(where x is larger than the list size)
Expected: Similar to previous.
G.15. Editing an expense from budget panel
-
Prerequisites: Go to primary budget panel using the
view primary budgetcommand. Multiple expenses in the list. -
Test case:
editexpense-primary 1 d/a
Expected: First expense’s description is updated to "a". -
Test case:
editexpense-primary 1 p/5
Expected: First expense’s price is updated to 5. Percentage in progress bar is updated accordingly. -
Test case:
editexpense-primary 1
Expected: No expense is edited. Error details shown in the result display message. -
Other incorrect editexpense-primary commands to try:
editexpense-primary,editexpense-priamry x d/a(where x is larger than the list size)
Expected: Similar to previous.
G.16. Testing of events
-
Prerequisites: None.
-
Test case:
addevent d/ test p/ 10 c/ Shopping t/ 1 week from now
Expected: A success message will appear. -
Now, view the event list using either
listeventorview event list. (Event commands can be inputted on any panel, but this is to facilitate the next step.)
Expected: The event with descriptiontestshould be at the bottom of the event list. -
Edit the
testevent via the commandeditevent <INDEX> t/ 10 seconds ago, where <INDEX> is the index oftestin the list.
Expected: A success message will appear. -
Within 2 seconds, a popup will appear to prompt for the automatic addition of an expense corresponding to
test. Pressing 'Yes' will add the expense into whichever primary budget you were on when you added the event. You can then view that budget to see that the expense has been added.
G.17. Testing of aliases
-
Test case:
addalias a/ cr i/ addexpense d/ chicken rice p/1.3 c/food
Expected: Successful creation of alias. -
The alias can be seen in your list of aliases, accessible by the
view aliasesorlistaliasExpected: displays list of aliases. -
Try using the alias by entering
crand pressing enter.
This should execute the command saved in the alias.
Expected: an expense is made with descriptionchicken riceand price1.30in the food category in your current primary budget. -
Delete the alias by typing
deletealias cr -
Test case :
addalias a/ addexpense i/ anything
Expected: error complaining that an alias name cannot use a reserved command word -
Test case :`addalias a/ magic i/ magic` (or any case where the alias name is the same as the first word of the input)
Expected: error message complaining that an alias cannot be be recursive.
G.18. Testing of suggestions
-
When you first open the applications, the suggestion feature is off by default (no green border around textfield).
-
Click the command box and press
tabto enable suggestions (textfield should have a green border)
Dropdown menu should show all possible commands you may enter (if the textfield is empty)
Typeadd, commands starting with add should be shown (you may have to scroll with arrow keys if the context menu shrinks and you do not see all the options.). -
Type
addexpensewith a space behind, the menu should show the prefixes available for the command:
d/p/c/andt/andALLMISSING
Use arrow keys to scroll toALLMISSING
Press enter
Expected: the non-optional prefixesd/p/andc/should be appended. -
Press
tabagain. This should disable suggestions.
G.19. Testing of input history
-
On a fresh session (restart the app), execute the following commands:
listevent
listexpense
listalias
These 3 commands should execute properly and be saved to your input history
With thesuggestionfeature disabled (no green box around text field)
Pressupto re-enter the past inputs.
1stup:listaliasshown
2ndup:listexpenseshown
3rdup:listeventshown
4thup: no change,listeventstill shown
1stdown: no change,listeventstill shown
2nddown:listexpenseshown
3rddown:listaliasshown
4thdown: no change,listaliasstill shown
G.20. Testing of generic commands
Navigate to the panels on the left column of the table below using the view command.
Execute a valid input for the commands in their respective
sections. It should behave as the command stated next to it.
i.e. add on the Expense List panel, should behave as addexpense
Expense List |
|
Budget List |
|
Event List |
|
Aliases |
|
Primary Budget |
|
G.21. Testing statsbasic
-
Prerequisites: Create a new budget, one possible way is
addbudget d/school p/3.00 sd/28-10 pr/day. -
Test case:
statsbasic
Expected: A success message of "Pie Chart calculated!" appears with the title of the statistics "Statistics Summary from DATE to DATE", where DATE is the current date, with $0.00 amount but no pie chart being shown -
Test case: Add an expense to the empty budget
addexpense d/ chicken rice p/2.50 c/foodand typestatsbasic
Expected: A success message of "Pie Chart calculated!" appears with the same title, amount to $2.50 and a pie chart being shown with only food category showing 100.00%. -
Test case: In any budget, type
statsbasic sd/12-12 ed/11-11
Expected : An error message of "End date cannot be before start date."
G.22. Testing statscompare
-
Prerequisites: Create a new budget, one possible way is
addbudget d/school p/3.00 sd/28-10 pr/day. -
Test case:
statscompare sd1/12-12 sd2/ 1 month ago
Expected: A success message of "Statistics Comparison Calculated!" appears with the the title "Statistics Summary: Comparing 12-12-2019 to 12-12-2019 with 12-10-2019 to 12-10-2019" but all entries reflect 0 for frequency and 0.00 for amount. -
Test case: Add an expense to the empty budget
addexpense d/ chicken rice p/2.50 c/food t/28-10and typestatscompare sd1/28-10 sd2/ 29-10+ Expected: A success message of "Statistics Comparison Calculated!" appears with the title "Statistics Summary: Comparing 28-10-2019 to 28-10-2019 with 29-10-2019 to 29-10-2019" with the first entry ofDifference Amounthaving a value of -2.50 and having the first entry ofDifference Frequencyhaving a value of -1.
G.23. Testing statstrend
-
Prerequisites: Create a new budget, one possible way is
addbudget d/school p/3.00 sd/28-10 pr/day. -
Test case:
statstrend mode/category sd/14-01 ed/31-01
Expected: A success message of "Statistics Trend Calculated!" appears with the title "Periodic trendline from 14-01-2019 to 31-01-2019 in the unit of days" unit of time equal to the period of the budget, but no trend lines are seen -
Test case: Add an expense to the empty budget
addexpense d/ chicken rice p/2.50 c/food t/28-10and typestatstrend mode/category sd/28-10
Expected: A success message of "Statistics Trend Calculated!" appears with the title "Periodic trendline from 28-10-2019 to 29-11-2019 in the unit of days", 1 trend line for food is observed, with the first plotted point of the line being the highest non-zero point at y-axis = 2.50 -
Now, add one more expense like
addexpense d/ chicken rice p/3.50 c/food t/29-10and typestatstrend mode/category sd/28-10again.
Expected: A success message of "Statistics Trend Calculated!" appears with the same title, 1 trend line for food is observed, with 2 points observed.